Configuring the dcm1 with the dcm1 utility tool, Installing the utility tool, Connecting to the dcm1 – Cloud Electronics DCM1 User Manual
Page 58
DCM1 & DCM1e Installation and User Guide V1.0
58
UTILITY
Configuring the DCM1 with the
DCM1 Utility Tool
Almost all DCM1 configurations and settings may be made
remotely using serial commands through the rear panel
RS232 INTERFACE
connector*. A simple software
application, the DCM1 Utility Tool, uses this feature to permit
the DCM1 to be configured remotely on a laptop, tablet or
other Windows-compatible device. This allows an installation
engineer to pre-configure a DCM1 off-site, and then upload
the unit’s core configuration and settings from the device
with a single mouse click. Further adjustments to individual
settings may be made in a similar manner.
*A version of the Utility Tool which can use an
Ethernet connection between the device running the Tool and
a DCM1e as well as an RS-232 serial link will be available
during 2014. This will allow devices without either serial
or USB ports to use the Tool, provided they have network
capability.
or details.
Installing the Utility Tool
The DCM1 Utility Tool may be used with either the DCM1 or
DCM1e. At the time of publication, the application has been
tested with Windows XP (+SP3), Windows Vista, Windows
7 and Windows 8; please check
or any
updates to this list. Note that there is no Mac version.
The Utility Tool may be downloaded free of charge from the
Cloud website,
. From the Home page, select
Products, then the DCM1 or DCM1e. Select Technical Notes
from the options list on the right; download the two Utility
Tool files – the application itself is a .zip file, the other is a
.pdf
ReadMe file. Save the files to a suitable location.
The ReadMe file gives information about DCM1 OS
compatibility; see page 39 for details of how to check which
firmware version is installed.
Navigate to the .zip file, and unpack it. The zip contains a
single .exe file, DCM1Utility Tool Vn_m.exe (where
n.m
is the version number). Save this file to any convenient
location.
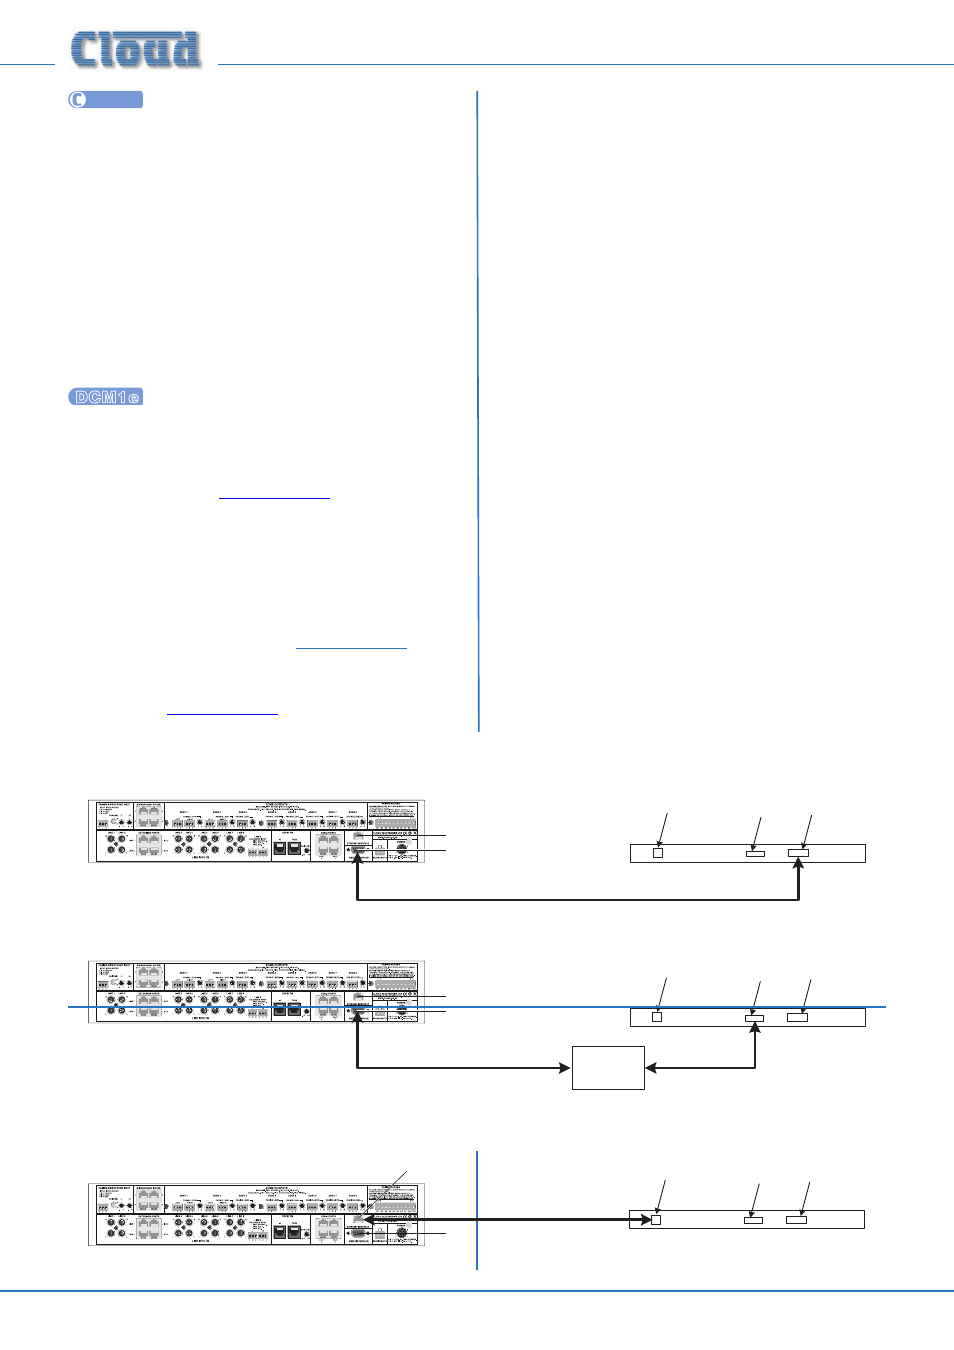
Connecting to the DCM1
Serial communication between the Utility Tool and a DCM1
uses one of the device’s Comms ports. If the device does not
have a 9-pin serial port, obtain a USB to RS-232 convertor
and connect to a USB port. Use a standard, male-to-female,
9-pin serial cable to between either the native serial port or
the USB convertor and the DCM1’s
RS232 INTERFACE
connector. See page 66 for further information regarding
the interface and cable.
The Utility Tool operates at 9600 baud, which is the default
baud rate of the DCM1’s serial port. If the baud rate has been
altered, it will be necessary to reset it to 9600 baud. See page
38 for details on how to do this.
Launch the Utility Tool by clicking on its .exe file icon.
The Tool defaults to the Comms port in use last time the
application was run; at the first launch, this will be Com 1. If the
serial (or USB) port being used is different, it can be chosen
by selecting Port in the Menu bar and choosing the correct
one. If you have a problem establishing communication with
the DCM1, please check your device’s port settings.
COMMS PORT
(if fitted)
USB PORT
NETWORK
PORT
LAPTOP, TABLET, OR OTHER
COMPUTER DEVICE
LAPTOP, TABLET, OR OTHER
COMPUTER DEVICE
9-pin SERIAL CABLE
COMMS PORT
(if fitted)
USB PORT
NETWORK
PORT
9-pin SERIAL CABLE
USB TO RS-
232
ADAPTOR
USB CABLE
COMMS PORT
(if fitted)
USB PORT
(if fitted)
NETWORK
PORT
NETWORK CABLE
OR
ETHERNET INTERFACE (DCM1e only)
SERIAL INTERFACE
ETHERNET INTERFACE (DCM1e only)
SERIAL INTERFACE
ETHERNET INTERFACE (DCM1e only)
SERIAL INTERFACE
For use with updated version of Utility Tool; available during 2014