Tukit.08, rev 4 back, Glass shade installation guide – Besa Lighting Karli (Mini Pendants 12V) User Manual
Page 3
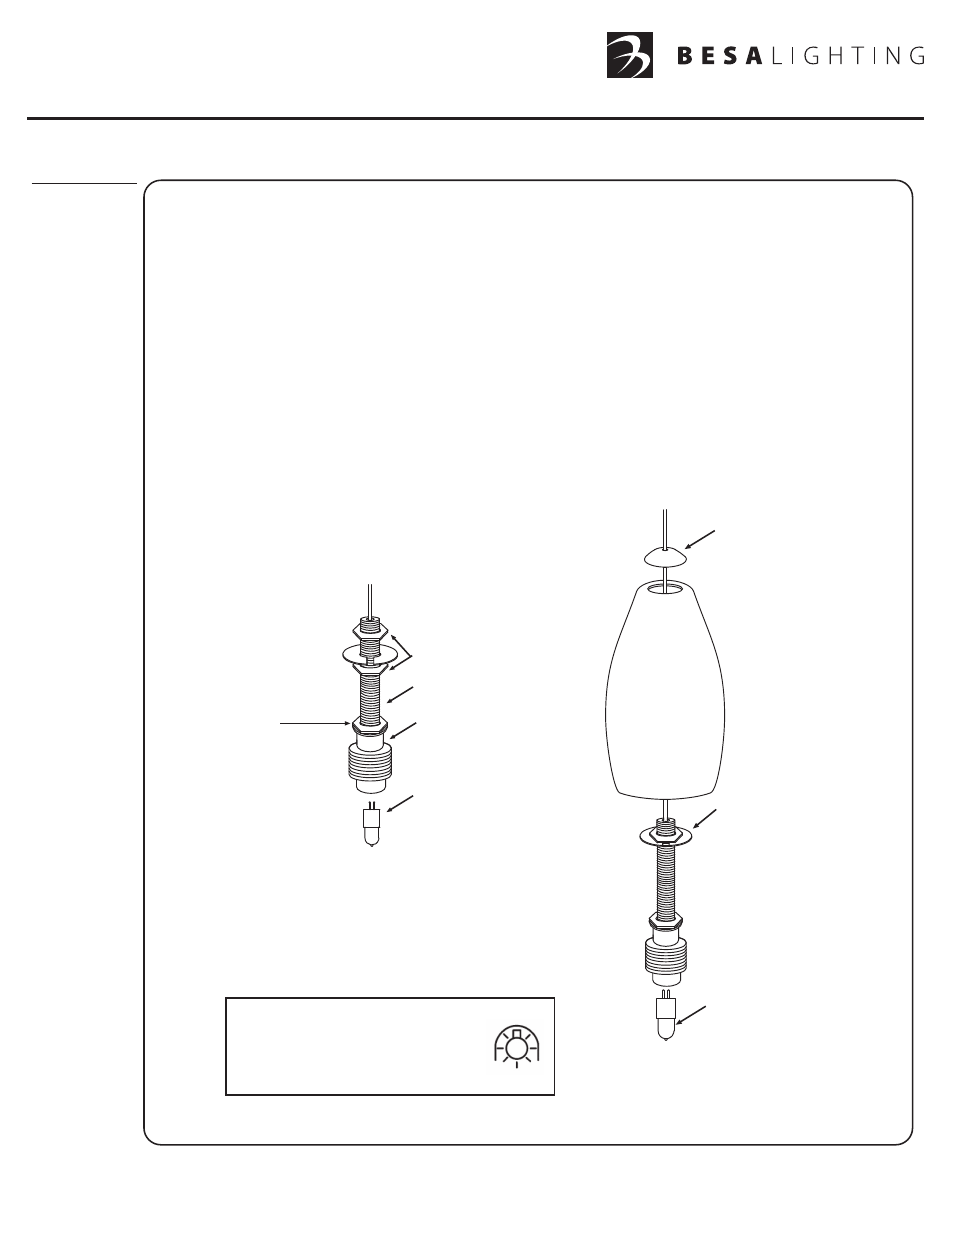
GLASS SHADE INSTALLATION GUIDE
6695 Taylor Rd. Blacklick, OH 43004
www.besalighting.com
1. Begin by threading the Treaded Nipple into the top of the Socket Assembly and
secure using the Lower Hex Nut and Washer provided. Then secure the Washer
between the two Upper Hex Nuts provided. See figure 1.
While holding the Lampholder secure, hold the Lamp by the base, just above
the contacts, and firmly push the lamp into the socket. See figure 1.
NOTE: Lampholder is designed to have a tight fit, so resistance may be
experienced when inserting lamp.
2. Following figure 2, the glass shade (shape may vary) will be positioned as shown.
Lower the glass shade until it rests on the Washer. Depending on the thickness of
glass, the Upper Hex Nuts and Washer may require adjustment to allow the Decorative
Cap to properly seat at top the glass shade.
Relamp with a low-pressure type lamp,
either xenon or halogen. Packaging of
this lamp will typically indicate that it’s
“Suitable For Use in an Open Fixture”
or marked with the symbol shown.
Lower Hex Nut
and Washer
Upper Hex Nuts
Threaded Nipple
Socket Assembly
Figure 1
Lamp
All electrical connections and the installation of this fixture must be in agreement with local codes,
ordinances or the NEC (National Electric Code) or CEC (Canadian Electrical Code).
Do not connect this fixture to an electrical system that does not provide a means for equipment grounding.
IMPORTANT: For installation of pendants and wiring, please refer
to the
Fixture Installation Guide included with fixture canopy
Use With
these Models:
• Karli
(7198xx)
Figure 2
Lamp
Washer
Decorative Cap
- Focus (Mini Pendants 12V) Kani (Mini Pendants 12V) Kona (Mini Pendants 12V) Trilo 7 (Mini Pendants 12V) Brella (Mini Pendants 12V) Domi (Mini Pendants 12V) Spazio (Mini Pendants 12V) Nico 4 (Mini Pendants 12V) Tay Tay (Mini Pendants 12V) Hoppi (Mini Pendants 12V) Divi (Mini Pendants 12V) Pera 6 (Mini Pendants 12V) Camino (Mini Pendants 12V) Amelia 6 (Mini Pendants 12V) Stilo 7 (Mini Pendants 12V) Copa (Mini Pendants 12V) Tu tu (Mini Pendants 12V)