Chapter 3 - configuring eyemonitor, Setting your data source path, Customizing your content – Adtec digital eyeMonitor User Manual
Page 12: Headend configuration, Chapter 3 - configuring eyemonitor
Chapter 3 - Configuration
10
Chapter 3 - Configuring eyeMonitor
You will need administrator access to make changes to the
configuration of eyeMonitor.
Setting your Data Source Path:
The Data Path is the mapped network drive to the TBGS and is
configured upon initial setup. If you receive the message during setup
that TBGS data paths do not exist or you have lost connectivity to your
network drive, you will need to re-establish the connection to the drive
(see Chapter 2 - Installer Instructions) and then configure your data
path correctly before using eyeMonitor. From the Configuration Menu,
select Data Sources (Figure 3.1)
Figure 3.1
Note: When configuring your data source from within the eyeMonitor
application, do not edit the IP Address of the TBGS. The fact that you are
logged in means that it is valid.
Correct the TBGS data path if needed, and click on the Save button
to save these settings. You will need to Logout of eyeMonitor and
relaunch for the changes to take effect.
If the TBGS data folder is not mapped correctly, you will experience
the following issues.
You will be unable to view verification files.
The Encode List Report will show all content as missing.
The Missing Content Report will not show MVL status
You will not be able to access merged schedules for Scheduled Spot Replace.
The Schedule Report will not display schedules status correctly and you will
not be able to view schedules.
Customizing Your Content
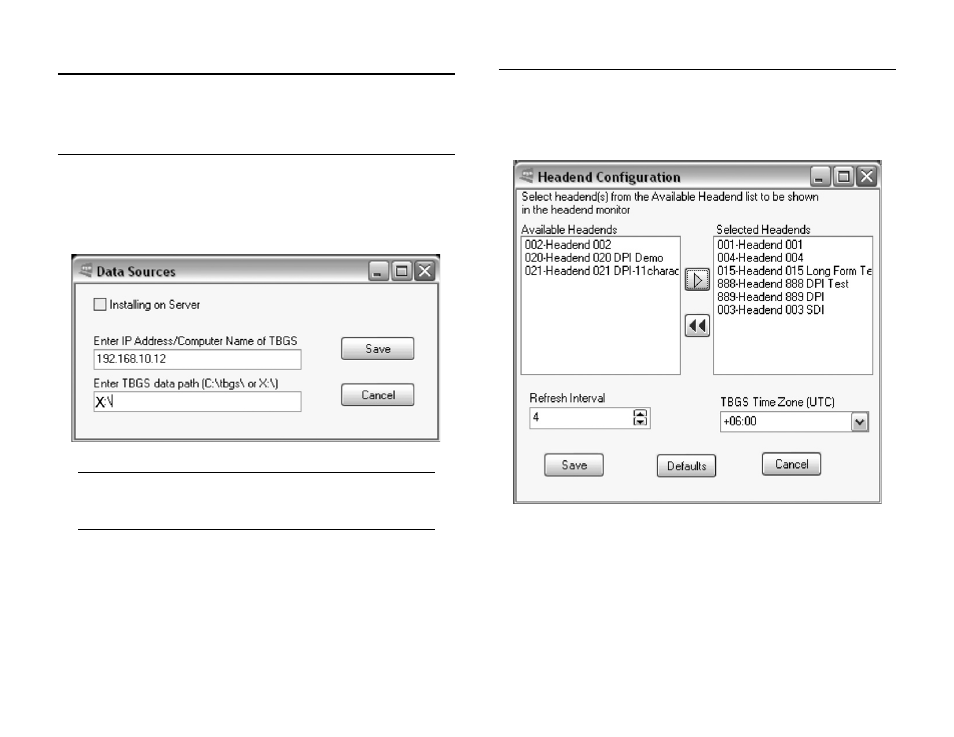
Headend Configuration:
To configure your content, begin by selecting the headends
you wish to view. From the Configuration Menu, select Headend
Configuration (Figure 3.2) The Headend Monitor Configuration panel
allows you to set up the headends you would like to display within the
monitor.
Figure 3.2
Available and Selected Headends:
A two panel configuration screen shows Available Headends on the left
and Selected Headends on the right. By default all headends are shown.
To customize your headend view, choose those headends you wish to view
from the left panel and click on the right arrow button to move them to
the Selected Headend(s) list. You may select multiple headends at the
same time by holding down the CTRL key. To remove a headend from
the monitor, select it from the right panel and click the double red arrow
to place it back in the Available Headend panel.
The recommended
settings is for all headends to be displayed.