Warning – Toa HY-VM7W User Manual
Page 4
4
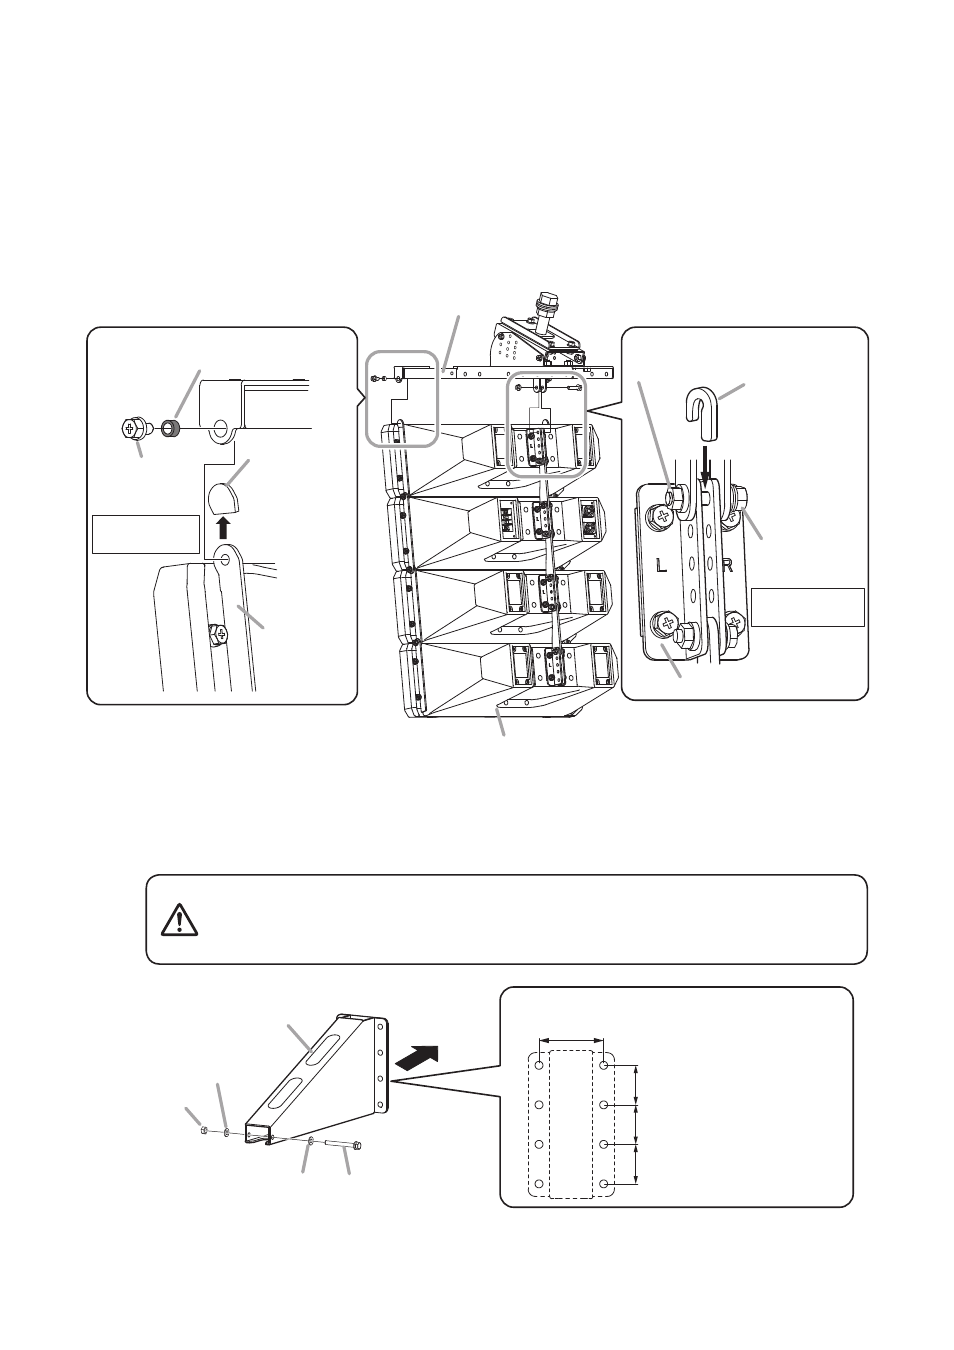
Step 4. Attach the T-bracket to the speaker.
Attach with the speaker set above as shown in the figure.
Fix the T-bracket to the speaker at all 3 indicated positions.
4-1. Fix the T-bracket to both ends of the side angle plates of the speaker front.
Use the supplied bolts (with spring and plain washers) and spacers.
4-2. Fix the T-bracket to the speaker’s rear bracket.
Fix to the rear bracket’s endmost hole.
Use the supplied bolt (with spring and plain washers), J-spacer, and flange nut.
For details, refer to the procedures (1) to (3) as shown below.
Note
Similarly, fix the T-bracket to the end of the
side angle plate on the opposite side.
Spacer ø9.2 (0.36")
(accessory)
Rear bracket
Hex head
bolt M6x12
(accessory)
Side angle plate
Protection cover
Note
Remove the
protection covers
from the side
angle plates
before joining.
4
-1
Tightening torque:
5 N·m
J-spacer
(accessory)
4
-2
(1) Lightly secure.
(3) Tighten firmly.
(2) Insert.
Flange nut for M6
(accessory)
Hex head
bolt M6x30
(accessory)
Tightening torque:
5 N·m
HX-7B or HX-7W
T-bracket
Step 5. Remove the safety bolt from Bracket A of the HY-WM7B or HY-WM7W.
Step 6. Using 8 bolts, etc., mount Bracket A of the HY-WM7B or HY-WM7W to the wall.
Safety bolt
To wall surface
[Bracket A's mounting dimensions]
Unit: mm
Nut for M8
Plain washer for M8
Plain washer for M8
HY-WM7B or HY-WM7W
(Bracket A)
90 (3.54")
55
55
55
(2.17")
(2.17")
(2.17")
Note
Be sure to use 8 mounting
holes in Bracket A.
6
5
Wall mounting bolts and nuts are not supplied.
Use nuts and bolts that are appropriate for the wall’s structure
and composition. Failure to do so may cause the speaker to fall,
resulting in personal injury.
WArNINg
Note
After tightening the bolt, ensure
that the J-spacer is firmly fixed.