Toa HY-C0801W User Manual
Warning
HY-C0801W
HS-120W, HS-150W, HS-1200WT,
HS-1500WT, HX-7W
HY-1200VW, HY-1200HW, HY-1500VW,
HY-1500HW, HY-VM7W
Rolled steel plate, white,
medium gloss, paint
1.9 kg (4.19 lb)
Hex bolt (with spring and plain washers) M8 x 25 ........ 4
Thank you for purchasing TOA's Ceiling Mount Bracket.
Please carefully follow the instructions in this manual to ensure long, trouble-free use of your equipment.
1. SAFETY PRECAUTIONS
HY-C0801
HY-C0801W
CEILING MOUNT BRACKETS
INSTRUCTION MANUAL
Indicates a potentially hazardous situation which, if mishandled, could
result in death or serious personal injury.
WARNING
• Install the unit only in a location that can structurally support the total weight of the unit and the speaker.
Doing otherwise may result in the speaker falling down and causing personal injury and/or property damage.
• Owing to the speaker's size and weight, be sure that at least two persons are available to install the speaker.
Failure to do so could result in personal injury.
• Do not use other methods than specified below to mount the bracket. Extreme force is applied to the unit, or
rust may deteriorate the unit, which then could fall off, possibly resulting in personal injuries.
· As the unit cannot be used separately, be sure to use it in conjunction with the specified bracket.
· As the unit is designed for in-door use, do not install it outdoors.
· Do not install the unit on a wall.
• Use nuts and bolts (not supplied) that are appropriate for the ceiling's structure and composition.
Failure to do so may cause the speaker to fall, resulting in material damage and possible personal injury.
• Tighten each nut and bolt securely. Ensure that the bracket has no loose joints after installation to prevent
accidents that could result in personal injury.
• Do not hang down from the unit as this may cause it to fall down or drop, resulting in personal injury and/or
property damage.
2. GENERAL DESCRIPTION
The HY-C0801 and HY-C0801W Ceiling Mount Brackets are designed to mount the speaker system to a
ceiling in conjunction with the optional speaker mount bracket.
3. SPECIFICATIONS
Model
Applicable speaker
Applicable
mounting bracket
Finish
Weight
Accessory
HY-C0801
ES-0851, HS-120B, HS-150B,
HS-1200BT, HS-1500BT, HX-7B
HY-0851ST, HY-0852ST, HY-1200VB,
HY-1200HB, HY-1500VB, HY-1500HB,
HY-VM7B
Rolled steel plate, black,
medium gloss, paint
Note: The design and specifications are subject to change without notice for improvement.
133-01-00055-00
URL: http://www.toa.jp/
4. INSTALLATION
The example here shows the installation procedure of the Ceiling Mount Bracket in conjunction with the HY-
0851ST or HY-0852ST Speaker Mounting Bracket.
For the installation procedure to the HY-1200 or HY-1500 series and the HY-VM7 series Mounting Bracket,
refer to the instruction manual attached to each mounting bracket.
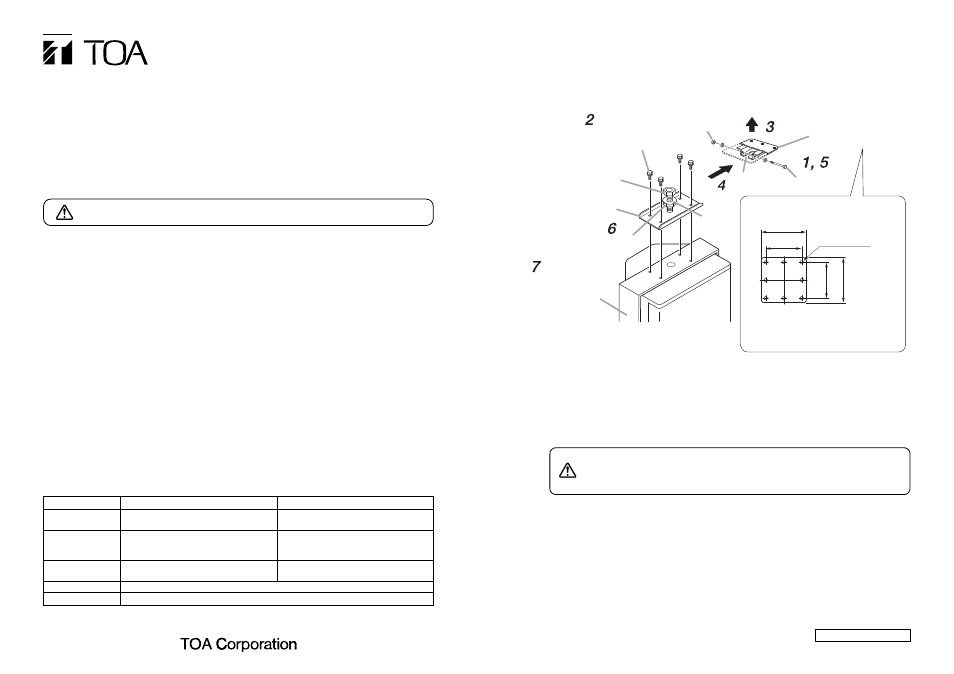
Step 4. Insert the bolt on the Bracket B into the notch in the Bracket A.
In this event, position the notch between the fixed nut and plain washer on the bolt.
Step 5. Run the safety bolt through the holes in the Bracket A, then tighten the bolt using the nut for M8.
Step 6. Adjust the speaker's horizontal angle.
After adjustment completion, tighten the horizontal adjustment nut on the Bracket B.
Horizontal angle adjustment range: 180° to the right or left (360° rotation)
Step 7. Adjust the speaker's vertical angle at the HY-0851ST or HY-0852ST side.
For adjustment instructions, refer to the instruction manual attached to the HY-0851ST or HY-0852ST.
8 - ø11 (0.43)
Hex bolt M8 x 25
(supplied with the HY-C0801
and HY-C0801W)
Fixed nut
Bracket B
(supplied with the HY-C0801
and HY-C0801W)
Horizontal angle adjustment nut
Speaker mounting bracket
(HY-0851ST or HY-0852ST)
Nut for M8
To the ceiling surface
Notch
Bracket A
(supplied with the HY-C0801
and HY-C0801W)
Safety bolt
Speaker
Dimensional diagram of the Bracket A
Note
Be sure to secure with at least all 4 corner-
mounting holes in the Bracket A.
150 (5.91)
120 (4.72)
150 (5.91)
120 (4.72)
Unit: mm (inches)
Plain
washer
Bolts and nuts used to fix the Bracket A to a ceiling are not
included. Prepare those that are appropriate for the ceiling's
structure and composition. Failure to do so may cause the unit
to fall, resulting in personal injury.
WARNING
Step 1. Remove the safety bolt from the Bracket A of the HY-C0801 and HY-C0801W to detach the Bracket B.
Step 2. Attach the removed Bracket B to the HY-0851ST or HY-0852ST Speaker Mounting Bracket.
Note
For the speaker installation, refer to the instruction manual attached to the HY-0851ST or HY-0852ST.
Step 3. Install the Bracket A to the ceiling using 4 bolts or more.