2 troubleshooting guide, 0 maintenance and service (cont'd) – Reznor RIHVL Unit Installation Manual User Manual
Page 18
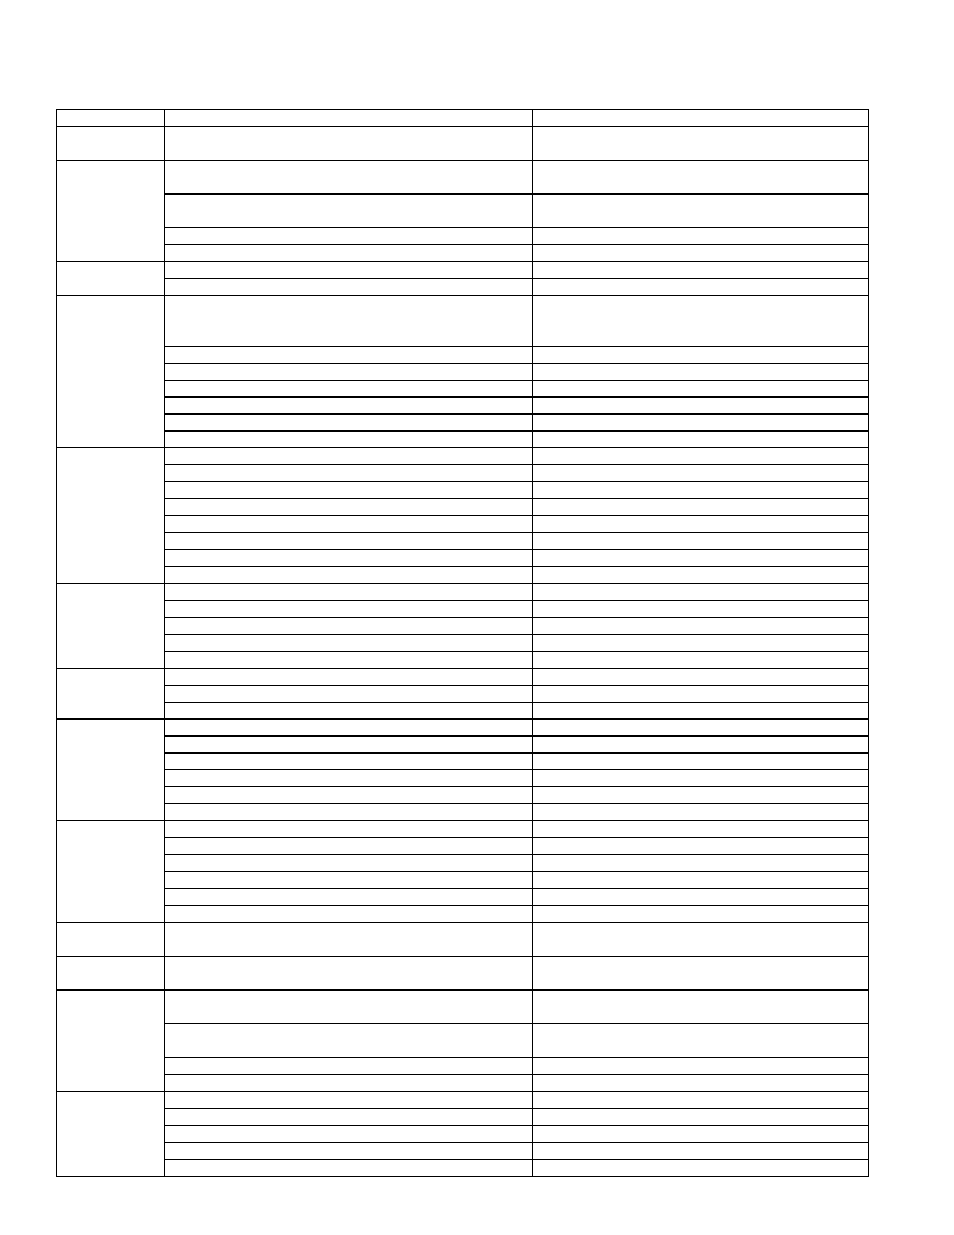
11.0 Maintenance and Service (cont'd)
11.2 Troubleshooting Guide
SYMPTOM
POSSIBLE CAUSE
CORRECTIVE ACTION
Gas Odor
1. Gas pipe joints loose.
1. Check joints with non-corrosive leak detection
fluid, tighten as needed.
New Installation
of heaters not
working
1. Heaters not isolated during high pressure leak testing
of gas lines
1. Replace combination gas valve(s) on each heater.
2. All gas lines not completely bled of air
2. Disconnect flex hose at each heater until gas is
present. Connect flex hose and leak test.
3. Gas supply regulator reversed
3. Remove and install properly.
4. Electrical supply line voltage & neutral polarity reversed 4. Correct electrical supply polarity.
No gas
1. Gas supply valves not opened
1. Open all manual gas supply valves.
2. Gas supply regulator sticking
2. Replace gas supply regulator.
Electrical
circuit closed
but heater not
working. (For
specific control
systems see
Ignition and
Operation
section)
1. Gas supply lacking caused control system lockout
1. Verify all gas supply valves are open. Purge air
from gas supply line. Turn thermostat off – wait 5
minutes, then reset thermostat.
2. Line fuse blown or tripped circuit breaker
2. Replace line fuse or reset breaker.
3. Electrical power short
3. Trace and correct short.
4. Wiring disconnected
4. Repair, see wiring diagram in Ignition section.
5. No electrical earth ground
5. Provide electrical earth ground.
6. Electrical supply line voltage & neutral polarity reversed 6. Correct electrical supply polarity.
7. Exhaust fan interlock (if used) is defective
7. Replace interlock.
Direct spark
fails to ignite
main burner(s)
1. Combination gas valve not in the ON position
1. Turn combination gas valve to ON position.
2. Electrode wire loose
2. Reconnect wire.
3. Electrode wire broken or frayed
3. Replace electrode.
4. Electrode ceramic cracked
4. Replace electrode.
5. Electrode improperly located
5. Relocate to correct position.
6. Gas valve fails to open when power is applied
6. Replace combination gas valve.
7. Supply/manifold gas pressure too low
7. See rating plate on heater and adjust pressure.
8. Ignition detection control defective
8. Replace ignition detection control.
Unit cycles on
and off, erratic
operation
1. Drafty condition
1. Shield heater and/or thermostat from drafts.
2. Flame sensor wire loose or damaged
2. Replace wire harness to ignition detection control.
3. No electrical earth ground
3. Provide electrical earth ground.
4. Electrical supply line voltage & neutral polarity reversed 4. Correct electrical supply polarity.
5. Heat on pilot flame sensor insufficient
5. Clean pilot, check pilot orifice and alignment.
No pilot
1. Gas line contains air
1. Purge air from gas line.
2. Pilot line, orifice, or passage blocked
2. Check and clean. See Paragraph 11.1.
3. Pilot solenoid valve inoperative
3. Replace combination gas valve.
Pilot goes out
on 100% shut-
off when hold-
down button is
released
1. Heat on pilot flame sensor insufficient
1. Clean pilot, check pilot orifice and alignment.
2. Pilot flame sensor location improper
2. Correct position with respect to pilot.
3. Manifold gas pressure low
3. See rating plate on heater and adjust pressure.
4. Poor contact at valve end of sensing element
4. Ensure clean and proper contact.
5. Pilot flame sensor defective
5. Replace pilot flame sensor.
6. Pilot interrupter in combination gas valve defective
6. Replace combination gas valve
Pilot burning,
no gas to main
burner(s)
1. Thermostat or manual switch open
1. Raise the thermostat setting or close switch.
2. Manual valve closed on combination gas valve
2. Turn valve to “ON” position.
3. No power to solenoid in combination gas valve
3. Check power supply and furnish proper voltage.
4. Heat on pilot flame sensor insufficient
4. Clean pilot, check pilot orifice, and alignment.
5. Pilot flame sensor defective
5. Replace sensor.
6. Combination gas valve defective
6. Replace combination gas valve.
Heater will not
turn off
1. Thermostat defective
1. Replace thermostat.
Controls over-
heating
1. Heater mounted incorrectly
1. See Location, Paragraph 2.0, and Suspending,
Paragraph 5.
Burning of gas
inside burner
(flash-back)
1. Heater mounted incorrectly
1. See Location, Paragraph 2.0, and Suspending,
Paragraph 5.
2. Gas leaking from: manifold, control assembly, or pilot
joints causing gas ignition at orifice
2. Check joints with non-corrosive leak detection
fluid, tighten as needed.
3. Ceramic tile(s) cracked or separating
3. Replace burner.
4. Drafts excessive
4. Shield from drafts or relocate heater.
Carbon forma-
tion on ceramic
surface or
burner
1. Gas supplied is wrong type
1. Check rating plate for type of gas required.
2. Venturi obstructed (by spider web)
2. Clean with a bottle brush.
3. Pilot depositing carbon
3. Clean pilot and check pilot orifice.
4. Supply/manifold gas pressure too low
4. See rating plate on heater and adjust pressure.
5. Main gas orifice(s) misaligned
5. Consult sales agent or factory
P/N 131793R10, Page 18