Recording, Recording level adjustment – Philips DAT850 User Manual
Page 13
Attention! The text in this document has been recognized automatically. To view the original document, you can use the "Original mode".
RECORDING
Before performing recording:
• Make sure the safety tab of the cassette is ciosed.
• Set the TiMER switch to OFF before switching the POWER
on.
— Operate in numerical order. —
Set the ON/OFF switch to ON.
It may be unlawful to record or playback copyrighted
material without the consent of the copyright owner.
(only analog recording)
PHILIPS
«MOTI CC«Ti!5(.UCi C i-’*.
A.:
D
tA)>£
ctcx OATSiO
DMT
'
>
II II ' -I I
IBH
Set the TIMER switch to OFF. 0
(6) 0®
0
®
0
©Press the B/
a
STOP/OPEN-CLOSE button to open the
cassette tray.
® Insert a cassette with its window facing up.
© Locate the position from which recording should start with
the SEARCH buttons.
REWIND: When recording is to start from the beginning of
the tape.
WIND : When recording is to start from the middle of the
tape. (The End code is detected.)
©Select the source to be recorded.
ANALOG: When recording analog input signals
OPTICAL or COAXIAL: When recording digital input signals
® Set the deck to the rec-pause mode.
• "SAMPLING MONITOR" lights.
® Select the recording mode. When recording analog signals,
adjust the recording level.
• Recording mode
REC TIME
switch
Analog recording
Digital recording
STD
48k mode
32k mode
48/44k mode
LONG
32k-LP mode
32k-LP mode
©Press the ► PLAY button to start recording.
• When recording a digital signal
The recording level, sampling frequency and emphasis status
are recorded as they are. It is not necessary to adjust the
recording level.
• For details about digital recording, see page 16.
• When the end of a tape is reached
With the auto rewind function, the tape is rewound to its begin
ning and stops automatically.
• Tape protection
When the cassette tray is closed, sometimes it will pop out
again; this is to protect the tape. If this happens, adjust the
position of the cassette and close the tray again.
Notes:
1.
When starting recording at the beginning of the tape, leave
a no-signal recorded section of about 10 seconds.
2
.
“TOP” is displayed when the deck enters the rec-pause or
rec mode after the tape has been rewound.
Recording level adjustment
(only when an analog signal is to be recorded)
m
I o
I LldB
•
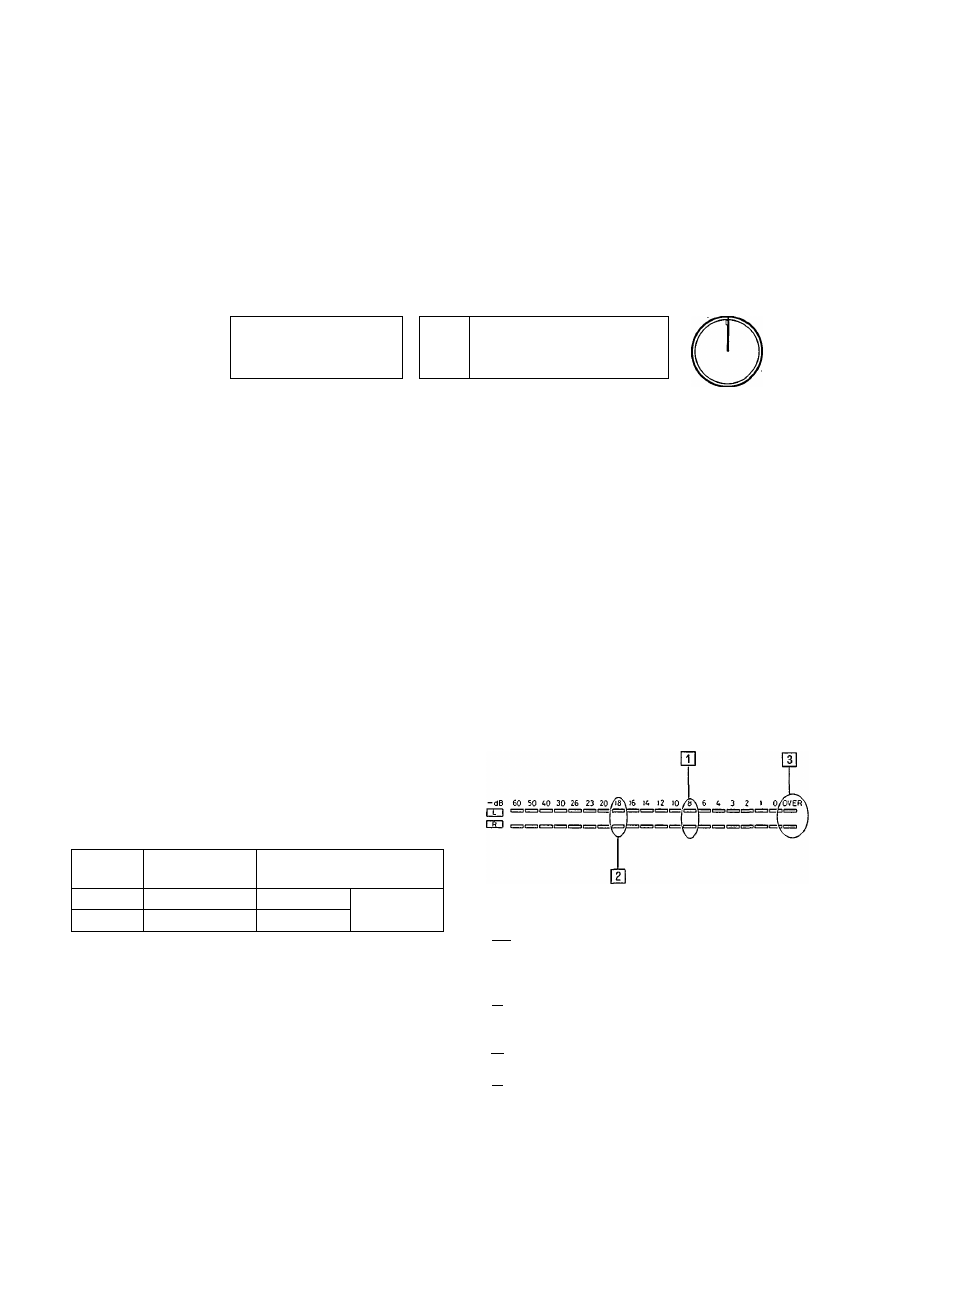
Peak level meter and digital peak display:
IT]
Peak level meter
Values higher than -40 dB will be displayed for the left and
right channels independently, while peak values are held for
approx. 2 seconds.
in Reference level indicator
Shows the reference input level of the DAT deck at a position
-18 dB from the full-scale level.
rn OVER level indicator
Lights when the recording level is too high.
m Digital peak display
Shows the margin between the maximum input level and
the input level of the signal being recorded in 1-dB steps,
within a range of -19 dB to 0 dB.
13