Great Planes Tracer 46 Kit - GPMA0400 User Manual
Page 13
❏ ❏
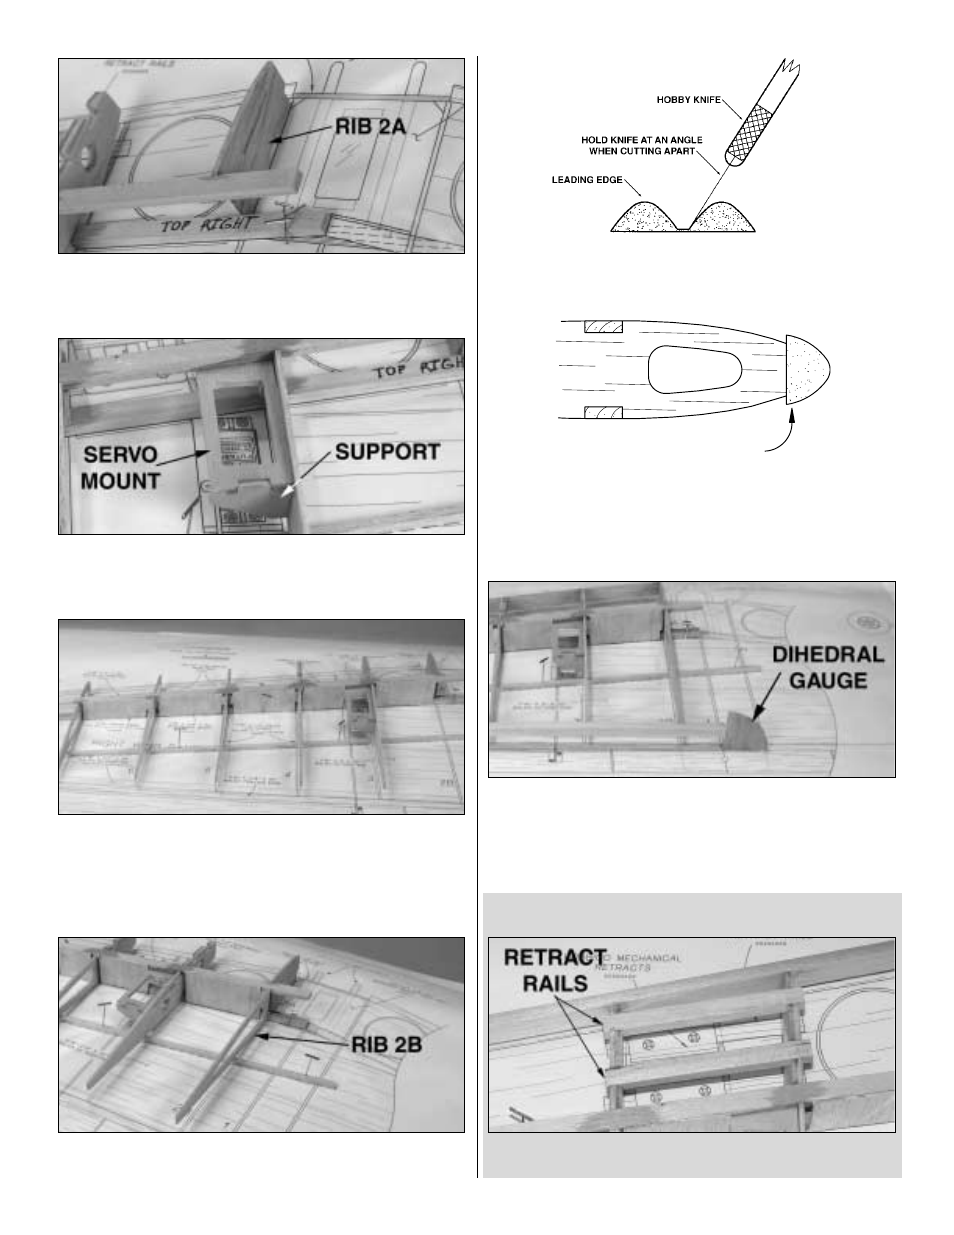
7. Using a square to keep it perpendicular to the work
surface, glue the die-cut 3/32" balsa rib 2A to the spars.
❏ ❏
8. Glue the die-cut 1/8" ply servo mount and the die-
cut 1/8" ply servo mount support in place.
❏ ❏
9. From a 1/16" x 3" x 24" balsa sheet, cut, fit and glue
the five shear webs in place. Note: You may have to move a T-
pin or two to glue the webs in place. Just replace them behind
the shear webs after the shear webs are glued in place.
❏ ❏
10. Position the die-cut 3/32" balsa r ib 2B
perpendicular to the work surface and glue it to the spars.
❏
11. If you are building the right wing panel, trim the two
shaped balsa LE's as shown in the sketch.
❏ ❏
12. Glue the shaped LE centered vertically on the
front of the ribs. Trim the ends of the shaped LE flush with
the inboard side of rib 2A and flush with the outboard side
of rib 9.
❏ ❏
13. Use the dihedral gauge to position the 3/8" x 3/8"
x 30" balsa TE at the centerline of the TE of the ribs. Glue
the TE to the ribs.
If you are using fixed gear, go to step 21.
RETRACT INSTALLATION
❏ ❏
14. Epoxy the two 1/4" x 3/8" x 4" basswood retract
rails to ribs 3 and 4.
Center the LE on the Ribs
13
- Avistar Elite .46 ARF - GPMA1005 (36 pages)
- Avistar Elite .46 RTF - GPMA1605 (20 pages)
- Big Stik 40 ARF MonoKote - GPMA1220 (24 pages)
- Cessna 182 Skylane 40 ARF - GPMA1228 (28 pages)
- Cherokee GP/EP ARF - GPMA1033 (28 pages)
- Christen Eagle 46 ARF - GPMA1431 (36 pages)
- Cirrus SR22 .46-55 ARF - GPMA1363 (32 pages)
- Citabria EP ARF - GPMA1127 (20 pages)
- Curtis P-6E Hawk EP Biplane ARF - GPMA1164 (24 pages)
- Dirty Birdy .60 ARF - GPMA1975 (44 pages)
- Easy Sport 40 ARF MonoKote - GPMA1036 (24 pages)
- Edge 540T EP ARF - GPMA1572 (24 pages)
- ElectroStik EP ARF - GPMA1574 (20 pages)
- ElectroStik EP RxR - GPMA7500 (16 pages)
- Escapade .61 GP/EP ARF - GPMA1201 (28 pages)
- Escapade EP/GP ARF - GPMA1200 (28 pages)
- Escapade MX 30cc ARF - GPMA1210 (32 pages)
- Escapade MX GP/EP ARF - GPMA1202 (24 pages)
- Evader EDF Sport Jet EP ARF - GPMA1800 (24 pages)
- Extra 300SP EP ARF - GPMA1188 (24 pages)
- Extra 300SP Performance Series ARF - GPMA1022 (28 pages)
- Extra 330SC EP ARF - GPMA1129 (20 pages)
- F1 Rocket Evo GP/EP ARF - GPMA1030 (28 pages)
- F-16 Falcon EDF ARF - GPMA1801 (24 pages)
- F-20 Tigershark Electric Ducted Fan ARF - GPMA1875 (16 pages)
- F-86 Sabre Micro EDF TxR - GPMA1771 (12 pages)
- Factor 3D ARF - GPMA1552 (20 pages)
- Fling ARF - GPMA1060 (16 pages)
- Fling DL ARF - GPMA1070 (16 pages)
- FlyLite EP Slow Flyer ARF - GPMA1107 (24 pages)
- Giant Big Stik ARF - GPMA1224 (32 pages)
- Giant Citabria 30cc/EP ARF - GPMA1435 (44 pages)
- Giant Revolver ARF - GPMA1425 (32 pages)
- Giant Super Sportster ARF - GPMA1044 (32 pages)
- Goldberg Super Chipmunk EP ARF - GPMA1928 (20 pages)
- Kunai 1.4M EP ARF - GPMA1815 (16 pages)
- Lanier RC Stinger II - GPMA1010 (24 pages)
- Matt Chapman Eagle 580 46/EP ARF - GPMA1281 (32 pages)
- Mister Mulligan EP ARF - GPMA1485 (32 pages)
- P-51 Mustang GP/EP ARF - GPMA1205 (24 pages)
- P-51 Mustang Sport Fighter .46 EP ARF - GPMA1208 (28 pages)
- PBY Catalina ARF - GPMA1154 (20 pages)
- Phazer EDF ARF - GPMA1802 (24 pages)
- Pluma 3D Bipe ARF ARF - GPMA1130 (24 pages)
- Proud Bird ARF - GPMA1260 (28 pages)