Assembly of the model – Great Planes Cherokee Kit - GPMA0180 User Manual
Page 23
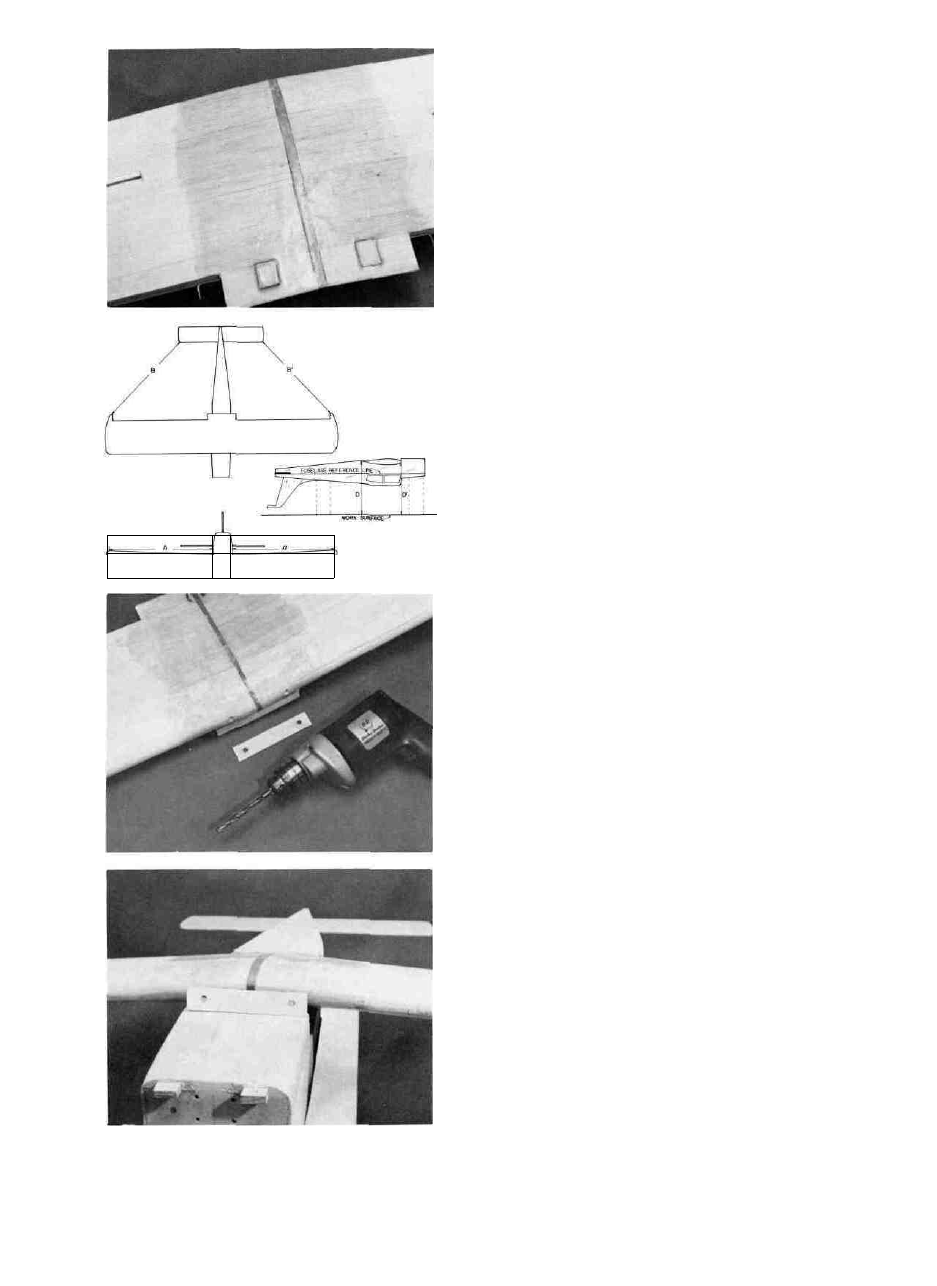
WORK SURFACE
2. D GLASS THE WING ; ADD THE 1/16" PLY PLATES
Apply a thin coat of polyester resin (or thinned epoxy)
to the wing center section. Lay the cloth on the wing. Add
more resin (or epoxy). Immediately squeegee off the ex-
cess. Let cure until dry. Sand the glass lightly. Brush on a
second coat of resin and let it dry (or apply a second coat
of epoxy). Let that coat dry. Turn the wing over and glass
the other side of the wing, overlapping the cloth at the
wing leading edge and trailing edge. Finish sand the wing
when the glass is dry. Now glue on the 1/16" x 3/4" x 1" Ply-
wood Wing Plate on the bottom of each Center Trailing
Edge piece.
ASSEMBLY OF THE MODEL
1. D ALIGN THE FUSELAGE TO THE WORK SURFACE
AND THE WING TO THE FUSELAGE
Align the Fuselage to the work surface using the line
along the top of the Fuselage Side as the reference point.
This line should be parallel to the flat work surface with
the Fuselage upside down. Align the Wing to the Fuselage
by making the following measurements: A-Center the Wing
side to side in the saddle. The distance from the Fuselage
Side to the Wing Tip on each side should be the same.
B-The Wing Tip to Stab Tip distance should be the same.
C-Wing Wing to work surface distance should be the same
on both sides. D-The Wing has 0 degrees incidence like the
Stabilizer. The Leading Edge to work surface should be the
same as the trailing edge to work surface distance. When
the wing is aligned correctly, mark the position of the wing
on the Fuselage so you can realign the wing again. (Re-
member these measurements will not work unless you
have aligned the Fuselage to the work surface first. The
reference line should be parallel to the work surface.
Measure from this line down to the work surface at several
points on both sides of the Fuselage. All the measure-
ments should be the same.)
2. D USE DOWEL JIG AND DRILL HOLES IN THE
WING LEADING EDGE FOR DOWELS
(The Dowel Jig is used to help you drill holes in the
Wing leading edge. The Jig also gives you the location of
the 1/4" holes in Bulkhead #2. You drill the Wing holes first,
position the Dowels and Jig and then drill the holes in the
Bulkhead after the Wing is in position.) Use the plan and
mark and drill 1/4" holes in the 1/8" Ply Dowel Jig piece
(1/8" x 7/8" x 4-9/16"). Center the Dowel Jig over the Wing
Leading Edge making sure the holes in the Jig are cen-
tered on the Wing Leading Edge centerline. Drill 1/4" holes
into the wing leading edge and through both 1/16" Dowel
Plates inside the wing. Be sure that the holes are drilled
parallel to the rib centerlines and at 90 degrees to the wing
leading edge.
3. D REALIGN THE WING TO THE FUSELAGE;
GLUE DOWEL JIG TO FUSELAGE
Place 1/4" Dowels into the holes in the Wing leading
edge. Place the Dowel Jig on the Dowels. Position the
Dowels so they are flush with the Dowel Jig when the Jig is
next to the Wing. You may want to tack glue the Dowels to
the Wing so they don't fall inside the Wing during this step.
Now place the Wing, Dowels and Dowl Jig into the Wing
Saddle. Realign the Wing. Push the Dowel Jig forward
against Bulkhead #2 and tack glue the Dowel Jig to the
rear of Bulkhead #2. Remove the Wing and Dowels from
the Fuselage.
23