Great Planes Cherokee Kit - GPMA0180 User Manual
Page 13
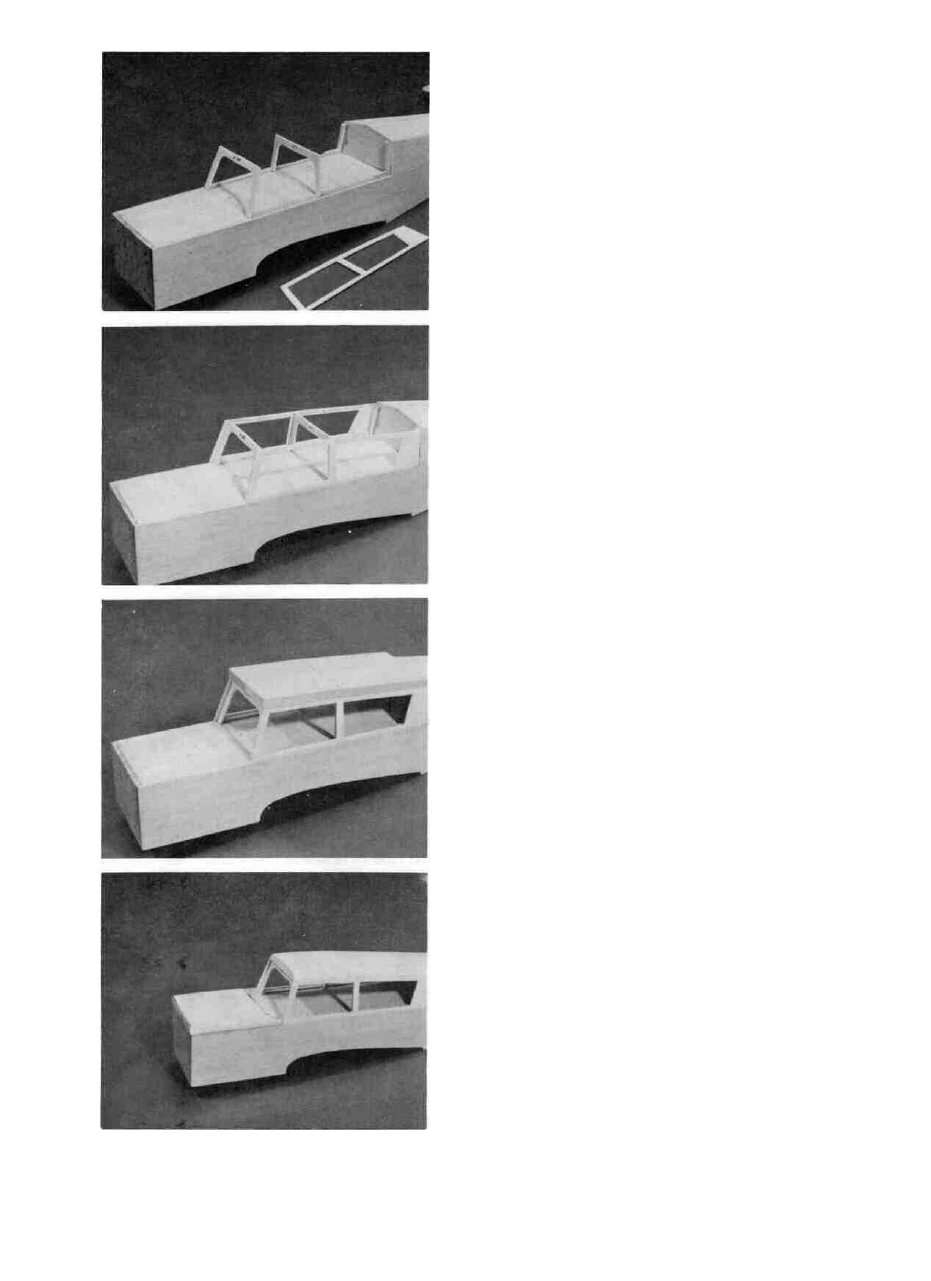
29. D GLUE IN BULKHEADS 2A AND 3A AND THE 1/4"
SQUARE STOCK ALONG THE BOTTOM OF
THESE BULKHEADS AND IN FRONT OF 4A
Use the Cabin Sides (from the plywood razor cut
sheet) as a guide for placement of Bulkheads 2A and 3A
(so 2A has the correct angle and both 2A and 3A are cen-
tered on the Cabin Base). Bevel the bottom of Bulkhead 2A
slightly. Glue the Bulkheads in place. Cut and glue 1/4"
square balsa vertically in front of Bulkhead 4A; it stops at
the top of the Cabin Side to be added next. Custom cut 1/4"
square balsa to fit between 2A and 3A and between 3A and
4A long the bottom of the Bulkheads on both sides. Trim
the 1/4" square balsa so it won't show when the window
sides are glued in later. Glue the 1/4" balsa in place.
30. D GLUE THE 1/8" CABIN SIDES TO THE FUSELAGE;
GLUE IN THE 1/4" SQUARE STOCK ALONG THE
TOP OF THE CABIN SIDES
Slightly bevel the bottom edge of each Cabin Side.
Glue the Cabin Side in position. Custom cut 1/4" square
stock to fit between Bulkheads 2A and 3A and between 3A
and 4A at the top. Save the plywood scrap from inside the
windows until later.
31. D GLUE IN THE FRONT AND REAR 1/2" CABIN
TOP PIECES; FINAL SAND
Sand the Cabin Top pieces so they fit to each other
and to 4A. Sand the tops of the Cabin Sides and Bulkheads
if necessary for a good fit. Glue the Cabin Top pieces in
place. Final sand the Cabin Top as shown on the plan. Cut
the front Windshield on the cut lines and use the wind-
shield as a guide when you sand the front of the Cabin Top.
You will be insetting the windshield into the Cabin Top
later so keep this in mind when sanding. You might want to
leave the Cabin Top slightly oversize until you install the
windshield later.
32. D CUSTOM CUT AND GLUE ON THE BALSA COWL
TOP BLOCK
Carve and sand the rear of the Cowl Top piece if
you wish to simulate the dashboard. Glue the Cowl Top in
place. Do not sand the front of the Cowl Top until after you
fit the Cowl later. The Windshield will be inset later into the
Cowl Top piece so do not sand the top of this piece yet
either.
13