EVCO EK354AJ7 User Manual
Page 2
• press
or
within 4 s
(6)
• press
The time the top output is turned ON is “ {[(time you have set
with parameter c1) / 10} x (number of bars turned ON in the LED
bar at the top) “
(7)
.
To modify the value of the percentage of power supplied to the
floor heating group:
• press
during the modification of
the percentage of power
supplied to the top heat-
ing group
• press
or
within 4 s
(6)
• press
The time the floor output is turned ON is “ {[(time you have set
with parameter c1) / 10} x (number of bars turned ON in the LED
bar at the bottom) “
(7)
.
(6)
if parameter c0 has value 1, the modification of the percentage of power
supplied to a heating group will automatically provoke the supply of the maxi-
mum power to the other one and vice versa; if parameter c0 has value 2, the
modification of the percentage of power supplied to a heating group will auto-
matically provoke an adjustment of the other one such as to guarantee that the
sum of bars turned ON will always be 10
(7)
the outputs are turned ON as much as possible alternatively.
7
CONFIGURATION PARAMETERS
7.1
How to set configuration parameters
Configuration parameters are arranged on two levels.
To gain access the first level:
• press
and
for 4 s
: the instrument
will show
To select a parameter:
• press
or
To modify the value of the parameter:
• press
and
or
To gain access the second level:
• gain access the first level
• press
or
to select
• press
and
or
to select “ -19 “
• press
and
for 4 s
: the instrument
will show
• press
or
within 4 s
(1)
• press
To activate the timer:
• be sure the instrument is turned OFF
• press
for 2 s
As soon as the time you have set with the procedure passes, the
device will automatically turn ON
(2)
(3)
.
(1)
you can set the timer for delayed starting between 1 and 99 h
(2)
the instrument stores the course of the time every 30 min
(3)
the first time the instrument stores the course of the value (after a lack of power
supply) will take place after 15 min the power supply has recovered, in order to
ensure the course storing even if the lacks take place over and over again.
4
COOKING TIMER
4.1
How to set the cooking timer
To modify the cooking timer:
• be sure the instrument is turned ON
• press
• press
or
within 4 s
(4)
• press
To activate/deactivate the timer:
• be sure the instrument is turned ON
• press
for 2 s
As soon as the time you have set with the procedure passes, the
buzzer will be activated for the time you have set with param. c4.
(4)
you can set the cooking timer between 1 and 99 min.
5
WORKING SETPOINT
5.1
How to set the working setpoint
• press
• press
or
within 4 s
(5)
• press
(5)
you can set the working setpoint between the limits you have set with param-
eters rA1 and rA2.
6
PERCENTAGE OF POWER SUPPLIED TO THE HEAT-
ING GROUPS
6.1
How to set the percentage of power supplied to
the heating groups
To modify the value of the percentage of power supplied to the
top heating group:
• press
LABEL MIN. MAX. U.M.
DEF. RESERVED
L1
---
---
---
---
reserved
L2
---
---
---
---
reserved
L3
---
---
---
---
reserved
L4
---
---
---
---
reserved
(8)
the unit of measure depends on parameter /8
(9)
the steam injection will not be allowed as long as the steam temperature gets again the temperature you have set with parameter rb1; to show the steam temperature,
press
; if LED steam generator is lit, the steam generator will be turned ON and the steam injection will be allowed; if LED steam generator flashes, the steam generator
will be turned ON but the steam injection will not be allowed (because the steam temperature is between rb1 and rb1 - rbE)
(10) ds = 0.1 seconds.
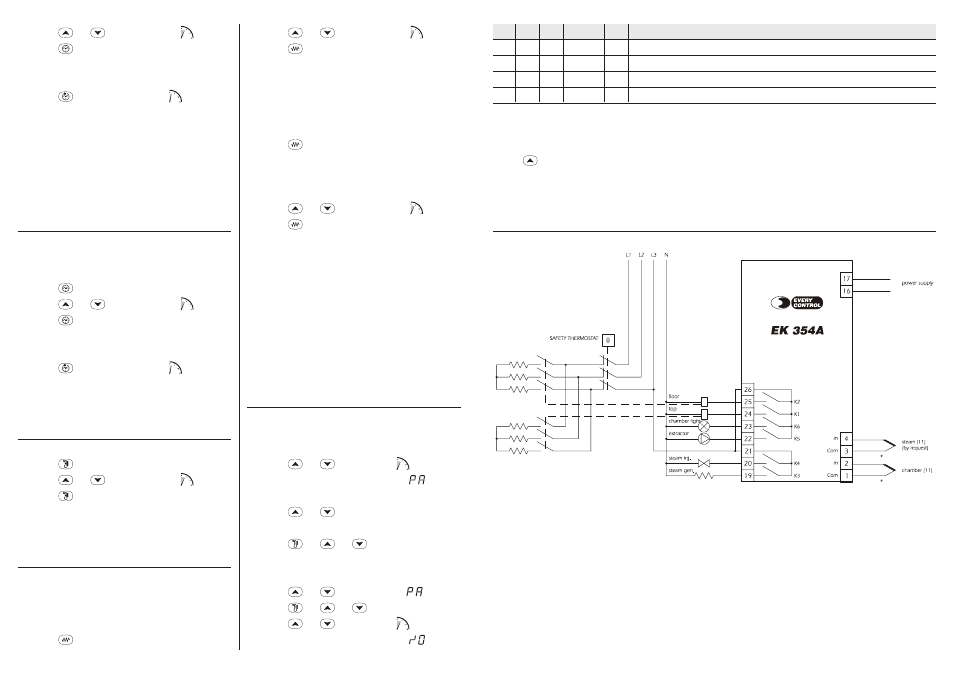
12
ELECTRICAL CONNECTION
12.1 Electrical connection
(11) provide the probes with a protection able to protect them against contacts with metal parts or use insulated probes.