Chapter 17 technical reference – Casio PV-S6100 User Manual
Page 173
171
Chapter 17 Technical Reference
1. Remove the cover and touch the screen with the stylus to turn on power.
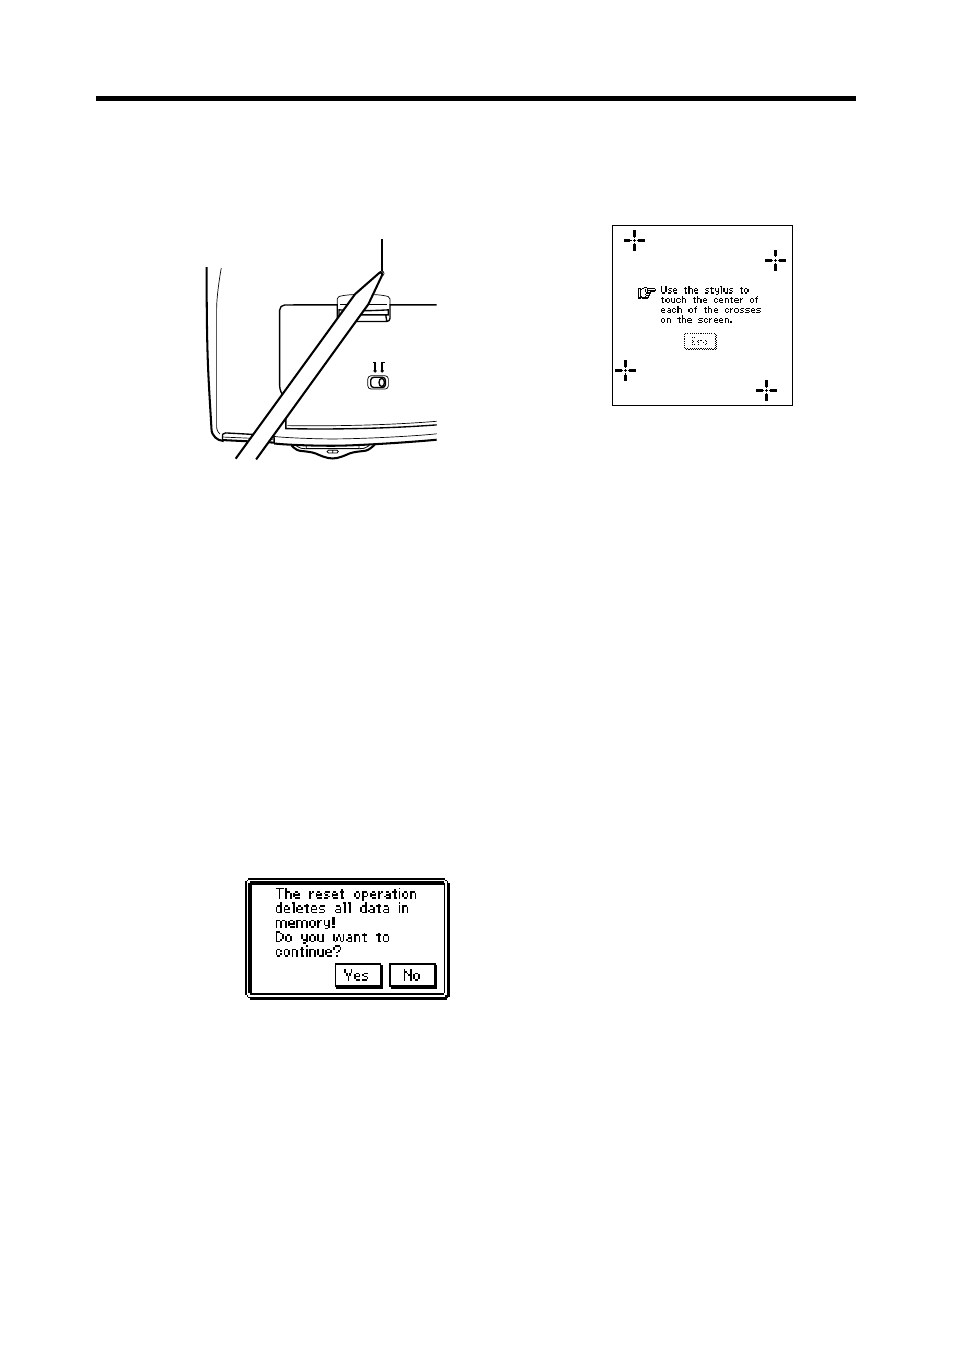
2. Use the stylus to press the RESET button on the back of the PV Unit.
REPLACE BATTERIES
NORMAL OPERATION
RESET
➜
•
It takes a while for the OS to load. After a few moments, the touch
screen calibration screen should appear.
•
If the touch screen calibration screen does not appear after a few moments
after you press the RESET button, slide the battery switch to the
REPLACE BATTERIES position and remove the battery compartment
cover. Remove the batteries from the battery compartment, and then
reload them. Replace the battery compartment cover, and then slide the
battery switch back to the NORMAL OPERATION position.
3. After the touch screen calibration screen appears, tap the center of each
of the four cross marks as they are displayed one-by-one.
•
The contrast adjustment screen appears next.
4. Tap
H or J to adjust the contrast of the display, and then tap OK.
5. In response to the message that appears, tap Yes to reset the PV Unit and
clear all memory contents, or No to abort the reset procedure without
doing anything.
6. If you tapped Yes in the above step, a second confirmation message
appears. Tap Yes to reset the PV Unit and clear all memory contents, or
No to abort the reset procedure without doing anything.
•
Tapping Yes in the above step starts the actual reset procedure.
RESET button
Touch screen
calibration screen
- PV-200 Before using for the first time PV-100 Before using for the first time PV-S450 Before using for the first time PV-S250 Before using for the first time PV-750 Before using for the first time PV-750 Plus Before using for the first time PV-S460/PV-S660 PV-200 Memo PV-100 Memo PV-S450 Memo PV-S250 Memo PV-750 Memo PV-750 Plus Memo PV-200 Contacts PV-100 Contacts PV-S450 Contacts PV-S250 Contacts PV-750 Contacts PV-750 Plus Contacts PV-200 Quick-Memo PV-100 Quick-Memo PV-S450 Quick-Memo PV-S250 Quick-Memo PV-750 Quick-Memo PV-750 Plus Quick-Memo PV-200 Expense Manager PV-100 Expense Manager PV-S450 Expense Manager PV-S250 Expense Manager PV-750 Expense Manager PV-750 Plus Expense Manager PV-200 Scheduler PV-100 Scheduler PV-S450 Scheduler PV-S250 Scheduler PV-750 Scheduler PV-750 Plus Scheduler PV-200 Game PV-100 Game PV-S450 Game PV-S250 Game PV-750 Game PV-750 Plus Game PV-200 Configuring the Unit PV-100 Configuring the Unit PV-S450 Configuring the Unit PV-S250 Configuring the Unit PV-750 Configuring the Unit PV-750 Plus Configuring the Unit PV-200 Pop Up Tools PV-100 Pop Up Tools PV-S450 Pop Up Tools PV-S250 Pop Up Tools PV-750 Pop Up Tools PV-750 Plus Pop Up Tools PV-200 Data Communication PV-100 Data Communication PV-S450 Data Communication PV-S250 Data Communication PV-750 Data Communication PV-750 Plus Data Communication PV-200 General Operations PV-100 General Operations PV-S450 General Operations PV-S250 General Operations PV-750 General Operations PV-750 Plus General Operations PV-750 Technical Reference 2 PV-200 Technical Reference PV-100 Technical Reference PV-S450 Technical Reference PV-S250 Technical Reference PV-750 Technical Reference 1 PV-750 Technical Reference PV-750 Plus Technical Reference