Wiring, Connecting to devicenet – KEYENCE DL-DN1 User Manual
Page 3
3
3
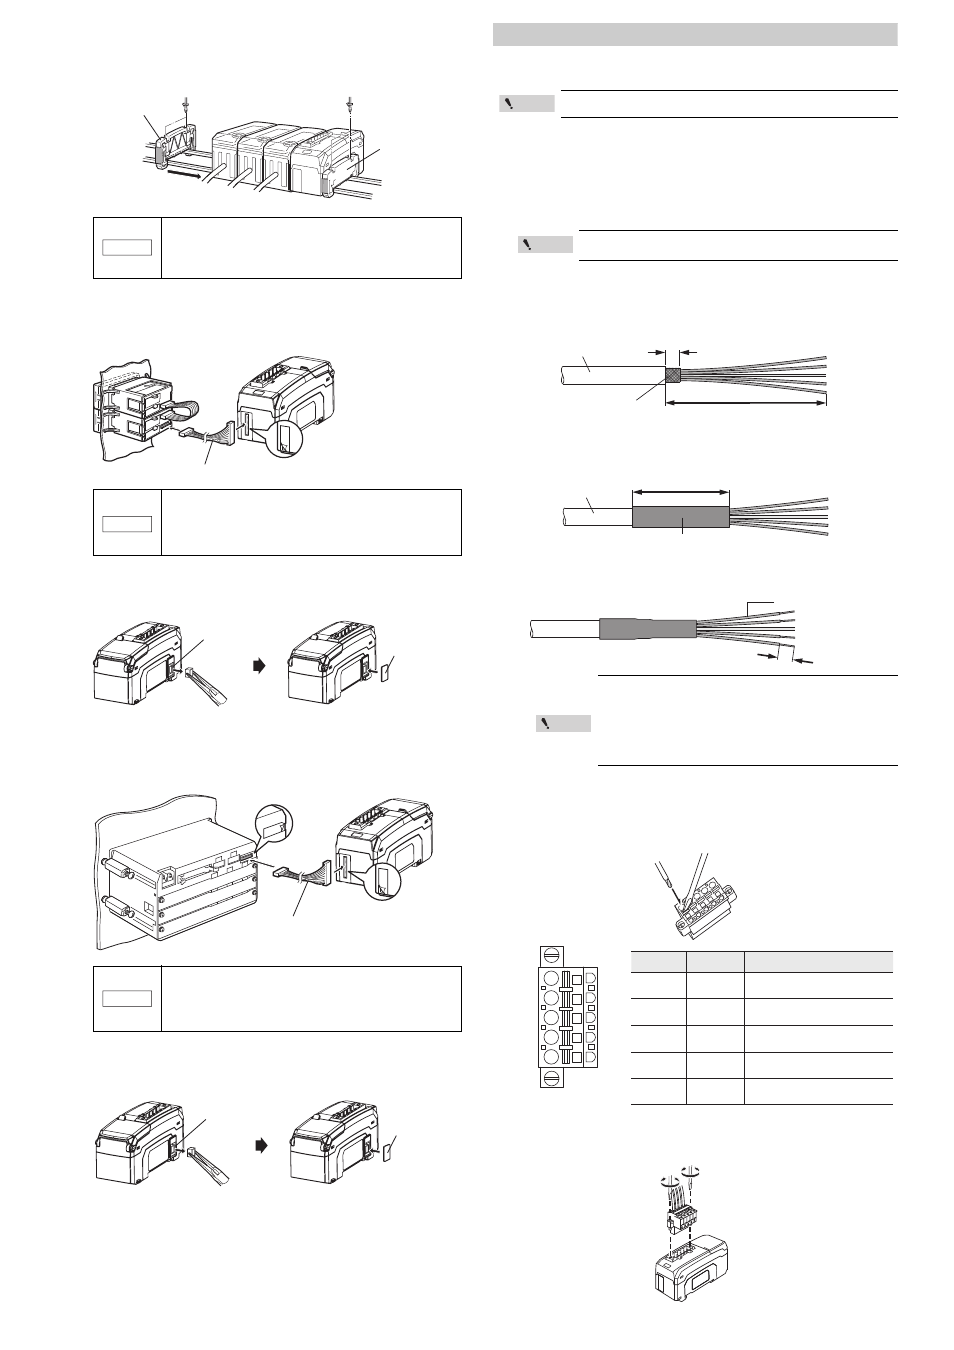
Mount the attached end units (OP-26751: a set of two pieces) on both sides of the
sensor amplifier and the DeviceNet Compatible Network Unit DL-DN1, then fix
the end units with screws on the upper part of each end unit (2 points x 2 units).
The mounting method of the end unit is the same as that of the DeviceNet Compatible
Network Unit DL-DN1.
z
Connecting to a panel mounting type sensor amplifier
1
Connect the sensor amplifier to the DeviceNet Compatible Network Unit DL-DN1
using the optional expansion cable (OP-35361).
2
Detach the sensor amplifier connector (for DIN rail mounting type) of the
DeviceNet Compatible Network Unit DL-DN1 with pliers and mount the attached
expansion connector sticker.
z
Connecting to a large display type sensor amplifier
1
Connect the sensor amplifier to the DeviceNet Compatible Network Unit DL-DN1
using the optional expansion cable (OP-35361).
2
Detach the sensor amplifier connector (for DIN rail mounting type) of the
DeviceNet Compatible Network Unit DL-DN1 with pliers and mount the attached
expansion connector sticker.
Wiring
Use the following procedures to wire the DL-DN1.
Refer also to the DeviceNet Installation Manual published by ODVA.
Connecting to DeviceNet
Use the following procedure to connect the DL-DN1 to the DeviceNet.
z
Recommended Cables
For connection between the DL-DN1 and the DeviceNet, use DeviceNet cables conform-
ing to the DeviceNet specifications or dedicated flat cables.
z
Trimming the Cable
1
Strip the cable sheath.
Strip approximately 70 mm of cable sheath.
Make sure that the bare part of the shield braid is 6 mm or shorter.
2
Install shrinkable tube.
Cover the exposed sheathed conductors and the sheath using a shrinkable tube
approximately 40 mm long.
3
Strip the sheathed conductors.
Strip approximately 10 mm of sheath from the end of each conductor.
z
Connecting the Cable
Use the following procedures to wire to the DeviceNet connector supplied with the DL-DN1.
1
Connect the trimmed cable to the DeviceNet connector.
Insert the cable completely.
2
Attach the DeviceNet connector to the DL-DN1.
Plug the connector into the DL-DN1 and secure it down with the screws on each end.
(Tightening torque: 0.2 to 0.3 Nm)
Be sure to insert the DeviceNet Compatible Network Unit DL-DN1
to the sensor amplifier to the end. Turning on the power with
diagonal insertion or improper insertion may damage the
equipment.
•
Turn OFF the power before connecting the expansion cable
and connect securely. Diagonal or otherwise improper
insertion may damage the equipment.
•
Inserting or pulling the cable when the power is turned ON
may damage the equipment.
•
Turn OFF the power before connecting the expansion cable
and connect securely. Diagonal or otherwise improper
insertion may damage the equipment.
•
Inserting or pulling the cable when the power is turned ON
may damage the equipment.
End unit
End unit
NOTICE
Detach the protection sticker
Expansion cable (cable length: 300 mm)
NOTICE
Sensor amplifier connector
(for DIN rail mounting type)
Expansion
connector sticker
Detach the
protection sticker
Detach the
protection
sticker
Expansion cable (cable length:300mm)
NOTICE
Sensor amplifier connector
(for DIN rail mounting type)
Expansion
connector sticker
Turn off the power before wiring.
To ensure normal communication, use only the DeviceNet or
dedicated cables.
•
If you are using solderless terminals, perform cable wiring /
trimming appropriately to suit the specifications of the
particular terminals.
Recommended solderless terminals: Phoenix Contact's A/AI
Series
•
Do not perform soldering (pre-soldering) on the trimmed
end of the cable.
Point
Point
6 mm or shorter
Approx. 70mm
Shield braid
Sheath
Approx. 40mm
Shrinkable tube
Sheath
Approx. 10mm
Sheathed conductor
Point
Wire color Signal name
Function
Black
Connects 0 V of the
communication power supply.
Blue
CAN_L
Communication signal (Low)
Bare wire
SHIELD
Connects the shield of the
DeviceNet cable.
White
CAN_H
Communication signal (High)
Red
V+
V-
Connects 24 VDC of the
communication power supply.
Black
Blue
White
Red