Checkline ETMPX User Manual
Page 6
– 6 –
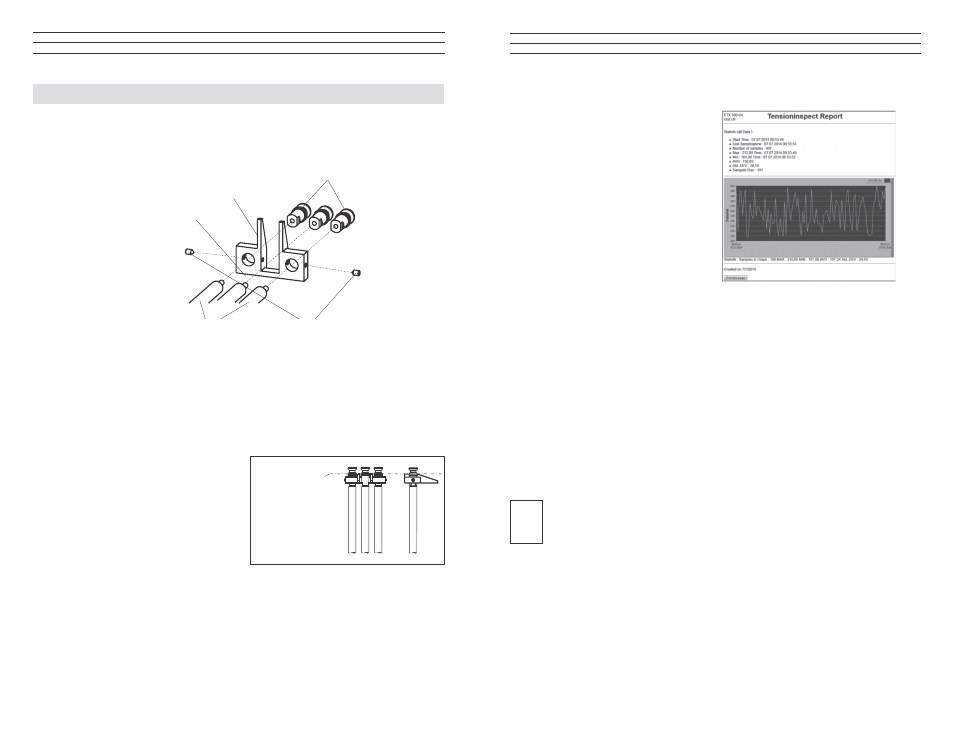
3.0 REMOVING AND REMOUNTING THE FILAMENT GUIDE
The tension meter is supplied with a FILAMENT GUIDE for fast and easy material
acquisition. For application in hard-to-reach areas with limited access space, you can
remove the FILAMENT GUIDE.
Removal Procedure
1 Loosen the SETSCREWS (2x) with the supplied screwdriver (1.5 mm blade).
2. Unscrew and remove the GUIDE ROLLERS (2x) with the supplied open end
wrench (jaw width 4 mm).
3. Slip the FILAMENT GUIDE off the ROLLER SHAFTS.
4. Screw the GUIDE ROLLERS (2x) back onto the ROLLER SHAFTS and carefully
tighten using the supplied open end wrench (jaw width 4 mm) until hand-tight.
Remounting Procedure
1. Unscrew and remove the GUIDE
ROLLERS (2x) with the supplied
open end wrench jaw width 4 mm).
2. Slip the filament guide on to the
ROLLER SHAFTS.
3. Screw the GUIDE ROLLERS (2x)
back on to the ROLLER SHAFTS
and carefully tighten them using the supplied open end wrench (jaw width 4 mm)
until hand-tight.
4. Push the FILAMENT GUIDE forward far nough to ensure that the rollers do not rub
against the FILAMENT GUIDE and that the process material can slide unhindered
from the FILAMENT GUIDE into the roller grooves (fig. CENTER LINE).
5. Carefully tighten the SETSCREWS (2x) with the supplied screwdriver
(blade width 1.5 mm) until hand-tight.
GUIDE ROLLERS (2x)
ROLLER SHAFTS (2x)
FILAMENT GUIDE
GRUB SCREWS (2x)
MEASURING ROLLER
CENTER LINE
–31 –
3.4 Printing and Data Transfer
Print:
1. Click the GENERATE button
to open the print preview.
2. Click the PRINT THIS PAGE
button to open the printer setup
box.
The print-out includes the
statistical data of the series of
measurements, the current
displayed graph and the
statistical values of the graph.
Data transfer:
1. The EXPORT SCREEN TO EXCEL button copies the readings, which are
displayed at the graph to an excel file (reading, date, time).With the infixed readings,
a graph can be created in the Excel file.
3.5 Save and load the readings
Save:
1. The statistical data, as well as the single readings of a measuring can be saved after
the measuring ends as CSV file, by clicking the the SAVE button.
Load:
1. Click the LOAD button and open the required file. The statistical data of the saved
measuring, the graph and the statistical data of the graph are displayed in
Tension Inspect 3
It is possible to add readings to an existing file. In this case open the file and start a
new series of measurements. The new readings will be added in the diagram. After
this store the complete CSV file again. If any readings are in the internal memory
before opening the existing file, the internal memory will be overwritten.
3.6 The READ button (Available only for ETX and ETPX)
With the TENSION INSPECT 3 program you can download all the tension data stored
in the memory of the connected tension meter.
Start the DOWNLOAD
1. Click the READ button.
The
MEMORY-REVIEW window opens.
i