E –0 800 – Checkline ETMPX User Manual
Page 17
–17 –
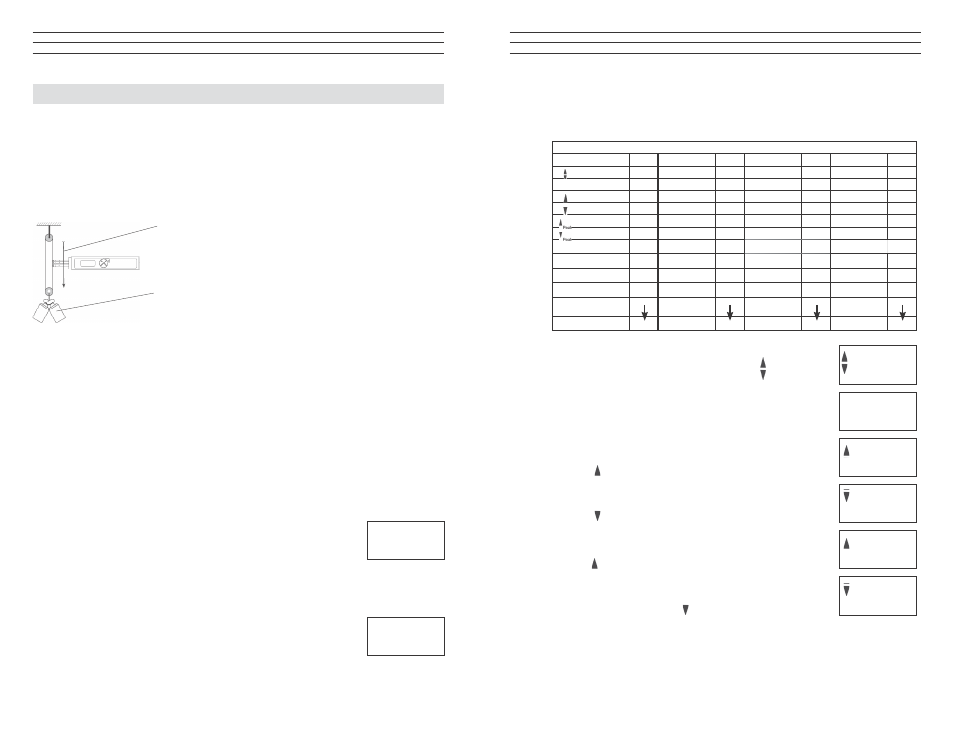
7.4 Recalling Stored Values in Mode F (Fast)
1. Turn on the tension meter and press the RECALL key, You can exit
recall at any time by pressing the POWER key.
Memory Mode FAST
Pos:
1 Pos:
2 Pos:
3 Pos:
4
AVG:
22.0 AVG:
12.0 AVG:
12.0 AVG:
12.0
Last:
23.0 Last:
22.1 Last:
22.1 Last:
22.1
MAX:
24.0 MAX:
22.1 MAX:
22.1 MAX:
22.1
MIN:
21.0 MIN:
5.4 MIN:
5.4 MIN:
5.4
PEAK
MAX
:
26.0 PEAK
MAX
:
28.1 PEAK
MAX
:
28.1 PEAK
MAX
:
28.1
PEAK
MIN
:
19.0 PEAK
MIN
:
1.8 PEAK
MIN
:
1.8 PEAK
MIN
:
1.8
10.8
14.2
14.1
15.4
10.0
19.4
11.2
18.3
7.3
22.9
8.9
17.5
6.1
17.3
10.2
7.8
n
n
n
n
– 20 –
9.0 CALIBRATION
9.1 Dynamic Calibration of the ETMX
All tension meters are calibrated with standard materials—such as polyamide
monofilament (PA)—ccording to the factory procedure. The diameters are given in
section 1.0. In 95% of all industrial applications, the factory calibration has been proven
to provide the best results and is used for comparative purposes. The basic setup for a
dynamic calibration is shown below.
Line speed Vmax. = ETMX 100 m/min
Vmax. = ETMXP 60 m/min
Hang twice the weight (pulley effect) which corresponds to
the tension to be measured from the measured material,
vertically, as shown here. Please keep in mind to include
the weight of the lower deflection pulley when you calcu-
late the suspended weight. Pay attention to the correct
unit of measure cN.
NOTE: The gauge has been calibrated dynamically according to factory procedure.
Therefore, differences may occur between static and dynamic readings.
9.2 Static Calibration
NOTE: The tension meter is factory calibrated for a vertical material path
Recalibration thus also has to be carried out with a vertical material path.
Before beginning:
Acquire one cN weight each (or several weights adding up to the required value),
corresponding to 10%,40%, 70% and 100% of the tension range. Make sure the tension
meter is switched off and that no process material is inserted between the rollers.
To select the calibration mode:
1. Press and hold the MEM and POWER keys until the DISPLAY
shows E –0
2. Release first the POWER key and then the MEM key.
To calibrate the zero point:
1. Press the RECALL key. As long as the RECALL key is
depressed, the DISPLAY shows a random decimal value between
–2000 and 2000, e.g. 800 cN. This decimal value may vary from
instrument to instrument.Write down the decimal value.
NOTE: If the value is outside this range, calibration cannot be guaranteed.
E –0
800
2. The DISPLAY blinks showing the average value (AVG)
of the first measuring period (POS: 1) and the
symbol.
3. Press the RECALL key. The DISPLAY blinks, showing
the last value (LAST) of the measuring period.
4. Press the RECALL key. The DISPLAY blinks, showing
the maximum value (MAX) or the measuring period
and the symbol.
5. Press the RECALL key. The DISPLAY blinks, showing
the minimum value (MAX) of the measuring period
and the
symbol.
6. Press the RECALL key. The DISPLAY blinks, showing the
maximum peak value (PEAKMAX) of the measuring period
and the
symbol.
7. Press the RECALL key. The DISPLAY blinks, showing the
minimum peak value (PEAKMIN ) of the measuring period,
the PEAK indicator and the
symbol.
8. Press the RECALL key. The measured values no. 1 — n
of the first measuring period can be recalled.
9. Press the RECALL key. The next measuring period (POS: 2) is shown on the
DISPLAY, starting with the average value (AVG).
22
D
cN
23
D
cN
24
D
cN
21
D
cN
26
Peak cN
19
Peak cN