Yamaha VSS-100 User Manual
Page 9
Attention! The text in this document has been recognized automatically. To view the original document, you can use the "Original mode".
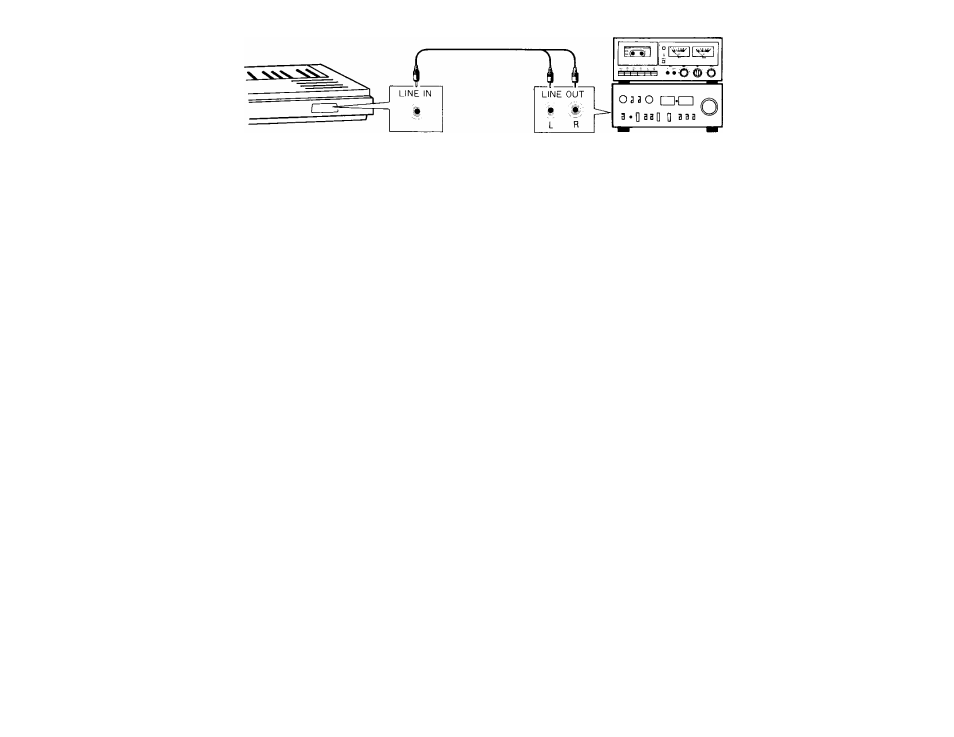
Now that everything is set up, you’re
ready to go ahead and begin ‘sannpling.’
First, try sampling your own voice with
the microphone as described below in
Step 1. Then, use the Line In method to
sample a sound from the pre-recorded
accessory tape, as described below in
Step 2. Finally, you can also try out
sampling in parts as explained in the
“Advanced Sampling”section.
STEP 7, Using the Microphone to
Sampie your own Voice.
Sampling
1. Remove the microphone from its
compartment.
2. Press the FULL button in the
SAMPLING selector section.
Pressing the FULL button puts the VSS-100
in the Full Keyboard Sampling Mode,
which means that the sampled sound
will be available on the entire keyboard.
For dividing the keyboard into different
parts, see the “Advanced Sampling”
section on page 11.
• Indicating the Sampling Key
When in the FULL mode, you may press
a key (use a keyboard key representing
a note closest tonally to the sound being
sampled) in the range of C3-C4. The
further the key is to the right, the shorter
the sampling time will be. C3 gives you
the maximum sampling time of eight
seconds, while C4, the minimum of four
seconds. When you wish to indicate a
specific duration, press the appropriate
key. When no key is pressed, C3 {eight
second sampling time) will be auto
matically selected.
Wenn alle Verbindungen hergestellt sind,
können Sie mit dem “Sampling” beginnen.
Fangen Sie zuerst Ihre eigene Stimme mit
dem Mikrofon ein, wie unten in Schritt 1
beschrieben. Dann verwenden Sie die Line-
In-Methode, um einen Ton vom mitgelieferten
Beispielband einzufangen, wie unten in
Schritt 2 beschrieben. Schließlich können
Sie andere Parts einfangen, wie im Abschnitt
“Fortgeschrittenes Sampling” beschrieben.
SCHRITT 1. Fangen Sie Ihre eigene
Stimme mit dem Mikrofon ein
Sampling
1. Nehmen Sie das Mikrofon aus dem
Fach.
2. Drücken Sie den Schalter FULL in
der Sampling-Schaltergnippe.
Durch Drücken des Schalters FULL wird
das VSS-100 in die Betriebsart “Full
Keyboard Sampling” gestellt. Das bedeutet,
daß der eingefangene Klang auf der ganzen
Tastatur zur Verfügung steht. Zur Aufteilung
der Tastatur in verschiedene Teile sehen Sie
“Fortgeschrittenes Sampling” auf Seite 11 .
• Einsatz des Sampling-Schalters
In der Betriebsart FULL drücken Sie eine
Taste (nehmen Sie eine Notentaste, die eine
Note repräsentiert, welche in der Tonlage
dem eingefangenen Klang ähnelt) im Bereich
C3
bis
C4,
Die Sampling-Zeit wird um so
kürzer, je weiter rechts die Taste liegt.
C3
gibt Ihnen die maximale Sampling-Zeit
von acht Sekunden, während
C4
die mini
male von vier Sekunden gibt. Wenn Sie
eine bestimmte Zeitdauer angeben wollen,
drücken Sie die entsprechende Taste. Wenn
keine Taste gedrückt wird, wird automa
tisch
C3
(acht Sekunden Sampling-Zeit)
eingestellt.
Une fois tes préparatifs terminés, on
pourra
procéder
à
l’échantillonnage.
Commencer par sa propre voix avec le
microphone, comme expliqué ci-après à
la démarche 1. Utiliser ensuite la méthode
par Entrée de ligne en utilisant le son
d’une bande pré-enregistrée, comme
expliqué à la démarche 2 ci-aprés. Enfin,
on procédera aux essais expliqués dans
la section “Echantillonnage évolué”.
DEMARCHE 1. Utilisation du
microphone pour Téchantillonnage de
sa propre voix
Echantillonnage
1. Retirer le microphone de son logement.
2. Appuyer sur la touche FULL dans la
section séiecteur SAMPLiNG.
Une poussée sur la touche FULL place le
VSS-100 en mode d’échantillonnage par
clavier complet, ce qui signifie que le
son échantillonné sera disponible sur l’en
semble du clavier. Pour diviser le clavier
en diverses parties, voir la section
“Echantiiionnage évolué” en page 11.
• Indication de touche d’échantillonnage
Quand on se trouve en mode FULL, on
pourra appuyer une touche dans la plage
C3-C4(utiliser une touche du clavier repré
sentant la note la plus proche du son en
cours d’échantillonnage). Plus la touche
est sur la droite, plus courte sera la durée
de l’échantillonnage. C3 fournit la durée
d’échantillonnage
maximale
de
huit
secondes, tandis que C4 fournit la plus
courte: quatre secondes. Si l’on désire
déterminer une durée particulière, appuyer
sur la touche adhoc. Si aucune touche
n’est actionnée, C3 (durée d’échantil ion-
nage de huit secondes) sera automatique
ment choisie.
Una vez efectuadas las conexiones, podrá
comenzar a “muestrear”. En primer lugar
pruebe a muestrear su propia voz con el
micrófono como se describe en el PASO 1
siguiente. Desqués emplee el método de
entrada de línea, como se describe en el
PASO 2, para muestrear el sonido de la
cinta grabada suministrada. Finalmente
podrá intentar muestrear en partes como se
explica en la sección “Muestreo avanzado”.
PASO
1. Empleo del micrófono para
muestrear su propia voz
Muestreo
1. Extraiga el micrófono de su
compartimiento.
2. Presione el botón FÜLL de la sección
del selector SAMPLING.
Al presionar el botón FÜLL, el VSS-100
pasará al modo de muestreo de teclado
completo, lo que significa que el sonido
muestreado estará disponible en todo el
teclado. Para dividir el teclado en partes
diferentes, consulte la sección “Muestreo
avanzado” de la página 11.
• Indicación de la clave de muestreo
En el modo FÜLL usted podrá pulsar una
tecla (emplee una tecla del teclado que
represente una nota lo más cercana en
clave tonal al sonido que esté muestreando)
en la gama de C3-C4. Cuanto más a la
derecha se encuentre la tecla pulsada, más
corto será el tiempo de muestreo. C3
ofrecerá el tiempo máximo de muestreo de
ocho segundos, mientras que con C4 se
obtendrá el mínimo de cuatro segundos.
Cuando desee indicar una duración espe
cífica, pulse la tecla apropiada. Si no pulsa
ninguna tecla, se seleccionará automática
mente C3 (tiempo de muestreo de ocho
segundos).