Step, Install pet door, Insert screws and plugs – Petsafe Passport™ Pet Access Smart System User Manual
Page 9: Train pet, 4e 4d 4c, 4g 4f, 5d 5c
16
Customer Care Center 1-800-732-2677
www.petsafe.net
17
INST
ALL
A
TION
INST
ALL
A
TION
Install Pet Door
Before putting away your jigsaw, place interior frame (frame with flap) inside the cut-out and check the fit. Then place
the exterior frame into the underside of the cut-out to check the fit. If the frames do not easily fit inside the opening, you may need to
recut opening before proceeding with installation.
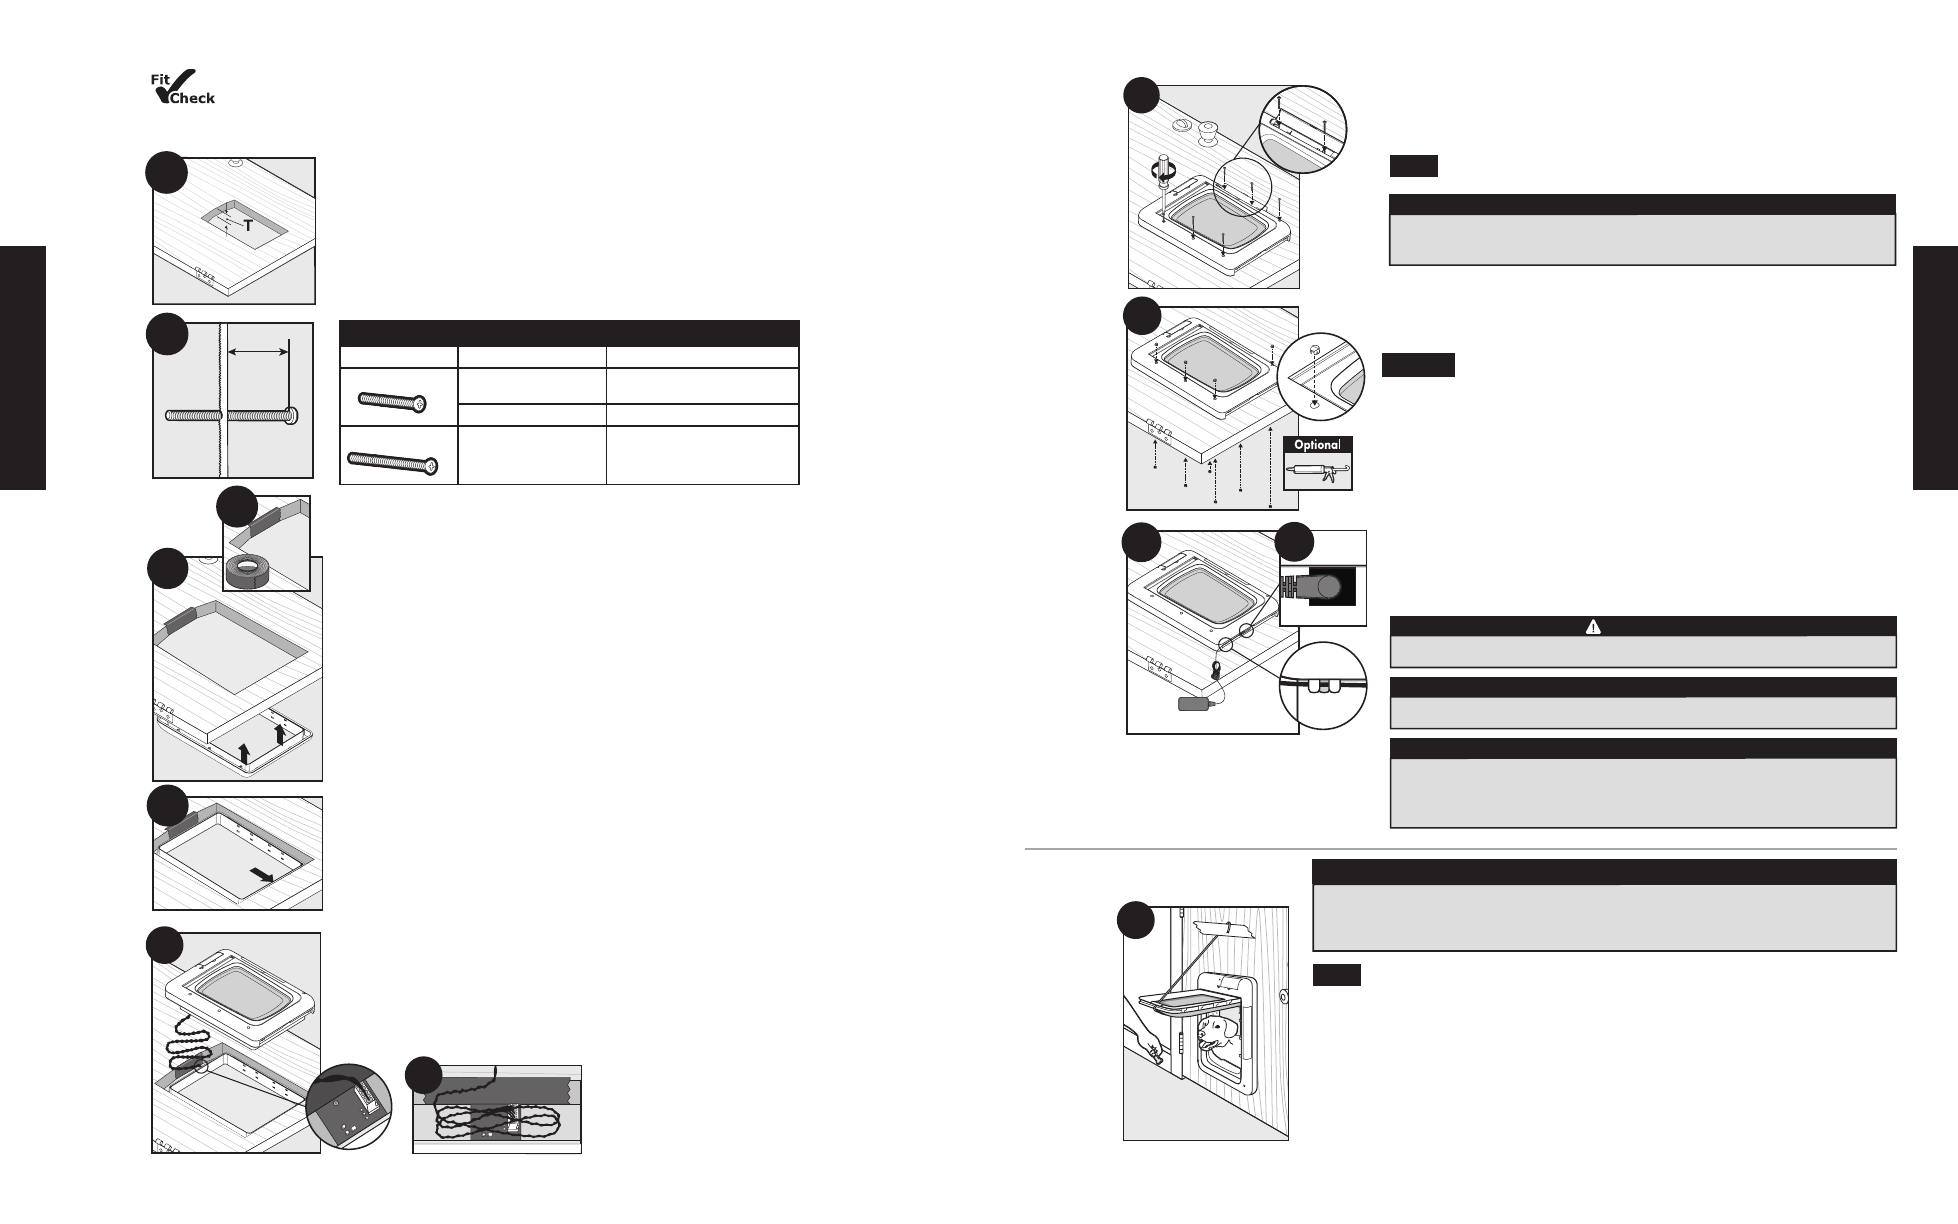
4A Measure the thickest part (T) of cut-out. Note this measurement.
4B Before installing pet door, you need to determine which screw length is needed for your
installation. Depending on your door thickness, the screws may need to be trimmed with a hacksaw
or screw cutter. If the screws are too long, the finishing plugs will not fit. Use the Screw Selection
Guide (Chart 1) to select which screw to use and if it needs to be trimmed.
Chart 1
Screw Selection Guide
Screw Length
Cut-Out Thickness (T)
Trimming Instructions
3 ₇⁄₁₆” screw (88mm)
3
⁄₁₆” - 1” (4mm - 25mm)
Trim screw to door thickness
(T) +2
3
⁄₁₆” (56mm). (See Illustration 4B)
1” - 1
1
⁄
2
” (25mm - 38mm)
No trimming needed.
3
15
⁄₁₆” screw (100mm) 1
1
⁄
2
” - 2” (38mm - 51mm)
No trimming needed.
Helpful Tip: Remove pencil marks and make sure surface is free of debris and shavings before
installing frames.
4C Apply duct tape along top interior and exterior edge of cut-out. Leave approximately 2”
uncovered on either side of tape and make sure no excess tape will show outside the frame. This is
to cover raw edge of cut-out to keep it from pinching or cutting motion sensor wire.
4D Place exterior frame into cut-out from the underside of the door.
4E Align exterior frame flush with bottom of cut-out.
Helpful Tip: Use sawhorse or other flat surface to keep exterior frame in place while installing
interior frame.
4F Plug motion sensor wire from interior frame into connector on the exterior frame.
4G Without pinching the wire, guide excess wire into space between top edge of door cut-out
and tunnel on exterior frame. Align interior frame into cut-out. View both sides of door to ensure the
exterior and interior telescoping tunnels are aligned.
Helpful Tip: You should be able to see clearly through
all screw holes when your door is aligned properly.
Step
4
4A
T+2
3
∕
₁₆
"
(56mm)
4B
4E
4D
4C
4G
4F
Insert Screws And Plugs
5A Insert mounting screws through interior frame screw holes. Be sure to insert screws
into screw holes inside battery compartment. Check to make sure pet door fit is correct
and frame is aligned flush. Tighten screws.
Note:
Small + has 4 screw holes and Medium has 6 screw holes.
5B Insert finishing plugs into screw holes of interior and exterior frames. Align flat
edge of plugs with outer edges of frame. Plugs will only fit into frame in one direction.
Optional:
Caulk around exterior frame and in between tunnels, where tunnels meet,
for improved weather resistance.
5C Plug power adapter into connector on underside of interior frame.
5D Route power adapter wire through wire guides in desired direction towards nearest
power outlet. Rehang door.
Train Pet
Note:
The Passport
™
is designed with an electric motor to release and unlock the flap system
when a Passport Key
™
is detected. Do not allow your pet to run or charge through the Passport
™
.
Due to variable radio-frequency interferences and the location where your Passport
™
is installed, it
could take several seconds for the unique code of the Passport Key
™
to be read and the flap system
to unlock.
6A To train your pet, set the Passport
™
to
Open Mode (see “Door Operational Modes” page
19). Lift or tape main flap and interior U-flap open using string to help your pet become familiar
with the pet door opening.
MAKE SURE TAPED FLAP IS SECURE AND WILL NOT FALL
DURING TRAINING. Try to encourage your pet to come through the pet door. DO NOT FORCE
your pet through the door or they may become frightened. If your pet is timid, it might be helpful to
5A
5D
5C
CAUTION
Do not allow your pet to chew on the power cord.
NOTICE
Only use designated power adapter with the product. Do not use power adapter
in temperatures below 32° F (0° C) or above 104° F (40° C). Power adapter for
inside use only.
WARNING
To avoid tripping, always position the power cord out of the path of foot traffic.
NOTICE
Use a manual screwdriver to tighten screws. Do not over-tighten. Over-tightening can strip the
screws or warp the pet door frame.
5B
Step
5
During pet training while pet door is in Open Mode, make sure to GENTLY lower flap onto
pet’s back. Also avoid possible injury by making sure your pet is entirely through the pet
door opening, including paws and tail, before completely releasing flap.
CAUTION
Step
6
6A