Getting started, Works, Passport key – Petsafe Passport™ Pet Access Smart System User Manual
Page 4: Features, controls and indicators, Key def initions, Control panel, Get ting st ar ted get ting st ar ted
6
Customer Care Center 1-800-732-2677
www.petsafe.net
7
GET
TING ST
AR
TED
GET
TING ST
AR
TED
GETTING STARTED
Components
How the Passport Pet Access Smart System
™
Works
Using radio frequency identification (RFID) technology, the Passport Pet Access Smart System
™
reads the Passport Key
™
worn on your pet’s collar.
When your pet approaches the Passport
™
, the system reads the unique ID of your pet’s Passport Key
™
and if that number is programmed, the pet door
will unlock allowing your pet to enter or exit. If a pet or animal is not programmed to the system, the pet door will remain locked. This allows access
to only your programmed pet(s) while helping keep out other pets, wild animals, pests and strays. Offering advanced selective entry and exit by
pet, multiple access options (such as in-only access and out-only access) and the option to only allow access at specific times of day, the Passport
™
gives you complete control of each pet’s access. You can set access by pet or easily set the same access setting for all pets with the Master Access
option. Pet Tracking shows your pet’s current location and the last 4 times your pet used the pet door, allowing you to monitor your pet’s access.
Programming is easy using the LCD screen and 5-Star Navigation or by connecting to your computer with included USB cable. A wireless connection
allows for remote programming from any smart device, providing ultimate convenience for today’s busy pet owners (requires Passport
™
Wireless
Card, sold separately). The Passport
™
is programmable for up to 20 pets.
Passport Key
™
Worn on your pet’s collar, the Passport Key
™
uses Radio Frequency Identification (RFID) technology by using a unique code to signal the Passport
™
to operate as programmed for your pet. The Passport Key
™
does not require a battery to operate. One Passport Key
™
is included which is NOT
pre-programmed to operate with your Passport
™
. Follow all steps under “Prepare, Setup and Test”, including “Test Passport Key
™
”page 13, before
starting installation. The Passport Pet Access Smart System
™
can be programmed for up to 20 pets. Additional Passport Key
™
accessories are sold
separately (see “Replacement Parts and Accessories” page 29).
Installaton and
Operating Guide
Interior Frame
with Flap
3-V Lithium Battery
for door Clock
(CR2032)
Exterior Frame
USB Cable
Power Adapter
Passport Key
™
Key Ring
2 pcs.
Finishing Plugs
11 pcs.
3
15
/
16
" (100mm)
Screws 6 pcs.
3
7
/
16
" (88mm)
Screws 6 pcs.
Cutting Template
Center Line
Cutting Template
NOTICE:
When applying cutting template there should be a
minimum of 3” between the bottom and sides of the
door and the outer edge of the template to maintain the
structural integrity of the door.
Radio Systems® Corporation • 10427 PetSafe Way, Knoxville, TN 37932
1-800-732-2677 • www.petsafe.net • ©2013 Radio Systems® Corporation
408-082
Center Line
M
ed
ium
17
1/
16
” (
43
.4
cm
) H
Shoulder Height
Shoulder Height
• Hammer
• Jigsaw*
• Phillips Screwdriver
• Slotted Screwdriver
• Drill
• ½” Drill Bit
• Level
• Tape Measure
• Masking or Painter's Tape
• Duct Tape
• String
• Pencil
• Safety Equipment
Optional:
• Caulk
*
With appropriate blade type and length;
example, a metal door would require a
blade for metal.
Tools Needed
Medium 13 1/
8 ” (33.4 cm) W
Center Line
Cutting Template
NOTICE:
When applying cutting template there should be a
minimum of 3” between the bottom and sides of the
door and the outer edge of the template to maintain the
structural integrity of the door.
Radio Systems® Corporation • 10427 PetSafe Way, Knoxville, TN 37932
1-800-732-2677 • www.petsafe.net • ©2013 Radio Systems® Corporation
408-082
Center Line
M
ed
ium
17
1/
16
” (
43
.4
cm
) H
Shoulder Height
Shoulder Height
• Hammer
• Jigsaw*
• Phillips Screwdriver
• Slotted Screwdriver
• Drill
• ½” Drill Bit
• Level
• Tape Measure
• Masking or Painter's Tape
• Duct Tape
• String
• Pencil
• Safety Equipment
Optional:
• Caulk
*
With appropriate blade type and length;
example, a metal door would require a
blade for metal.
Tools Needed
Medium 13 1/
8 ” (33.4 cm) W
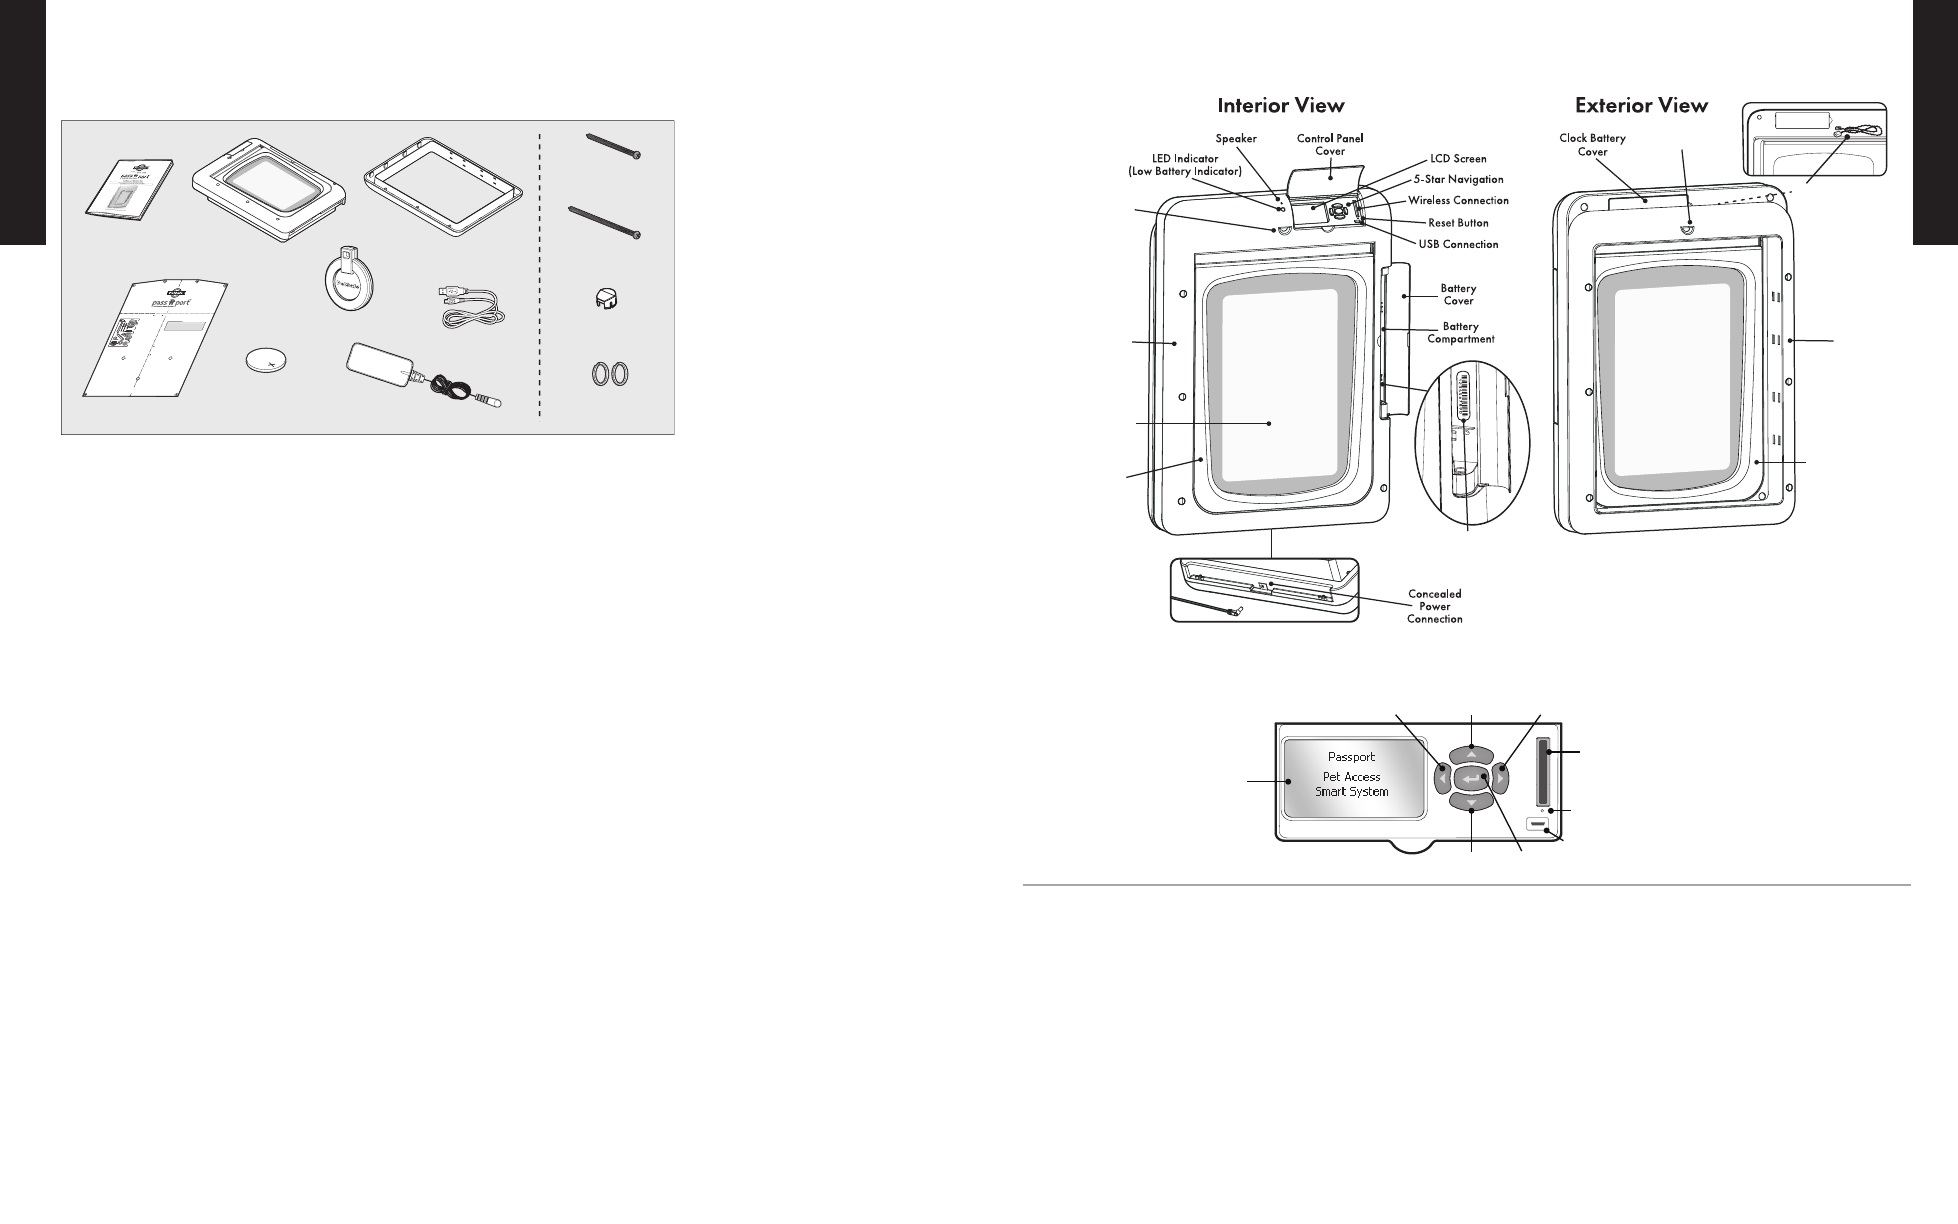
Features, Controls and Indicators
Interior
Motion Sensor
Exterior
Motion Sensor
Interior
Frame
Exterior
Frame
Interior
Locking U-Flap
Exterior
Locking U-Flap
Main Flap
Serial Number inside
battery compartment
Motion Sensor
Wire
Control Panel
Key Def initions
•
5-Star Navigation – Group of five buttons with up arrow key, down arrow key, left arrow/back key, right arrow key, and enter/select key
used to navigate the Passport
™
menu system for easy programming. Located in control panel on interior frame.
•
Antenna - The antenna is located inside main flap and receives radio signals from Passport Key
™
. The Passport Key
™
must be located within a
certain distance of antenna in order for the unique code to be read.
•
Battery Compartment – The battery compartment is located on interior frame and holds the optional Passport
™
Rechargeable Battery
(sold separately).
•
Battery Cover – Covers and protects optional rechargeable lithium-ion battery and battery compartment.
•
Blind Zones – Areas where motion sensors cannot detect your pet and the Passport
™
will not read your pet’s Passport Key
™
.
•
Clock Battery – The 3-V lithium coin cell battery (size CR2032) which keeps the clock’s time during any power loss.
•
Clock Battery Cover – Covers and protects 3-V lithium coin cell clock battery and Passport
™
electronics circuit board.
•
Control Panel – Area at top of interior frame where LCD screen, 5-Star Navigation, wireless connection, USB connection and reset button
are located.
LCD Screen
USB Connection
Enter/Select
Arrow Key
Down
Arrow Key
Left Arrow/
Back Key
Up
Arrow Key
Right
Arrow Key
Reset Button
Wireless
Connection