Installation, Step, Checklist before installation – Petsafe Passport™ Pet Access Smart System User Manual
Page 8: Want professional installation help, Tools needed, Installation in a non-glass door, Preparing door, Cut pet door opening, Determine pet door location, 2a 2b 2c
14
Customer Care Center 1-800-732-2677
www.petsafe.net
15
INST
ALL
A
TION
INST
ALL
A
TION
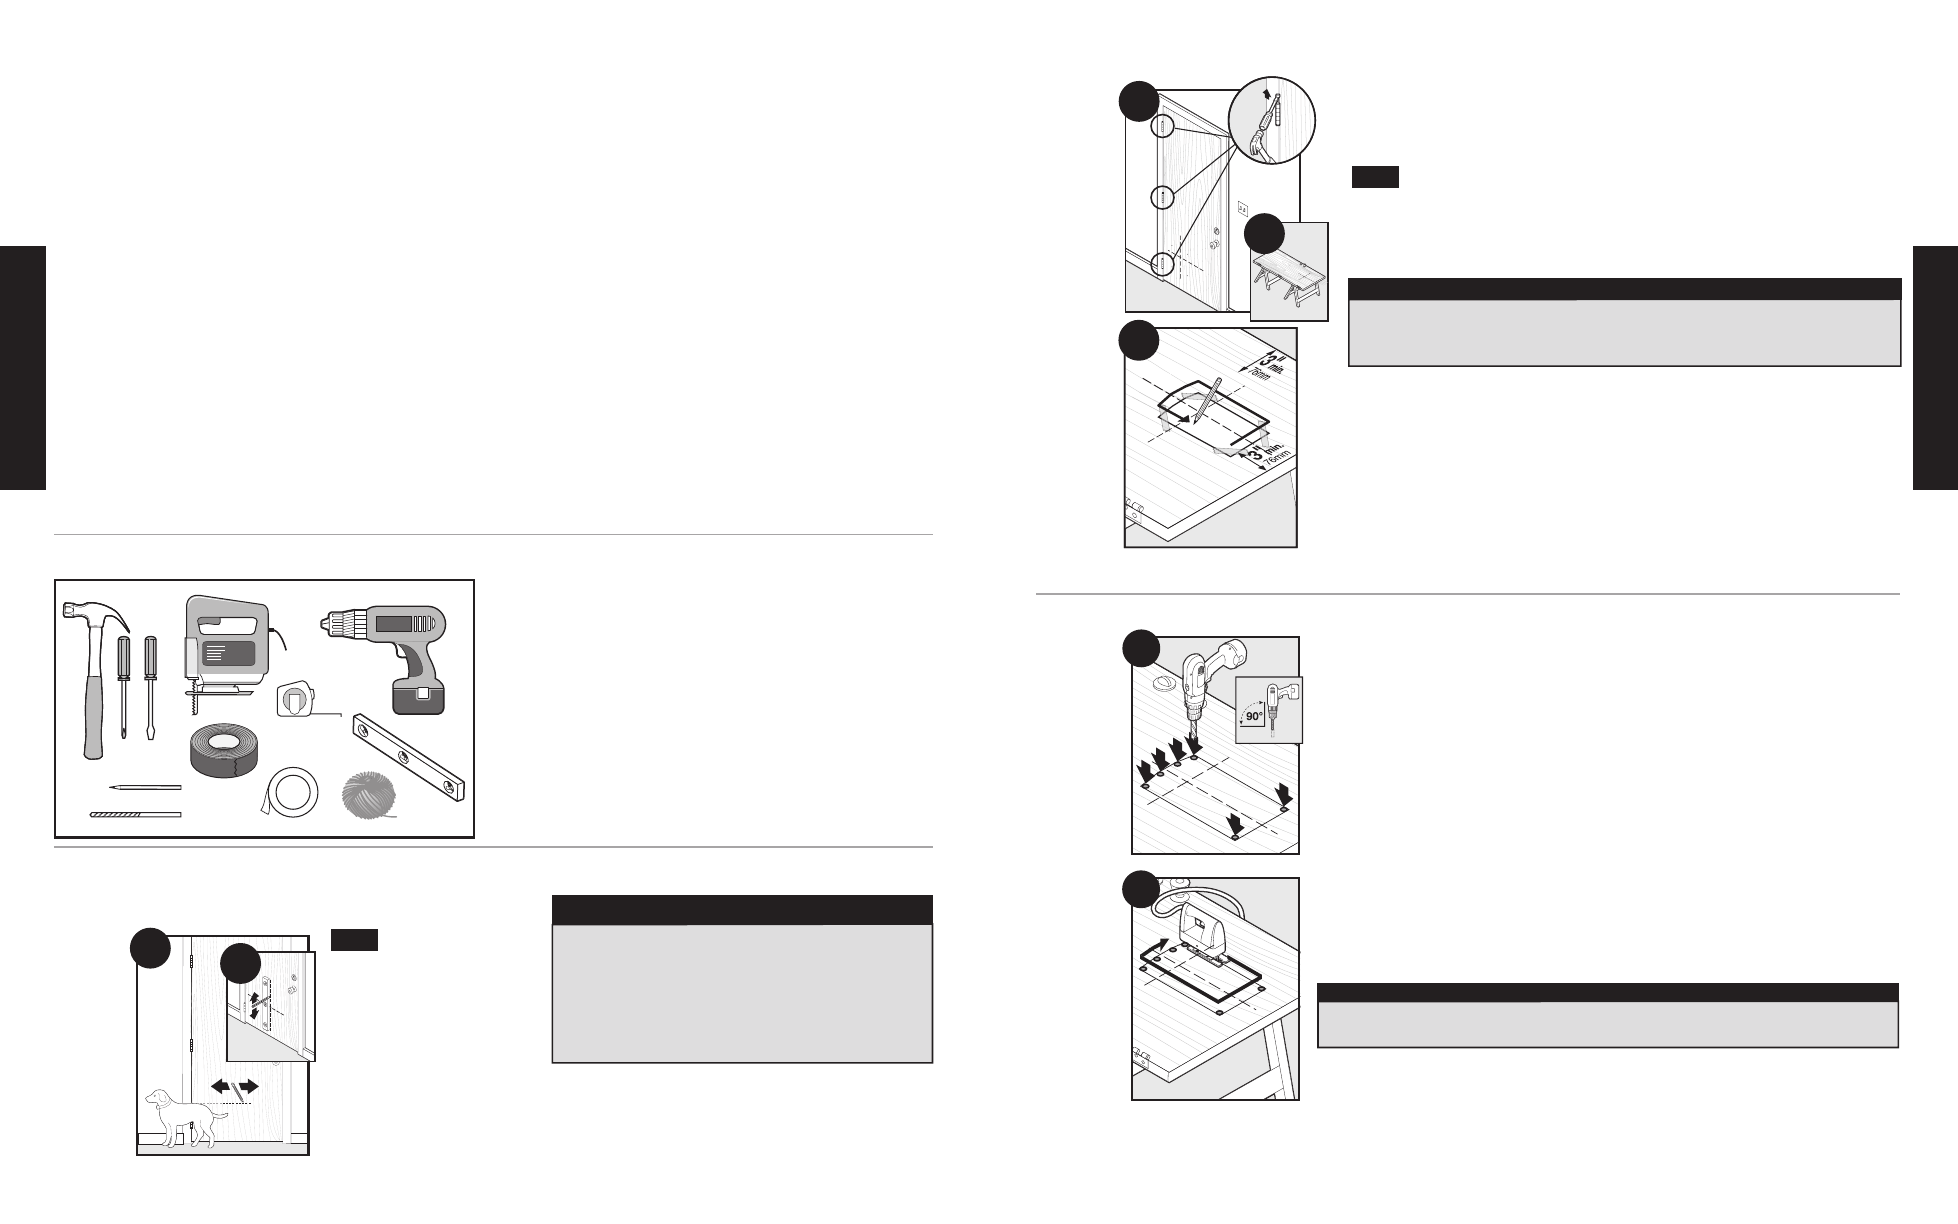
Preparing Door
2A Remove door by removing door hinge pins.
2B Place on a raised level surface such as saw horses. Place interior side of door facing up.
Helpful Tip: Clamp down or weight the door to prevent it from moving.
The Pet Door can be installed with the door hanging based on your skill level.
2C Match the marked lines on the door with the shoulder and center lines on the template.
Tape the template in place and carefully trace template. Make sure to trace underneath tape
and connect the corners. Remove the template and any excess tape from the door.
Cut Pet Door Opening
3A Drill ½” holes in inside corners and center of top angle of drawn template.
Helpful Tip: Use both hands to hold drill steady and straight at a
90° angle.
Helpful Tip: Before cutting pet door opening, apply painter’s or masking tape on jigsaw blade
guide and along outer edges of drawn template to help protect door surface from marks and
scratches during cutting.
3B Beginning in one of the holes just drilled, cut along the drawn template lines. After cutting out
the opening, you may need to recut to square the opening. This is necessary for the pet door
frame to fit correctly.
Helpful Tip: Use proper saw blade length and type according to door thickness and material
(for example a wood blade for a wood door and a metal blade for a metal door). Cut slowly
using both hands to hold the saw steady and straight at a 90° angle. This will prevent the blade
from cutting unevenly between interior and exterior sides of the door.
Helpful Tip: If cut piece does not fall out, check underside of door to make sure exterior side has
been cut.
2A
2B
2C
Note:
NOTICE
When applying cutting template there should be a minimum of 3” between the bottom
and sides of the door and the outer edge of the cutting template to maintain the
structural integrity of the door.
Step
2
3A
Step
3
3B
NOTICE
Make sure there is nothing underneath the door where you will be drilling the holes or
cutting the opening.
INSTALLATION
Checklist Before Installation
Before installing the Passport Pet Access Smart System
™
, it is important to consider the following:
*
Clock battery is installed.
*
If using the power adapter, you have located a power outlet in planned location on inside of home where power adapter can plug in. If not,
you have a power cord extension to reach the outlet or are using the optional Passport
™
Rechargeable Battery instead (sold separately) as the
power source.
*
Planned location has been checked for possible radio-frequency interference by ensuring all common household appliances and electronic
devices are at least 2 feet away (60 cm).
*
Power adapter and motion sensor wire have been disconnected or if using optional Passport
™
Rechargeable Battery, it has been removed.
*
“Initial User Setup” steps to set the language, time and date have been completed.
*
Each pet to use the Passport
™
has a Passport Key
™
and is successfully programmed to the pet door.
*
Each Passport Key
™
has been tested in the installation location on both interior and exterior side and the Passport
™
can read each key.
*
If installing in a door, will any components of the Passport Pet Access Smart System
™
be obstructed by the door opening and closing?
*
If installing in a wall, do you have a Passport
™
Wall Entry Kit? The Passport
™
fits doors or applications 1” to 2” thick. Wall installations and
thicker applications 3½” up to 12” require the Passport
™
Wall Entry Kit (sold separately, see “Replacement Parts and Accessories”
page 29).
*
If installing in a wall, are there any objects (such as doors, shrubs, heat pump, etc.) that could obstruct the Passport
™
once installed?
*
If installing in a wall, have you check for electrical and plumbing fixtures in the wall where you plan to install the Passport
™
.
Want Professional Installation Help?
Invisible Fence
®
Brand installers (where available) may come to your home and install your new PetSafe
®
Pet Door for an additional cost. Contact
the Invisible Fence
®
Brand Customer Care Center at
1-877-866-DOGS (3647) or visit the website at www.invisiblefence.com for more
information.
Tools Needed
• Hammer
• Jigsaw*
• Phillips Screwdriver
• Slotted Screwdriver
• Drill
• ½” Drill Bit
• Level
• Tape Measure
• Masking or Painter’s Tape
• Duct Tape
• String
• Pencil
• Safety Equipment
•
optional: Caulk
INSTALLATION IN A NON-GLASS DOOR
Determine Pet Door Location
Disconnect power adapter
from Passport
™
(or remove optional
rechargeable battery if using) and
disconnect the motion sensor wire
from exterior frame prior to
installation.
1A Measure and mark your pet’s
shoulder height on the interior side of door. Draw a level line at your pet’s shoulder height.
1B Determine location for the pet door. Draw a vertical center line through the shoulder height line
using a level.
Helpful Tip: Mark shoulder height and vertical center line lightly with a pencil or on a piece of tape
so marks can easily be erased or removed.
*
With appropriate blade type and length;
example, a metal door would require
a blade for metal.
Step
1
NOTICE
• Read this entire guide prior to cutting or modifying an
opening in your door or wall. Do not proceed with cut-out
or installation until your Passport
™
is assembled, powered
up, programmed for your pet, and all steps under
“Prepare, Setup and Test” have been completed.
• If homeowner’s door or other application is not level, the
pet door must be installed level to swing properly.
1A
1B
Note: