Test passport key, Prepare passport key, Program pet – Petsafe Passport™ Pet Access Smart System User Manual
Page 7: Get ting st ar ted get ting st ar ted, Understanding read range
12
Customer Care Center 1-800-732-2677
www.petsafe.net
13
GET
TING ST
AR
TED
GET
TING ST
AR
TED
If your pet’s Passport Key
™
is not successfully programmed, you will receive a failure message on the LCD screen. If the Passport
™
does not program
your pet’s Passport Key
™
after a few tries, double check for household appliances, electronic devices , or any other Passport Key
™
accessories in the
area that may be interfering and remove them from the location. Try to program your pet’s Passport Key
™
again. If you continue to have issues, move
the Passport
™
to another location and follow the “Program Pet” steps once more. If the attempt to program your
pet’s Passport Key
™
in the new location is unsuccessful, please contact our Customer Care Center for additional
help.
DO NOT PROCEED WITH INSTALLATION.
Once you successfully complete programming of your pet’s Passport Key
™
to the Passport
™
, the Pet Settings
menu will display. All programmed pets will be listed at the bottom of the screen. You are now ready to
proceed to “Test Passport Key”.
Test Passport Key
™
Once your pet’s Passport Key
™
has been programmed, it is important to test to make sure it is working properly and can be read by the Passport
™
in
your planned installation location. Testing should be done on both the interior and exterior side of the location for each programmed Passport Key
™
.
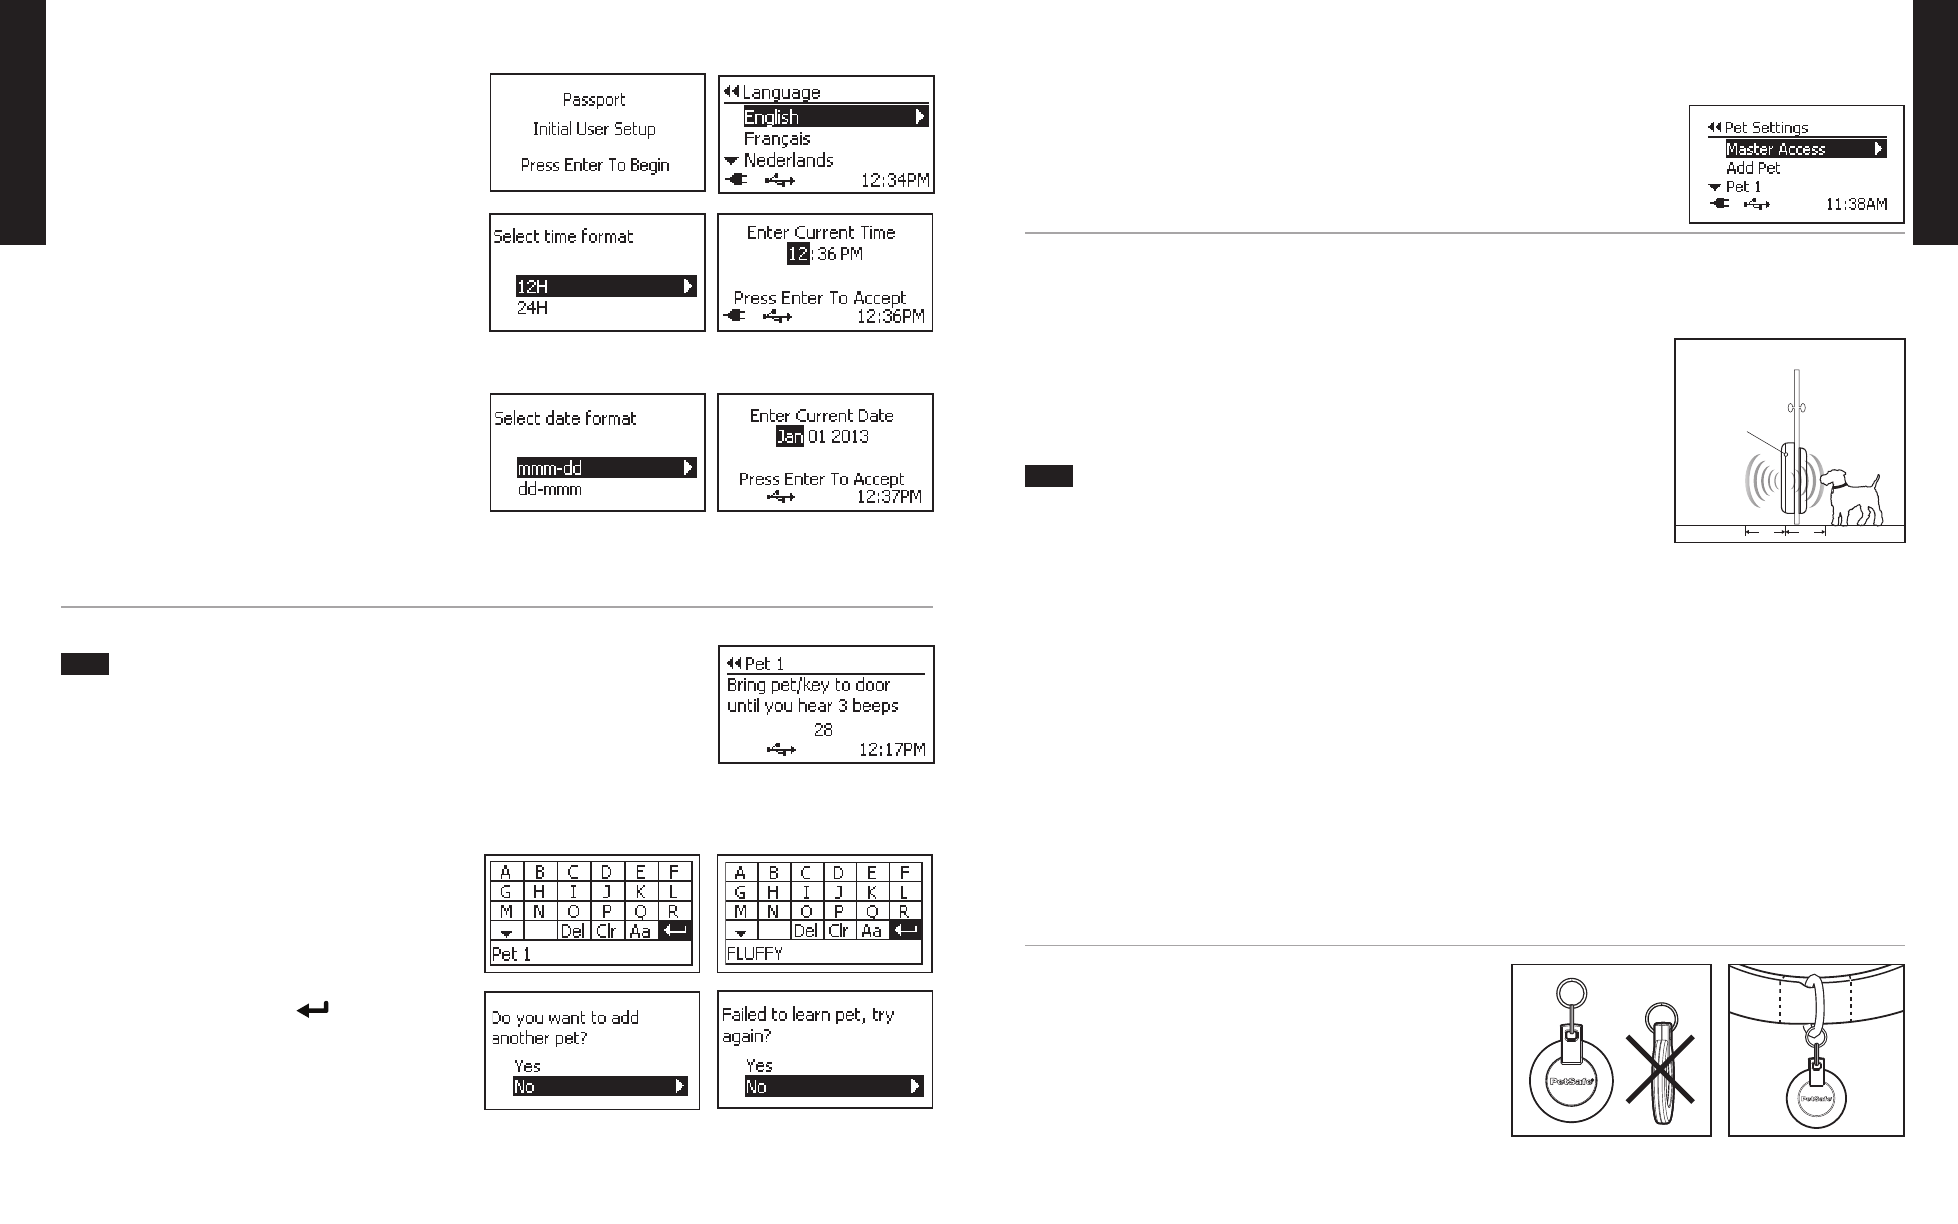
Understanding Read Range
Prior to testing the Passport Key
™
, it is important to understand the Read Range of the Passport
™
. Read
Range is the distance between the Passport Key
™
and the Passport
™
when it first detects the key and triggers
the flap system to unlock or operate as programmed for your pet. The Read Range can be up to 10” or it
may be less depending on the location and application in which the Passport
™
is installed. The mechanism
which detects and reads the Passport Key
™
is located within the interior pet door frame. Due to this, you
may see slight differences between the Read Range on the inside and outside of the Passport
™
.
To test the Passport Key
™
, the Passport
™
Door Operational Mode must be set to Smart Mode
(which is default factory setting). Check to make sure the Passport
™
is in Smart Mode (see “Door Opera-
tional Modes”
page 19) prior to testing.
To Test Key:
1. Place the Passport
™
directly in front of interior side of door or installation application in the upright position. It is VERY IMPORTANT the Passport
™
is
vertical and not leaning so the flap system will operate properly and not jam.
2. Stand to side of Passport
™
out of view of interior motion sensor. Do not stand in front of Passport
™
or this could cause the motion sensor to not
operate properly.
3. While standing to side, wave your hand back and forth in front of motion sensor to activate. Next, hold your pet’s programmed Passport Key
™
10”
to 12” away from flap and parallel to flap. Slowly move toward flap until the Passport
™
reads Passport Key
™
and flap system unlocks. Push through
flap with your hand to check Passport
™
flap unlocked on interior side.
4. After testing from interior side, go to exterior side of your installation location. Turn Passport
™
around where exterior frame is facing you.
5. Again, stand to side of Passport
™
. Repeat waving your hand back and forth in front of motion sensor to activate and test if the Passport
™
is reading
the Passport Key
™
. Make sure to push through flap with your hand to check flap unlocked on exterior side.
6. If you have multiple pets, repeat this test for each programmed Passport Key
™
.
If the Passport
™
does not read your pet’s programmed Passport Key
™
after several testing attempts, you may need to relearn the key (see “Relearn
Pet” page 26). Make sure you relearn the Passport Key
™
at 5” to 6” from the flap then test the key again. If the Passport
™
will still not read the key,
move to another location and follow key testing steps once more. If the “To Test Key” steps continue to be unsuccessful, contact our Customer Care
Center for additional help (see “Customer Care International” page 29).
DO NOT PROCEED WITH INSTALLATION.
If the Passport
™
is reading your pet’s programmed Passport Key
™
and ALL steps under “Prepare, Setup and Test” were successful, you can proceed
with preparing your pet’s Passport Key
™
and installation.
IF ANY STEPS UNDER “PREPARE, SETUP and TEST” WERE UNSUCCESSFUL,
DO NOT PROCEED WITH INSTALLATION. Contact our Customer
Care Center for assistance (see “Customer Care International” page 29).
Prepare Passport Key
™
Attach the Passport Key
™
to your pet’s collar using the included split key rings.
For best results, attach the Passport Key
™
to the front of your pet’s collar. The
Passport Key
™
should hang under your pet’s neck and parallel to the flap so the
Passport
™
can properly read the key.
10”
10”
READ RANGE
Main Flap
with Reader
outSIDE
InSIDE
Note:
✔
To use the Passport
™
control panel to begin setup, press the enter key on 5-Star Navigation and follow steps below:
Select Language
The Passport
™
is factory-set to the English language. To change
language:
1. Use up and down arrow keys to highlight desired language.
2. Press enter/select key or right arrow key on highlighted language
to select.
Select Time Format
The Passport
™
clock can be set to 12-hour or 24-hour format. To select
time format and set time:
1. Use up and down arrow keys to highlight desired time format. Press
enter or right arrow key to select.
2. Press up or down arrow keys to set current hour. Press right arrow
key to move to minute field.
3. Press up or down arrow keys to set current minute.
4. If in 12-hour format, press right arrow key to move to AM/PM field. Press up or down arrow key to toggle between
AM/PM.
5. Press enter key to accept time.
Select Date Format
The date can be set to month/day or day/month format. To select
date format and set date:
1. Use up and down arrow keys to highlight desired date format. Press
enter or right arrow key to select.
2. Press up or down arrow keys to set month or set day. Press right
arrow key to move to next field.
3. Press up or down arrow keys to set day or set month. Then press right arrow key to move to year field.
4. Press up or down arrow keys to set year. After setting last field, you are ready to program your pet’s Passport Key
™
to the pet door. Ensure your
pet’s Passport Key
™
is nearby
before pressing enter to accept date and start programming key. Programming the Passport Key
™
to
the Passport
™
is time sensitive.
Program Pet
Only one pet/Passport Key
™
at a time can be programmed. Any other Passport Key
™
near the pet
door will prevent proper programming. Also, do NOT hold the Passport Key
™
in your hand against LCD
screen when you press enter key to accept date and start programming pet. This could prevent the Passport
Key
™
from programming properly.
To program Pet:
1. After pressing the enter key to accept date, you will have 30 seconds to program your pet’s Passport Key
™
to the Passport
™
. The LCD screen will show a 30 second countdown.
2. Hold the Passport Key
™
5” to 6” from center of main flap and parallel to flap. Patiently hold key in this position and wait for it to program during
the 30 second countdown. DO NOT HOLD KEY AGAINST FLAP. It is very important Passport Key
™
is programmed at least 5” to 6” from flap so
the Passport
™
will consistently read the key when worn by your pet.
3. When your pet’s Passport Key
™
is successfully programmed, you
will hear three beeps and the rename pet text screen will appear.
Pet n (with n being the next available number) will be listed at the
bottom of the screen. You can leave the pet name as default Pet n
or you can rename the pet.
4. To rename pet, use arrow keys on 5-Star Navigation to scroll
through text entry screen to
Clr. Press enter/select key on 5-Star
Navigation to clear name. Use arrow keys to select letters on text
screen to type pet’s name. Select the
symbol on text screen
to complete the new name.
5. A screen will display asking if you want to program additional
pets. If you are programming an additional pet, ensure your pet’s
Passport Key
™
is close by since you only have 30 seconds to
program the key. Repeat for all pets you want programmed to use
the Passport
™
. If multiple pets have been programmed, you may
want to keep a list of which pet is Pet 1, Pet 2, etc. if you did not rename pets.
Example:
Note: