Pet settings, Master access, Master access modes – Petsafe Passport™ Pet Access Smart System User Manual
Page 11: Timer mode (master access), Low battery mode, Language, Progr amming progr amming, Setting timer mode, Change low battery mode, Change language
20
Customer Care Center 1-800-732-2677
www.petsafe.net
21
PROGR
AMMING
PROGR
AMMING
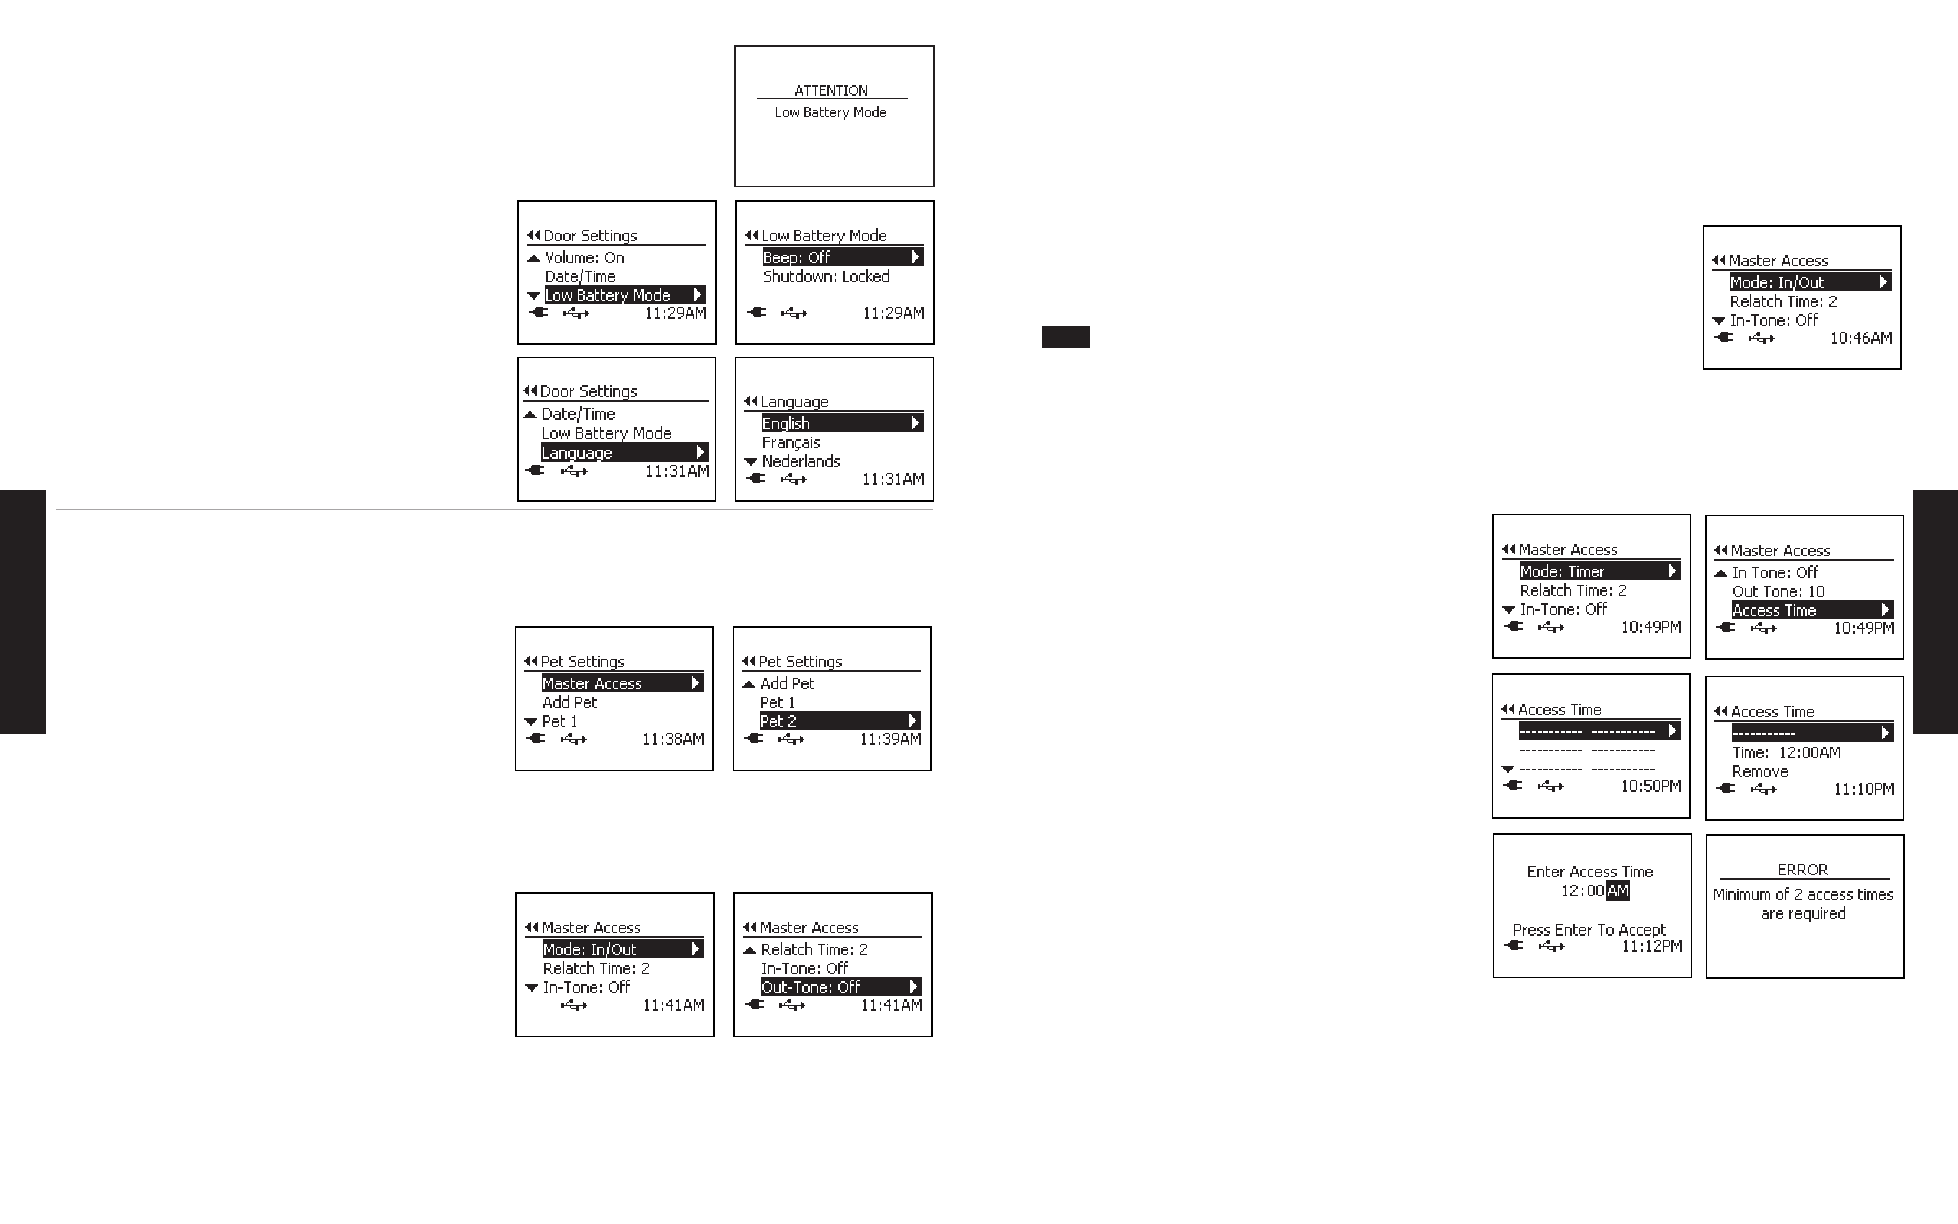
Master Access Modes
There are 4 Master Access Modes: In/Out, In-Only, Out-Only and Timer.
In/Out: The default access mode and allows any pet wearing a programmed Passport Key
™
to enter or exit as they please.
In-Only Mode: Allows pet(s) wearing a programmed Passport Key
™
to enter through the Passport
™
but pet(s) cannot exit. This is useful if you need
to take your pet(s) to the vet or if you want to keep your pet(s) in at night.
Out-Only Mode: Allows pet(s) wearing a programmed Passport Key
™
to exit through the Passport
™
but pet(s) cannot enter.
Timer Mode: Allows the other access modes (In/Out, In-Only, Out-Only) to be programmed at specific times of day for pet(s) wearing a
programmed Passport Key
™
. Four programmable time slots available with a
minimum of two programmed times required.
To Change Master Access Mode:
1. To change the Master Access Mode, from
Main Menu select Setup > Pet Settings > Master Access.
Use right arrow key to select. Mode will be displayed at top of Master Access Menu.
2. Use right arrow key to scroll through and select desired mode option (
In/Out, In-Only, Out-Only or
Timer). Press left arrow/back key to return to Main Menu.
If Timer Mode is selected, Access Times must be set with a minimum of two programmed times
required (see “Timer Mode” page 21).
Timer Mode (Master Access)
Timer mode under Master Access Mode allows you to easily set the Passport
™
to one of the other access options (In/Out, In-Only, or Out-Only) at
specific times of day for all pets wearing a programmed Passport Key
™
. This is useful if you want your pets to have a certain access during a specific
time period (for example at night). There are four programmable time slots available with a
minimum of two programmed times required. The two
times are required to prevent your pet from accidentally being locked out or in.
Setting Timer Mode:
1. From
Main Menu select Setup > Pet Settings > Master Access >
Mode.
2. Press right arrow key to scroll to
Timer option to select.
3. Once Timer Mode has been selected, Access Time will appear at bottom
of Master Access Menu list. Use down arrow key to highlight
Access
Time then right arrow key to select.
4. The Access Time screen will list four available time slots. Press right arrow
key to select first time slot.
5. The first line listed on Access Time menu is to select the pet access mode.
Use right arrow key to scroll through and select desired pet access mode:
In/Out, In-Only or Out-Only.
6. Use down arrow key to highlight
Time. Press right arrow key to enter
specific time for your pet(s) to have type of access you just selected in
step 5. After you use arrow keys to enter desired time, press enter key to
accept. Press left arrow/back key to return to Access Time menu screen.
7. Use down arrow key to highlight second time slot. Press right arrow key
to select. Repeat steps 5 & 6 to select pet access mode and scheduled
time for the access. Repeat steps for as many times as you want to
schedule.
Remember a minimum of 2 programmed times are
required but up to 4 time slots are available. After you select and enter
desired access options and scheduled times, review the Access Time
menu screen to make sure what you entered is correct.
If 2 time slots have NOT been programmed, you will receive
an error screen. The Master Access Mode will then default
back to In/Out Mode.
Note:
Low Battery Mode
When powered by the rechargeable battery, the Passport
™
enters Low Battery Mode before the battery
becomes too low to properly operate the flap. An alert will appear on the LCD screen when the Passport
™
enters
Low Battery Mode. In Low Battery Mode, the Passport
™
flap shutdown position can be set to either Open or
Locked. Also an optional audible beep can be set to notify you when the battery is low. The factory settings for
Low Battery Mode are Locked for the flap shutdown position and Off for the audible beep.
Change Low Battery Mode:
1. From
Main Menu select Setup > Door Settings. Use down arrow
key to highlight
Low Battery Mode. Press right arrow key to select.
2. Use down arrow key to highlight which setting to change. Use right
arrow key to change the setting. Press left arrow/back key to return to
Main Menu.
Language
The Passport
™
default language setting is English. The Language screen
allows the language of the Passport
™
to be changed.
Change Language:
1. From
Main Menu select Setup > Door Settings. Use down arrow
key to highlight
Language and right arrow key to select.
2. Use up and down arrow keys to highlight desired language. Press right
arrow key to change language. Press left arrow/back key to return to
Main Menu.
PET SETTINGS
The Passport
™
allows you to set the same access option and settings for all pets with the Master Access option or to set access and custom settings by
individual pet within the Pet Settings menu.
To open the Pet Settings menu, from the
Main Menu select Setup> Pet Settings. The Pet Settings screen displays the following options:
Master Access: Easily allows the same pet access mode and pet settings
to be set for all pets. This is the default factory pet setting for all pets when
first programmed to the Passport
™
.
Add Pet: Allows additional pets to be programmed to the Passport
™
with
the purchase of additional Passport Key
™
accessories (sold separately). Up
to 20 pets can be programmed.
Pet n (or Pet Name): Where Pet n’s (or Pet Name) individual access and
pet settings can be changed. All pets that have been successfully programmed
to the Passport
™
will show under Pet Settings menu below Add Pet.
Master Access
With Master Access, you can easily set the same access option and settings for all pets programmed to the Passport
™
without the need to individually
program by pet. Master Access is the default access setting when pets are first programmed to the Passport
™
. Door Operational Mode must be set to
Smart Mode for Master Access setting to work (see “Door Operational Modes” page 19).
To open the Master Access menu from
Main Menu select Setup > Pet
Settings > Master Access. Under the Master Access menu you will
find the following options:
Mode: Access mode for any pet set to Master Access. There are four
access modes: In/Out (which is default factory setting), In-Only, Out-
Only and Timer.
Re-latch Time: Amount of time the Passport
™
multi-point locking U-flap
system takes to re-latch and lock once a Passport Key
™
is no longer
detected for any pet set to Master Access.
In-Tone: Optional audible tone that sounds when any pet set to Master Access and wearing a programmed Passport Key
™
comes in. Default
factory setting is Off with 10 sound options available.
Out-Tone: Optional audible tone that sounds when any pet set to Master Access and wearing a programmed Passport Key
™
goes out. Default
factory setting is Off with 10 sound options available.