Wireless connection, Battery operation, Prepare, setup and test – Petsafe Passport™ Pet Access Smart System User Manual
Page 6: Install clock battery and power adapter, Understanding motion sensors, Check for radio-frequency interference, Select installation location, Initial user setup, Get ting st ar ted get ting st ar ted, Notice
10
Customer Care Center 1-800-732-2677
www.petsafe.net
11
GET
TING ST
AR
TED
GET
TING ST
AR
TED
Downloading Software:
Open your browser and visit
http://petsafe.rscconnect.com. Click the
register button and complete registration steps. Your Passport
™
serial
number is required for registration (see “Serial Number” page 27). Select
Passport
™
Door from “Add Product” drop down box and click “Add”
button. Next, click “Download Software” link to download Passport
™
Computer Application software. To complete “Initial User Setup” steps
using Computer Application, follow Door Setup Wizard. After the
Passport
™
Computer Application software has been downloaded, use it to
easily program your Passport
™
and customize your pet’s access.
Wireless Connection
A Wireless Connection, which connects to the Passport
™
Wireless Card (sold separately, see “Replacement Parts and Accessories” page 29), is
located on the Passport
™
control panel above the USB connection. The Passport
™
Wireless Card works with your home’s wireless router and is
required for remote, wireless operation from your computer, tablet or smartphone. See the “Passport
™
Wireless Card Operating Guide” for more
information.
Battery Operation
An optional, rechargeable lithium-ion battery is available to use with the Passport
™
(sold separately, see “Replacement Parts and Accessories” page
29). The Passport
™
Rechargeable Battery can be used for full operation of the Passport
™
or as a battery back-up option in case of a power loss. See
the “Passport
™
Rechargeable Battery Operating Guide” on how to install and use the rechargeable battery.
PREPARE, SETUP AND TEST
Install Clock Battery And Power Adapter
The Passport
™
is shipped with the clock battery not installed. This is to prevent loss of battery life before purchase
and use. The 3-V lithium coin cell battery (size CR2032) will need to be installed before proceeding with setup,
testing and installation. The battery is required to keep the clock’s time during any power loss. Typical battery life
is about 1 year with normal use and operating power from power adapter or optional rechargeable lithium-ion
battery (sold separately). With no operating power, the expected battery life is about 10 weeks. If you will not
be using the Passport
™
or have no operating power for an extended period of time, it is recommended to remove
the clock battery to prevent loss of battery life. When clock battery needs replaced, if battery has not been
installed, or if installed incorrectly, you will receive an alert on the LCD screen.
To install clock battery: Remove clock battery cover from back of
interior frame. Battery slot is located on left side of circuit board. Insert
battery with positive (+) side facing the right side of the battery slot.
Make sure battery is fully inserted. Reinsert battery cover and push to
snap into place.
To install power adapter: The Passport Pet Access Smart System
™
is
supplied with a low-voltage AC adapter for power. Insert power
adapter into concealed power connection located underneath bottom of
interior frame.
An optional rechargeable lithium-ion battery is available to use with the
Passport
™
(sold separately, see “Replacement Parts and Accessories”
page 29). If using the Passport
™
Rechargeable Battery instead of adapter
for power source, insert it into battery compartment on right side of interior
frame (see “Passport
™
Rechargeable Battery Operating Guide” on how to
install the rechargeable battery).
NOTICE
Read this entire guide prior to cutting or modifying an opening in your door or wall. Do not proceed with cut-out or installation until your
Passport
™
is assembled, powered up, programmed for your pet and all steps under “Prepare, Setup and Test” have been completed.
Pull and lift
here
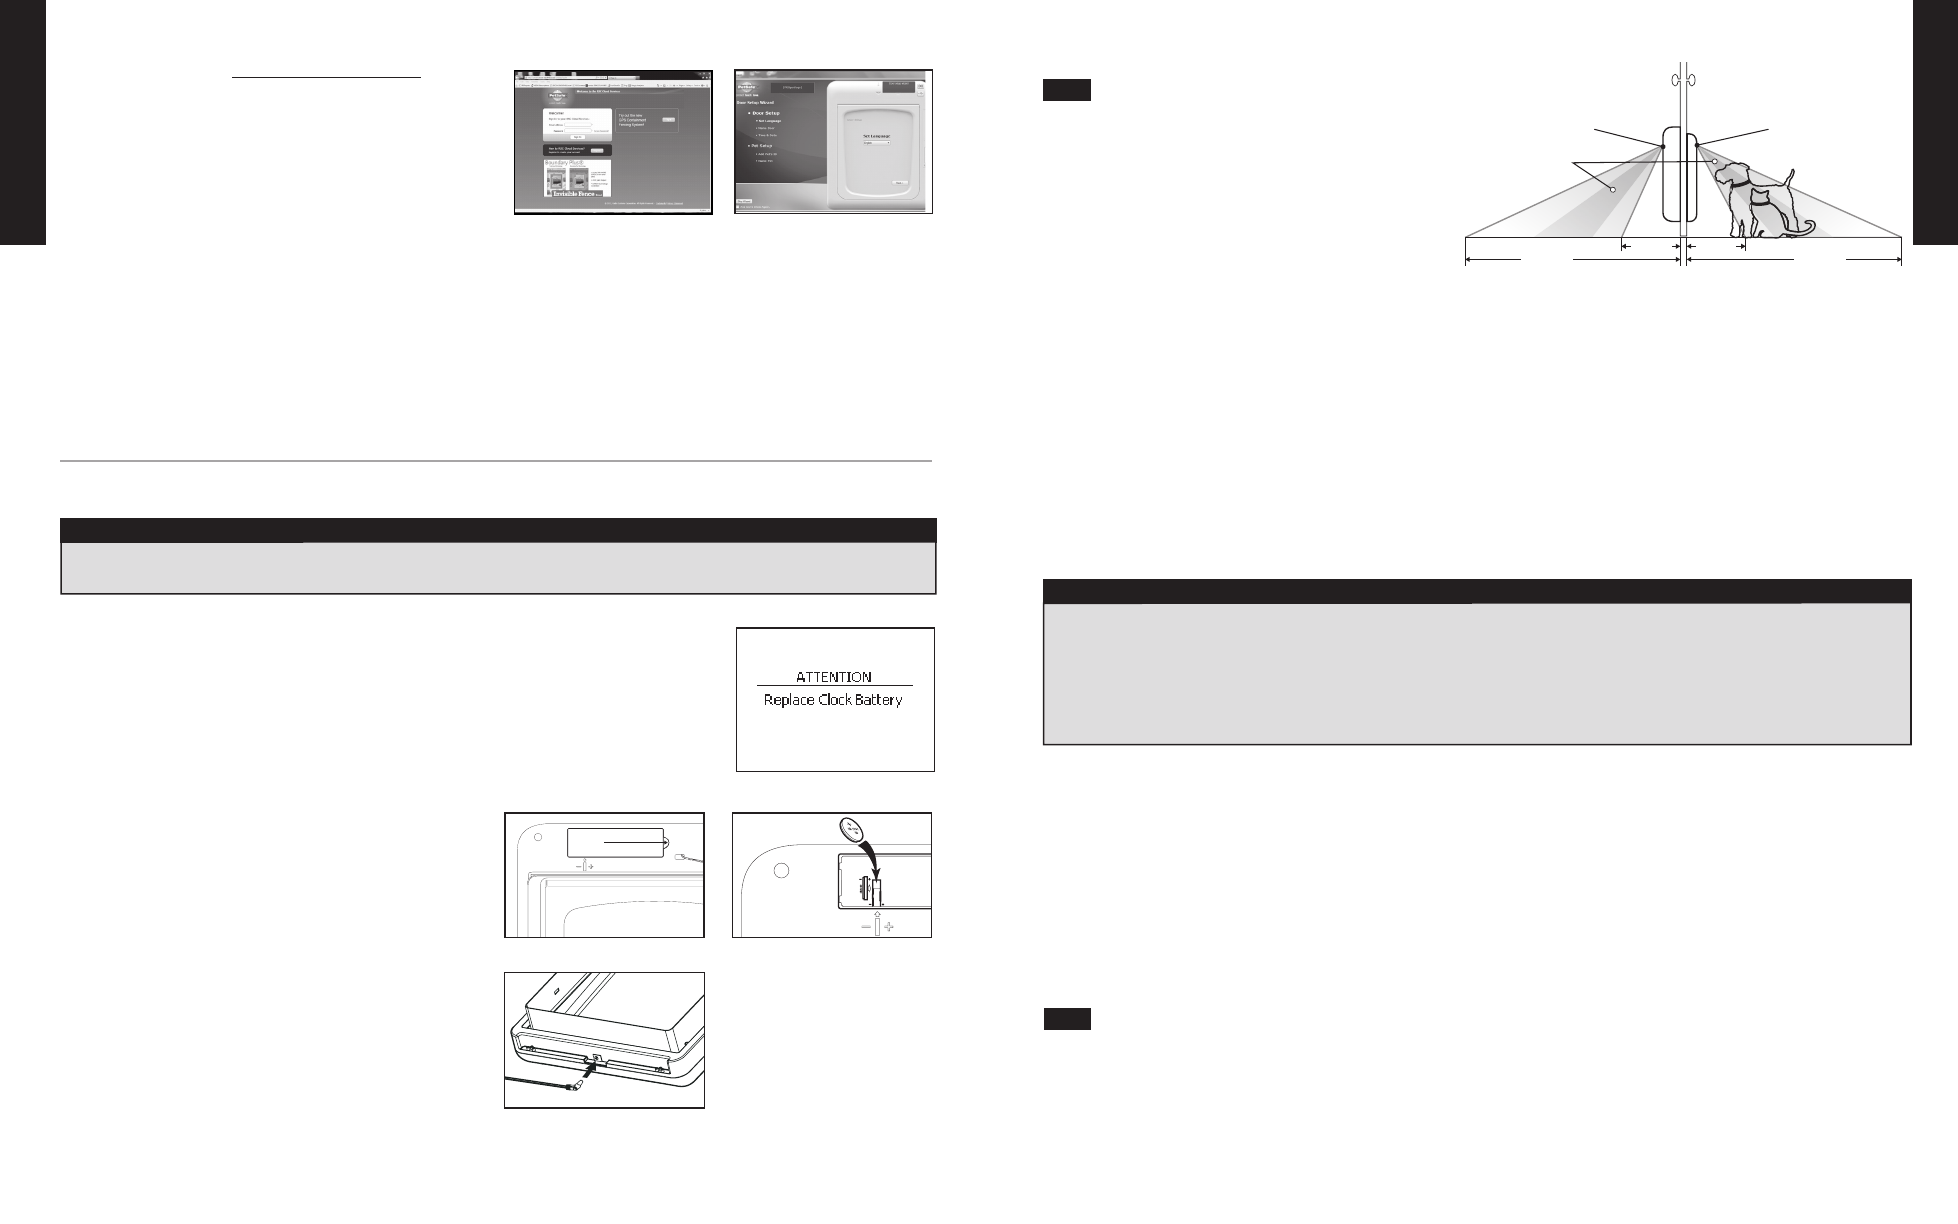
Understanding Motion Sensors
For testing purposes, the Passport
™
motion sensor wire
should have been connected from the interior frame to exterior
frame at the factory. Before proceeding with the next steps, make
sure the motion wire is connected or the Passport
™
will not detect
the Passport Key
™
and open from the outside during testing (See
“Installation In a Non-Glass Door” Step 4F page 16 for
connecting motion sensor wire).
It is important to understand how the Passport
™
interior and exterior
motion sensors work and keep this in mind when selecting your
installation location. When the Passport
™
motion sensors detect
movement, they trigger the reader, which detects and reads the
Passport Key,
™
to turn on. The areas where the motion sensors can detect motion are called the Motion Sensing Zones. Where your pet is detected
within the Motion Sensing Zones can depend on your pet’s size and hair type, surrounding temperatures, and the location where the Passport
™
is
installed. For example, if your pet has longer hair, it may take longer for the motion sensors to detect your pet. Also, if your Passport
™
is installed in a
location with stairs on one side, the motion sensor will detect your pet differently on the side with the stairs than on the side without the stairs. Blind Zones
are areas where the motion sensors cannot detect your pet and the Passport
™
will not read your pet’s Passport Key
™
.
Check for Radio-Frequency Interference
Prior to installation, it is recommended to set-up, program and test the Passport Pet Access Smart System
™
in the intended installation location or
application to check for possible radio-frequency interferences. These interferences could negatively affect the Passport
™
from working properly and
receiving the signal of the Passport Key
™
. Common household appliances and electronic products should be located at least two feet (61cm) away
from the location where the Passport
™
will be installed. Typical household products to consider are microwaves, televisions, wireless telephones,
computers, garage door openers and hand-held electronic devices such as remote controls or game stations.
Select Installation Location
The Passport
™
must be installed in a location where the LCD screen, battery compartment and power adapter are not exposed to outside elements
such as rain or snow. The power adapter is for inside use only. It is recommended to install the Passport
™
in a location where prolonged exposure to
direct sunlight is not a factor. Passport
™
operating temperature range is: -5° F to 131° F (-20.5° C to 55° C).
Go to location where you plan to install the Passport
™
. Place the Passport
™
directly in front of door or desired installation location in the upright
position. Make sure the Passport
™
is vertical and not leaning so flap will operate properly. If using supplied power adapter, find closest power
outlet. Plug in adapter to power the pet door. The power adapter cord is 6’ in length. If power adapter cord will not reach closest outlet, you
will need a power cord extension, or to use the optional Passport
™
Rechargeable Battery (both sold separately, see “Replacement Parts and
Accessories” page 29) or find an alternative location to install the Passport
™
.
Keep the Passport
™
in front of the door or application in the upright, vertical position and proceed to “Initial User Setup”, “Program Pet” and “Test
Passport Key
™
” steps to continue to check for radio-frequency interferences and check the motion sensors.
Initial User Setup
A Passport Key
™
is required for your pet to be programmed to and access the Passport Pet Access Smart System
™
. One Passport Key
™
is
included. Additional Passport Key
™
accessories are available for multiple pet households (sold separately, see “Replacement Parts and Accessories”
page 29). The Passport
™
can be programmed for up to 20 Passport Key
™
accessories or pets. Have your pet’s Passport Key
™
nearby before
beginning the “Initial User Setup” steps. Programming is time sensitive with 30 seconds for the Passport
™
to read and store the unique ID of your pet’s
Passport Key
™
. If you are programming multiple pets, it is important to note which key belongs to which pet.
The Initial User Set Up and Programming Pet steps quickly get your Passport
™
ready for you and your pet to use. These steps can be completed using
the Passport
™
control panel or the Passport
™
Computer Application. To use the Computer Application, see “Connect Passport
™
to Computer” page 9.
1’–1 ½’
1’–1 ½’
2½’– 3 ½’
2½’– 3 ½’
Motion Sensing
Zones
Interior
Motion Sensor
Exterior
Motion Sensor
outSIDE
InSIDE
Blind
Zone
Blind
Zone
Note:
NOTICE
•The unit only operates properly while outside temperatures are greater than -5°F (-20.5°C) and less than 131° F (55°C). If operating
from optional rechargeable lithium-ion battery, the battery and battery compartment cannot be exposed to temperatures below 32°F
(0°C).
•Do not install in a location where the Passport™ interior frame, including the LCD screen and battery compartment, and the power adapter
are exposed to damp or wet conditions or to water or outside elements, such as rain or snow.
•Do not use power adapter in temperatures below 32° F (0° C) or above 104° F (40° C). Power adapter for inside use only.
•To avoid tripping, always position the power cord out of the path of foot traffic.
Note: