Individual pet settings, Pet access (individual pet), Re-latch time (master access) – Petsafe Passport™ Pet Access Smart System User Manual
Page 12: In-tone & out-tone (master access), Add pet, Progr amming progr amming
22
Customer Care Center 1-800-732-2677
www.petsafe.net
23
PROGR
AMMING
PROGR
AMMING
Timer Mode Example: It might be helpful to think of Timer Mode in the form of a 24 hour or clock timeline. If you want your pet(s) to have full
access during the daytime (for example, from 7 am in the morning until the late evening) but want your pet(s) to be indoors at night (for example,
starting at 7 pm), you would want to set the access mode to
In/Out at 7 am and then the access mode to In-Only at 7 pm.
To Remove Timer Mode Access Time:
1. From
Main Menu select Setup > Pet Settings > Master Access > Mode.
2. Press right arrow key to scroll to Timer option to select.
3. Once Timer has been selected, Access Time will appear at bottom of
Master Access Menu list. Use down arrow key to highlight
Access Time
then right arrow key to select.
4. Use up and down arrow keys to highlight which Access Time slot you
wish to remove. Press right arrow key to select.
5. Use down arrow key to highlight
Remove and right arrow key to
select. The time slot on the Access Time Menu should now be removed.
Remember you must have a minimum of two programmed
Access Times for Timer Mode to work.
Timer Mode can be disabled by setting a different Master Access Mode, while keeping the programmed Timer Mode Settings. This might
be useful if you want to use Timer Mode during the week and a different Master Access Mode on the weekend.
Re-latch Time (Master Access)
The Re-latch Time is the amount of time it takes the pet door flap to re-lock after the Passport Key
™
is no longer
detected. Under Master Access the same Re-latch Time is easily set for all pets. The factory default Re-latch
Time is set to 2 seconds but can be changed from 1 second to 60 seconds. A longer Re-latch Time may be
needed if you have older or slower pets.
To Change Re-latch Time:
1. From
Main Menu select Setup > Pet Settings > Master Access. Use right arrow key to select.
2. Use down arrow key to highlight
Relatch Time then use right arrow key to scroll through to find desired Re-latch Time. Press left arrow/back
key to return to Main Menu.
In-Tone & Out-Tone (Master Access)
Optional audible alerts can easily be set for all pets wearing a programmed Passport Key
™
to let you know when they enter or exit with the In-Tone
and Out-Tone settings. The default factory setting for both In-Tone and Out-Tone is off, but these can easily be changed to one of 10 audible tones.
Note:
Door Operational Mode must be set to Smart Mode for In-Tone and Out-Tone to work.
To Change In-Tone Or Out-Tone:
1. From
Main Menu select Setup > Pet Settings > Master Access.
Use right arrow key to select.
2. Use down arrow key to highlight
In-Tone or Out-Tone (whichever
one you want to change). Use right arrow key to scroll through the
ten options to select desired audible tone (each tone will play when
selected) or to turn tone off. Press left arrow/back key to return
to Main Menu.
12 am
7 am
12 pm
7 pm
11 pm
In Only
In/Out
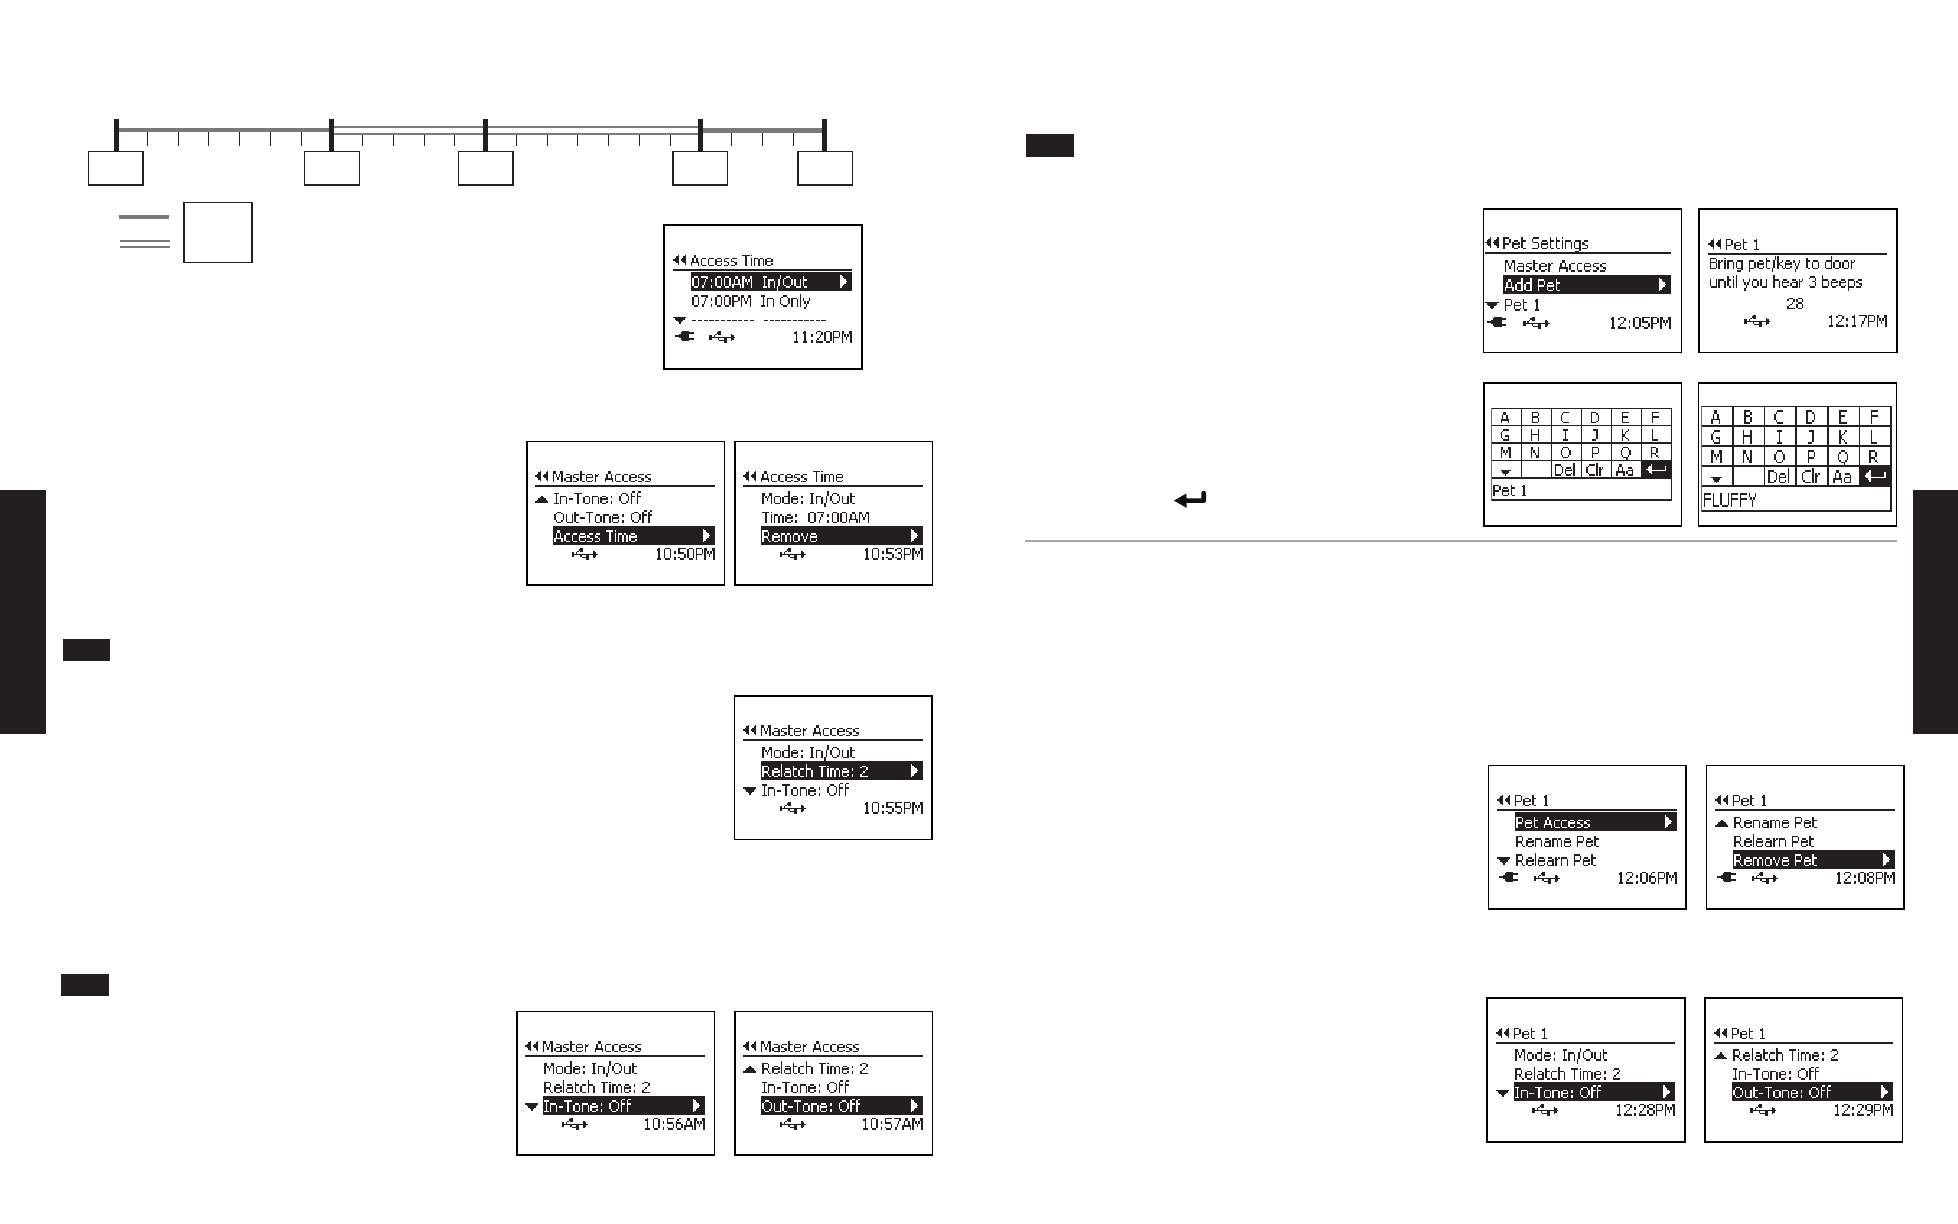
After using Timer Mode to
program the example listed, the
Access Time menu screen would
display:
Example:
Note:
Add Pet
The Passport Pet Access Smart System
™
allows up to 20 pets to be programmed or added with the purchase of additional Passport Key
™
accessories
(see “Replacement Parts and Accessories” page 29. Adding a pet’s Passport Key
™
is time sensitive. You will have 30 seconds to add a pet to the
system so make sure pet’s Passport Key
™
is nearby before adding pet.
Only one pet/Passport Key
™
at a time can be programmed. Any other Passport Key
™
accessories near the pet door will prevent proper
programming. Also, do NOT hold the Passport Key
™
in your hand against the LCD screen when you select Add Pet. This could prevent the Passport
Key
™
from programming properly.
To Add Pet:
1. Go to
Main Menu > Setup > Pet Settings > Add Pet.
2. Hold the Passport Key
™
5” to 6” from center of main flap and parallel to
flap. Patiently hold key in this position and wait for it to program during
the 30 second countdown. DO NOT HOLD KEY AGAINST FLAP. It is
very important Passport Key
™
is programmed at least 5” to 6” from flap
so the Passport
™
will consistently read key when worn by your pet.
3. When your pet’s Passport Key
™
is successfully programmed, you will
hear three beeps and the rename pet text screen will appear.
Pet n (with n
being the next available number) will be listed at the bottom
of the screen. You can leave the pet name as default Pet n or you can
rename the pet.
4. To rename pet, use arrow keys on 5-Star Navigation to scroll through
text entry screen to
Clr. Press enter/select key on 5-Star Navigation to
clear name. Use arrow keys to select letters on the text screen to type
pet’s name. Select the
symbol on text screen to complete the new
name. Repeat these steps for each pet you want to add to the Passport
™
.
Individual Pet Settings
The individual pet settings allow you to customize settings and access to the Passport
™
by pet for pets wearing a programmed Passport Key
™
. It is
very useful if you have multiple pets which need different access options or settings (for example the cat needs different access than the dog). The
default individual pet setting is Master Access until changed. Also if you have a different setting programmed for an individual pet, it
overrides the
Master Access settings for that specific pet. Door Operational Mode must be set to Smart Mode for the individual pet settings to work (see “Door
Operational Modes” page 19).
To change access and settings for a specific pet, from
Main Menu select Setup > Pet Settings. Use down arrow key to highlight desired pet,
then press right arrow key to select.
Under each individual pet menu you will find the following options:
Pet Access: Menu where you can change the Access Mode, Re-latch time,
In-tone and Out-tone for an individual pet.
Rename Pet: Allows the default Pet n (where n is the next available
number) name assigned by the Passport
™
to be changed to actual pet name
or allows name to be changed.
Relearn Pet: Allows Passport
™
to keep a pet’s programmed settings if for
some reason the pet has to be re-programmed (for example, if replacing
the pet’s Passport Key
™
).
Remove Pet: Allows a pet who is programmed to the Passport
™
to be
deleted with all programmed settings removed.
Pet Access (Individual Pet)
Under each individual pet, the Pet Access menu allows the Access Mode,
Re-latch Time, In-Tone and Out-Tone to be changed for that specific pet.
To open the Pet Access menu, from
Main Menu select Setup > Pet
Settings > Pet n (or name of pet) > Pet Access. Press right arrow key to
select. Under the Pet Access menu are the following options:
Mode: Access mode set for the individual pet which overrides the Master
Access Mode. There are five modes: Master (which is the default factory
setting), In/Out, In-Only, Out-Only and Timer.
Note:
Example: