Operation, Xpres – Xpres Cut Lite User Manual
Page 14
Operation
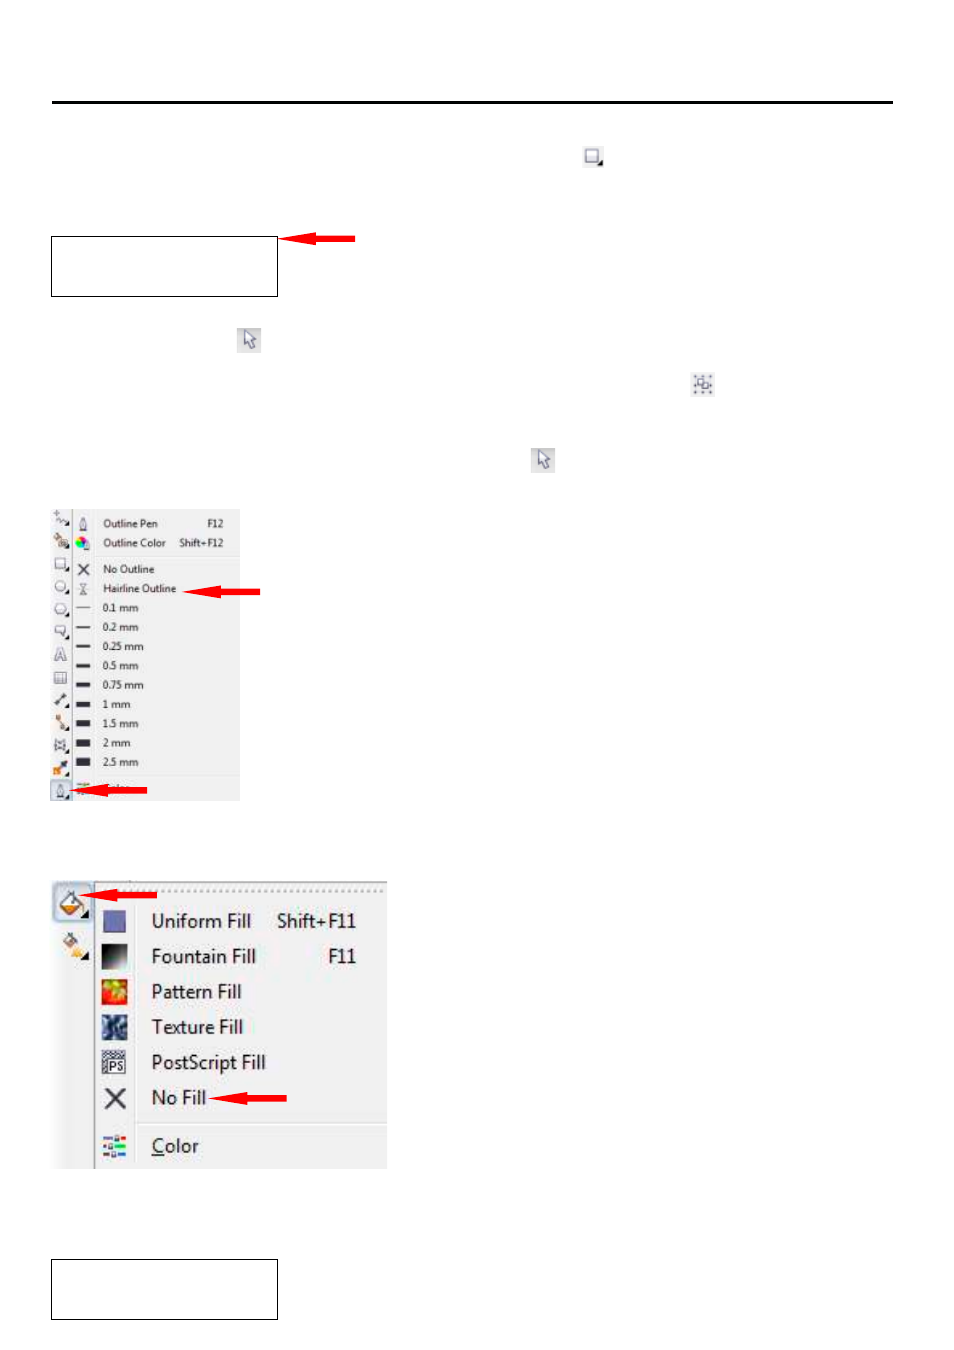
3. Draw a weed box around the text using the Rectangle Tool ( ) as shown below. This gives us a
start point for weeding once the transfer has been cut. (With the Rectangle Tool selected, Left click
and drag the cursor around the desired objects).
XPRES
Weed Box
4. With the Pick Tool ( ), left click in a blank area of the page and drag the cursor over the text and
the weed box whilst holding left click, this will allow you to select both the text and the weed box as
one object. You can now group these objects together (Arrange > Group or ). See ‘Grouping and
Ungrouping’ on page 8 for more information.
5. Making sure the image is selected with the Pick Tool ( ), as explained in step 4, click on the
‘Outline Tool’ and select ‘Hairline Outline’.
6. Now click on the ‘Fill Tool’ and select ‘No Fill’.
Your text should now look like the following, with no fill to the design and the outline set to a hairline
outline:
XPRES
Note: The cutter will only recognise Hairline Outlines. Every design
must be set to a Hairline Outline to allow the cutter to operate.
12
- 3D SMARTone (25 pages)
- Canvas (2 pages)
- Banner (2 pages)
- Crystal Print (5 pages)
- Easy Dome (12 pages)
- Gem Tec (8 pages)
- Sign Vinyl Application Guide (2 pages)
- SubliJet IQ EPSON Stylus PRO 4880 (Windows Power Driver Setup): Power Driver Installation & Getting Started Guide (52 pages)
- SubliJet IQ EPSON Stylus PRO 4880 (Windows Power Driver Setup): Print & Setup Guide CorelDRAW X5 (6 pages)
- SubliJet IQ EPSON Stylus PRO 4880 (Windows Power Driver Setup): Print & Setup Guide Photoshop CS5 (5 pages)
- SubliJet IQ EPSON Stylus PRO 4880 (Windows Power Driver Setup): Print & Setup Guide Illustrator CS5 (6 pages)
- SubliJet IQ EPSON Stylus PRO 4880/4450 (Windows Power Driver Setup): Sublimation Cartridge Quick Start Guide (2 pages)
- SubliJet IQ EPSON Stylus PRO 4880 (Windows Power Driver Setup): Sublimation Ink Configuration Guide (1 page)
- SubliJet E Epson Stylus Pro 7700 (Windows Power Driver Setup): Power Driver Installation Guide (16 pages)
- SubliJet E Epson Stylus Pro 7700 (Windows Power Driver Setup): Printer Setup (4 pages)
- SubliJet E Epson Stylus Pro 7700 (Windows Power Driver Setup): Print & Setup Guide CorelDRAW 12 - X4 (3 pages)
- SubliJet E Epson Stylus Pro 7700 (Windows Power Driver Setup): Print & Setup Guide CorelDRAW X5 (6 pages)
- SubliJet E Epson Stylus Pro 7700 (Windows Power Driver Setup): Print & Setup Guide Photoshop Elements 8 - 10 (4 pages)
- SubliJet E Epson Stylus Pro 7700 (Windows Power Driver Setup): Print & Setup Guide Illustrator CS4 - CS5 (6 pages)
- SubliJet E Epson Stylus Pro 7700 (Windows Power Driver Setup): Print & Setup Guide Photoshop CS5 (6 pages)
- SubliJet E Epson Stylus Pro 7700 (Mac ICC Profile Setup): Printer/Profile Installation Guide (17 pages)
- SubliJet E Epson Stylus Pro 7700 (Mac ICC Profile Setup): Print & Setup Guide Photoshop Elements 8 - 10 (7 pages)
- SubliJet E Epson Stylus Pro 7700 (Mac ICC Profile Setup): Print & Setup Guide Photoshop CS - CS4 (8 pages)
- SubliJet E Epson Stylus Pro 7700 (Mac ICC Profile Setup): Print & Setup Guide Photoshop CS5 (7 pages)
- SubliJet E Epson Stylus Pro 7700 (Windows ICC Profile Setup): Printer/Profile Installation Guide (15 pages)
- SubliJet E Epson Stylus Pro 7700 (Windows ICC Profile Setup): Driver Configuration Guide (6 pages)
- SubliJet E Epson Stylus Pro 7700 (Windows ICC Profile Setup): Print & Setup Guide CorelDRAW 10 - 12 (4 pages)
- SubliJet E Epson Stylus Pro 7700 (Windows ICC Profile Setup): Print & Setup Guide CorelDRAW X3 - X4 (4 pages)
- SubliJet E Epson Stylus Pro 7700 (Windows ICC Profile Setup): Print & Setup Guide CorelDRAW X5 (5 pages)
- SubliJet E Epson Stylus Pro 7700 (Windows ICC Profile Setup): Print & Setup Guide Photoshop Elements 8 - 10 (4 pages)
- SubliJet E Epson Stylus Pro 7700 (Windows ICC Profile Setup): Print & Setup Guide Illustrator CS4 - CS5 (4 pages)
- SubliJet E Epson Stylus Pro 7700 (Windows ICC Profile Setup): Print & Setup Guide Photoshop CS (4 pages)
- SubliJet E Epson Stylus Pro 7700 (Windows ICC Profile Setup): Print & Setup Guide Photoshop CS2 (4 pages)
- SubliJet E Epson Stylus Pro 7700 (Windows ICC Profile Setup): Print & Setup Guide Photoshop CS3 - CS5 (4 pages)
- SubliJet IQ Epson Stylus Pro 7890 - IQ Pro Photo (Mac ICC Profile Setup): Printer/Profile Installation Guide (16 pages)
- SubliJet IQ Epson Stylus Pro 7890 - IQ Pro Photo (Mac ICC Profile Setup): Printer Setup (4 pages)
- SubliJet IQ Epson Stylus Pro 7890 - IQ Pro Photo (Mac ICC Profile Setup): Print & Setup Guide Photoshop CS6 (7 pages)
- SubliJet IQ Epson Stylus Pro 7890 - IQ Pro Photo (Mac ICC Profile Setup): Print & Setup Guide Photoshop CS - CS5 (7 pages)
- SubliJet IQ Epson Stylus Pro 7890 - IQ Pro Photo (Mac ICC Profile Setup): Print & Setup Guide Photoshop Elements 8 - 11 (6 pages)
- SubliJet IQ Epson Stylus Pro 7890 - IQ Pro Photo (Windows ICC Profile Setup): Printer/Profile Installation Guide (15 pages)
- SubliJet IQ Epson Stylus Pro 7890 - IQ Pro Photo (Windows ICC Profile Setup): Driver Configuration Guide (3 pages)
- SubliJet IQ Epson Stylus Pro 7890 - IQ Pro Photo (Windows ICC Profile Setup): Print & Setup Guide CorelDRAW 12 - X4 (6 pages)
- SubliJet IQ Epson Stylus Pro 7890 - IQ Pro Photo (Windows ICC Profile Setup): Print & Setup Guide CorelDRAW X5 - X6 (7 pages)
- SubliJet IQ Epson Stylus Pro 7890 - IQ Pro Photo (Windows ICC Profile Setup): Print & Setup Guide Illustrator CS - CS6 (8 pages)
- SubliJet IQ Epson Stylus Pro 7890 - IQ Pro Photo (Windows ICC Profile Setup): Print & Setup Guide Photoshop CS - CS5 (6 pages)