Msi-9300 porta-weigh+ crane scale – Rice Lake MSI9300 PortaWeigh Crane Scale Operator Manual User Manual
Page 20
Page 20 MSI-9300 Crane Scale™
•
User Guide
MSI-9300 Porta-Weigh+ Crane Scale
SECTION 4 – THE EMBEDDED CELLSCALE
For a complete guide to all the features of the embedded CellScale, refer to the MSI-9000 User Guide.
ACCESSING THE CELLSCALE
MSI-9300 Series crane scales are a shell interface to an embedded CellScale. To access the advanced features
of the CellScale, a Comm Port is provided on the front casting of the crane scale. This Comm Port is only used
for interfacing to the embedded CellScale and cannot be used as an output of any kind.
The CellScale offers Set Points, ID Codes, and other advanced features which are controlled either through a
remote Indicators such as the MSI-3750CS, the MSI-9850, or the MSI-9750A Handheld. These features are
also accessed by connecting a terminal program in a PC to the Comm Port. Tested terminal programs that
function well with the CellScale include ProComm Plus, Qmodem, HyperTerm (shipped with many versions
of Windows), WinTerm, and ZTerm (for Macintosh). Usually a VT102 emulation is used. All commands are
single key except when entering data.
Settings for your terminal program are: 9600 baud, 8 bit, 1 start bit, 1 stop bit, no parity, Handshaking usually
not required, but you can turn on Xon/Xoff if you desire.
While the Comm Port is in use, the display of the MSI-9300 Series crane scale is in standby with the message
“C-Port” or “H-Port” displayed. The only key that will function in this mode is the Power key.
The CellScale Terminal Access Mode is used to set Network parameters, Scale parameters, Set Points, and
other various setup conditions. Refer to the MSI-9000 CellScale User Guide for detailed information. The Ter-
minal Access Mode is used for calibration on MSI-9300 Series crane scales that do not have the RF modem.
CONNECTION PROCEDURE
The MSI-9300 must be on and finished with its startup sequence before connecting the
terminal cable to a PC.
1) Without connecting the PC or Terminal to the MSI-9300, turn the MSI-9300 on. Wait for the startup
sequence to complete (usually about 10-15 seconds). When weight is displayed, the MSI-9300 is ready.
2) Press and Hold the
NET/GROSS
key and then push
TEST
. The display should change to “H-PORT”.
3) Connect the PC to the MSI-9300 through the Comm Port. Start your terminal emulation program with set-
tings 9600-N-8-1
4) You can now access the Terminal menus in the CellScale. Push any key to refresh the menu.
5) Once in the Terminal Access Mode menus, commands are usually a single number or letter. Refer to the
9000 CellScale User Guide for further information.
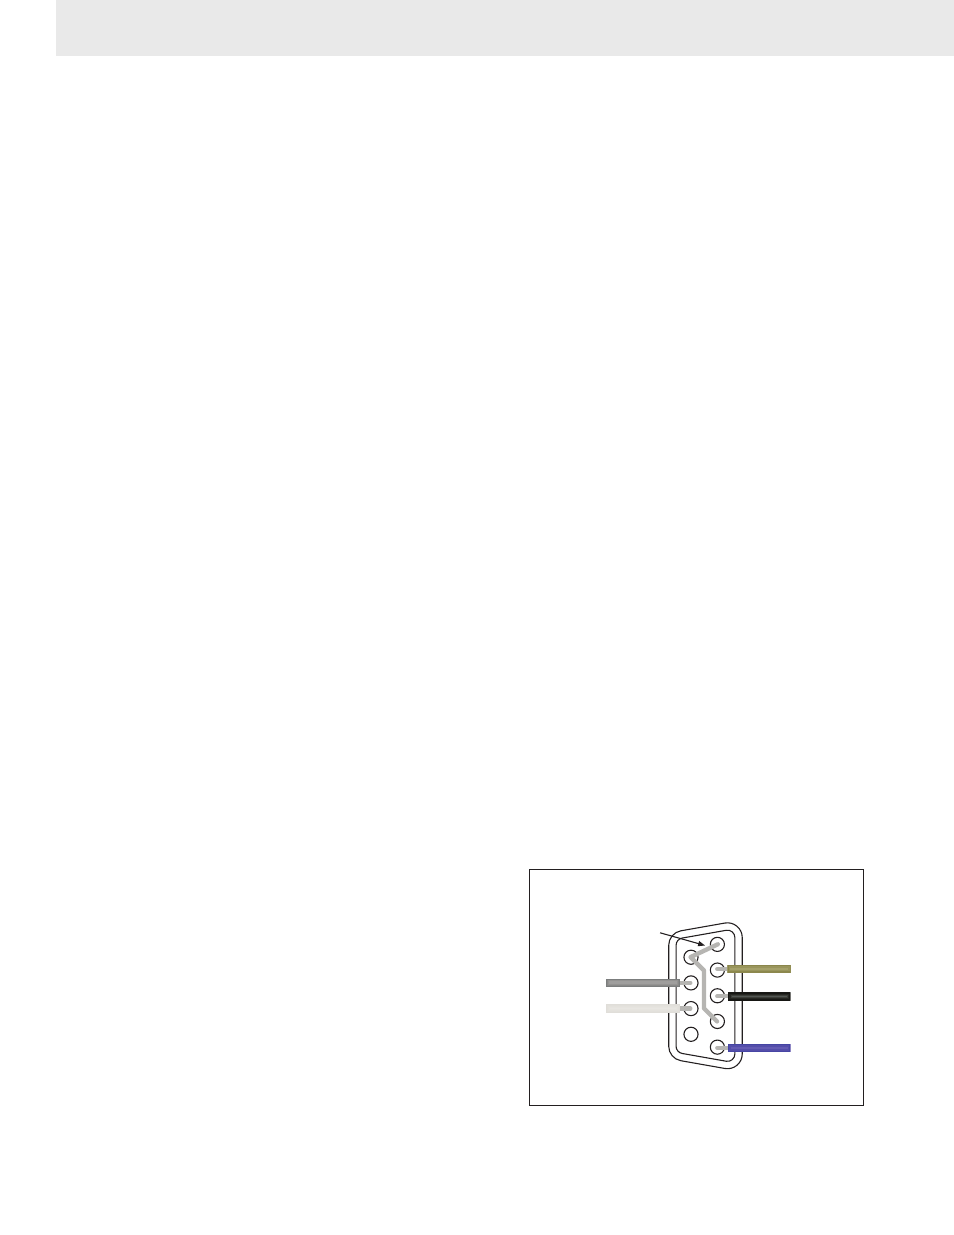
COMM PORT CABLE
The MSI-9300 comes standard with one Comm port cable wired for RS-232 (MSI P/N 501705-0001) follow-
ing the AT standard for 9 pin serial cables (DCE). An unterminated cable is available (MSI P/N 12023) if you
wish to wire your own serial cable for RS-232.
1
2
3
4
5
6
7
8
(NC) 9
Brown (TD)
Black (RD)
Blue (GND)
Grey (CTS)
White (RTS)
Jumper 1-6-4
RS-232 DCE
9-Pin Female ‘D’
Solder Cup View
Standard wiring for direct
9000 to Computer connection
Comm Port Cable Color Code RS-232
Brown – Transmit output from CellScale, connect to
receive of DTE.
Black – Receive input to CellScale, connect to trans-
mit of DTE.
Grey – CTS Input to CellScale. Connect to RTS or
RTR output of DTE.
White – RTS/RTR output from CellScale. Connect to
CTS input of DTE.
Blue – Signal Ground
Drain Wire – Connect to metal shell.