Arcmaster, 160ts, 02 hf tig & lift tig welding – Tweco 160 TS Arcmaster User Manual
Page 32
ARCMASTER
®
160TS
March 31, 2006
5-2
5.02 HF TIG & Lift TIG Welding
• Connect work lead to positive terminal
• Connect TIG torch to negative terminal
• Switch machine on
• Set WELD current.
• Connect remote control device. A remote control device
is required for use during LIFT TIG and HF TIG operation.
See section 3.01, section 2 “Remote Control Socket”,
for complete details of the remote device.
Use the Scroll Buttons to move to the parameter to be set.
The LED will show which function is being adjusted on the
weld sequence graph. Use the control knob to adjust each
parameter.
• Set PRE-FLOW time
• Set HOT START current
• Set POST-FLOW time
• Set WELD current
• Set POST-FLOW time
Slope Mode Parameters if required
• Set INITIAL CUR current
• Set UP SLOPE time
• Set (WELD) PEAK CUR current
• Set BASE current
• Set DOWN SLOPE time
• Set CRATER CUR current
Pulse Mode parameters if required
• Set PULSE WIDTH % for PEAK CURRENT
• Set PEAK CURRENT
• Set PULSE FREQ
Commence welding
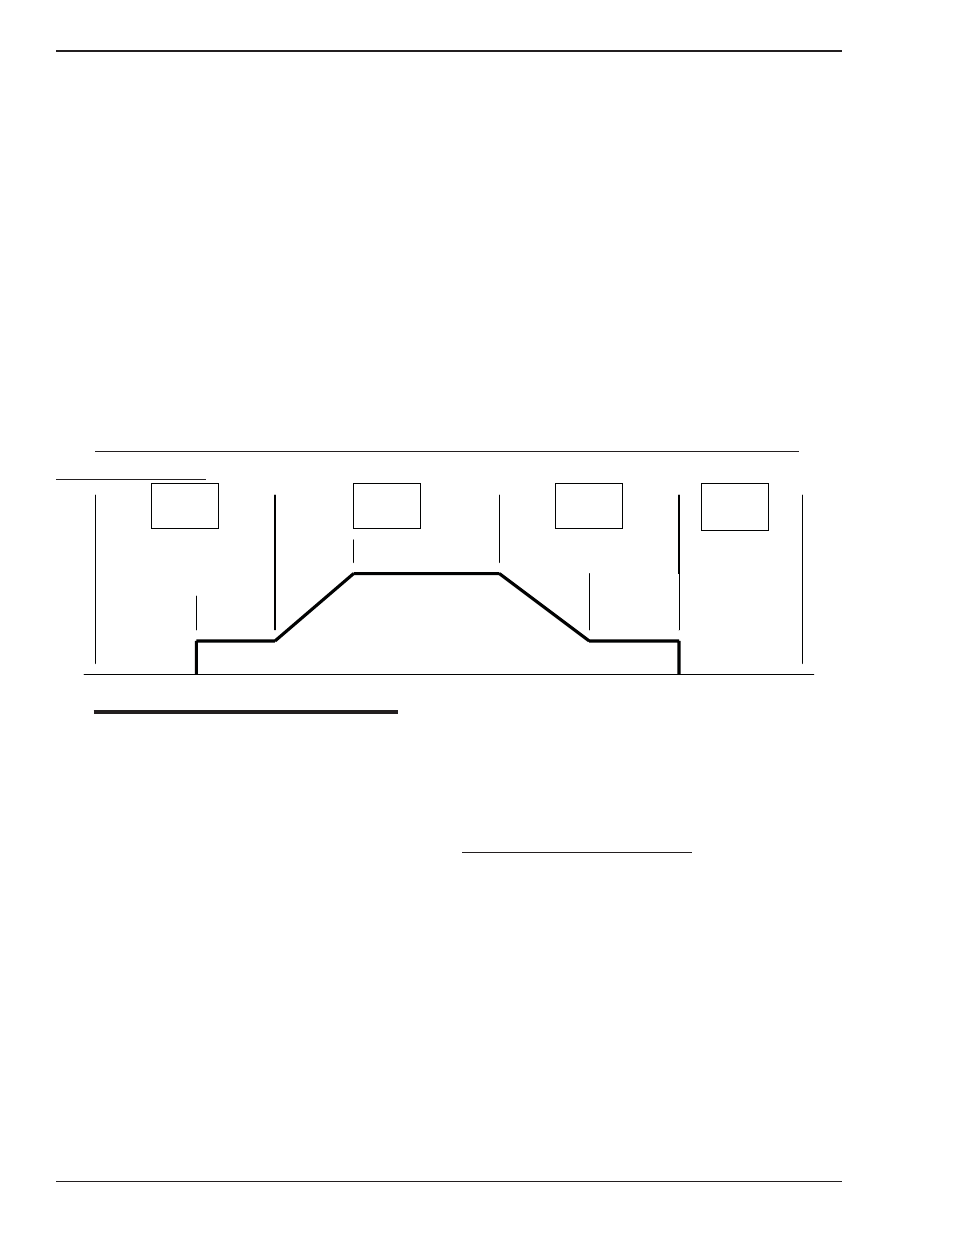
Slope Mode Sequence
Weld Current
Down
Slope
Up
Slope
Initial
Current
Switch
Closed
Switch
O pen
Switch
Closed
Switch
O pen
Preflow
Final
Current
Postflow
NOTE
Slope function operates with a Remote ON/OFF
device only.
1) To start Slope sequence Close remote switch contacts.
Once the welding arc is established the Power Source
will maintain initial current setting as long as the remote
switch contacts are closed.
a) In the HF TIG mode, after Pre-fl ow time High Frequency
is present at the torch. When the torch is positioned
close to the work the welding current will transfer to
the work and establish the arc at the initial current
setting.
b) In the Lift TIG mode, after pre-fl ow time Lift Start
current is present at the torch. When the electrode
is touched to the work and lifted off, the welding arc
is established at the initial current setting.
2) Open Remote Switch – current increases to weld current.
Once welding arc has reached weld current the power
source will maintain weld current as long as the remote
switch contacts are open.
3) Close Remote Switch – Welding current decreases to fi nal
current setting. Once fi nal welding current is reached the
power source will maintain fi nal current setting as long
as the remote switch contacts are closed.
4) Open Remote Switch – Welding arc stops and post fl ow
begins.
Slope Mode with repeat sequence
The repeat function is operated during the down slope cycle
of the Slope Sequence and is active through the down slope
period only. During the down slope period by opening the
Remote Switch contacts the current will increase back to weld
current. Within the Down Slope period the repeat function can
operated as many times as desired. To continue slope cycle
and end slope sequence close remote switch contacts and
allow weld current to reach fi nal current setting. Once fi nal
current setting is reached opening the Remote Switch again
will turn off the welding arc and post fl ow begins.