Troubleshooting – tekmar 279 Steam Control User Manual
Page 21
21 of 24
© 2010 D 279 - 05/10
Establish the problem. Get as much information from the customer as possible about the problem.
Is there too much heat, not enough heat, or no heat? Is the problem only in one particular zone or
area of the building or does the problem affect the entire system? Is this a consistent problem or only
intermittent? How long has the problem existed for? This information is critical in correctly diagnosing
the problem.
Understand the sequence of operation of the system. If a particular zone is not receiving enough heat,
which pumps or valves in the system must operate in order to deliver heat to the affected zone? If the
zone is receiving too much heat, which pumps, valves or check valves must operate in order to stop
the delivery of heat?
Press the Test button on the control and follow the control through the test sequence as described in
the Testing section. Pause the control as necessary to ensure that the correct device is operating as
it should.
Sketch the piping of the system. This is a relatively simple step that tends to be overlooked, however
it can often save hours of time in troubleshooting a system. Note flow directions in the system paying
close attention to the location of pumps, check valves, pressure bypass valves and mixing valves. Ensure
correct flow direction on all pumps. This is also a very useful step if additional assistance is required.
Troubleshooting
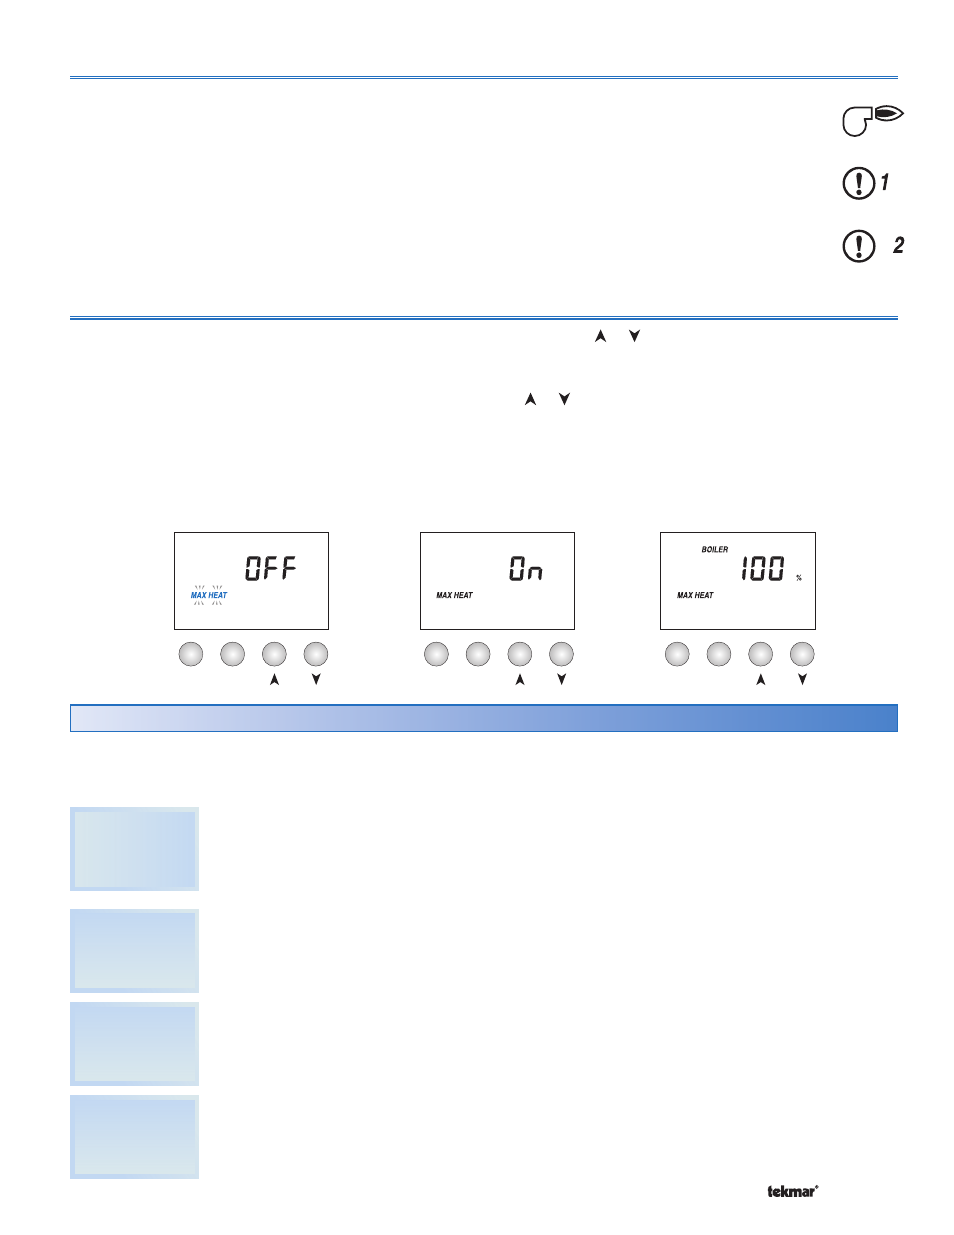
The control has a function called Max Heat. In this mode,
the control turns on and operates the steam system at the
percent output selected. The control continues to operate
in this mode for up to 24 hours or until the Menu, Item or
Test button is pressed.
To enable the Max Heat feature, use the following
procedure.
Press and hold the Test button for more than 3
seconds. At this point, the control flashes the MAX
HEAT segment and displays the word OFF.
1.
Establish the
Problem
Understanding
the Sequence of
Operation
Use the Test
Routine
Sketch the
Piping in the
System
When troubleshooting any heating system, it is always a good idea to establish a set routine to follow. By following a
consistent routine, many hours of potential headaches can be avoided. Below is an example of a sequence that can be
used when diagnosing or troubleshooting problems in a steam heating system.
Each step in the test sequence lasts 10 seconds.
During the test routine, the test sequence may be paused
by pressing the Test button. If the Test button is not pressed
again for 5 minutes while the test sequence is paused, the
control exits the entire test routine. If the test sequence is
paused, the Test button can be pressed again to advance
to the next step. This can also be used to rapidly advance
through the test sequence. To reach the desired step,
repeatedly press and release the Test button until the
appropriate device and segment in the display turn on.
Step 1
Turn on the Boiler relay for 10 seconds, then
shut off.
Step 2
Turn on the Alert 1 relay for 10 seconds,
then shut off.
Step 3
Turn on the Alert 2 relay for 10 seconds,
then shut off.
Menu
Item
Menu
Item
Menu
Item
Using the or button, select the word On. After 3
seconds the Boiler % is shown.
Select the desired boiler output percentage using the
or buttons.
To cancel the Max Heat mode, press the Menu, Item,
or Test button.
Once the Max Heat mode has either ended or is
cancelled, the control resumes normal operation.
2.
3.
4.
5.
Test Sequence
Max Heat