Decal installation, Center of gravity – E-flite Cessna 150 Aerobat 250 ARF User Manual
Page 27
27
E-flite Cessna 150 Aerobat 250 ARF Assembly Manual
Decal Installation
Required parts
Fuselage assembly Wing assembly
Required Tools and Adhesives
Spray bottle
Dish washing detergent
Paper towel
Hobby knife with #11 blade
1. Apply the decals to your model using the photos
located in this section of the manual and the box
art from your model. A drawing has also been
provided on page 35 showing decal placement.
Use a spray bottle and a drop of dish washing
liquid sprayed in the location of the decal to allow
repositioning of the decal. Use a paper towel as
a squeegee to remove excess water from under
the decal. Allow the model to rest overnight so the
remaining water can evaporate.
Center of Gravity
Required parts
Assembled airframe
Required Tools and Adhesives
Felt-tipped pen
Ruler
Phillips screwdriver: #2
Balancing stand (optional)
An important part of preparing the aircraft for flight is
properly balancing the model.
CAUTION: Do not inadvertently skip this step or
property damage and injury could occur.
1. Assemble your model in preparation for flight,
making sure the wing is on securely and the motor
battery is installed as instructed in this manual.
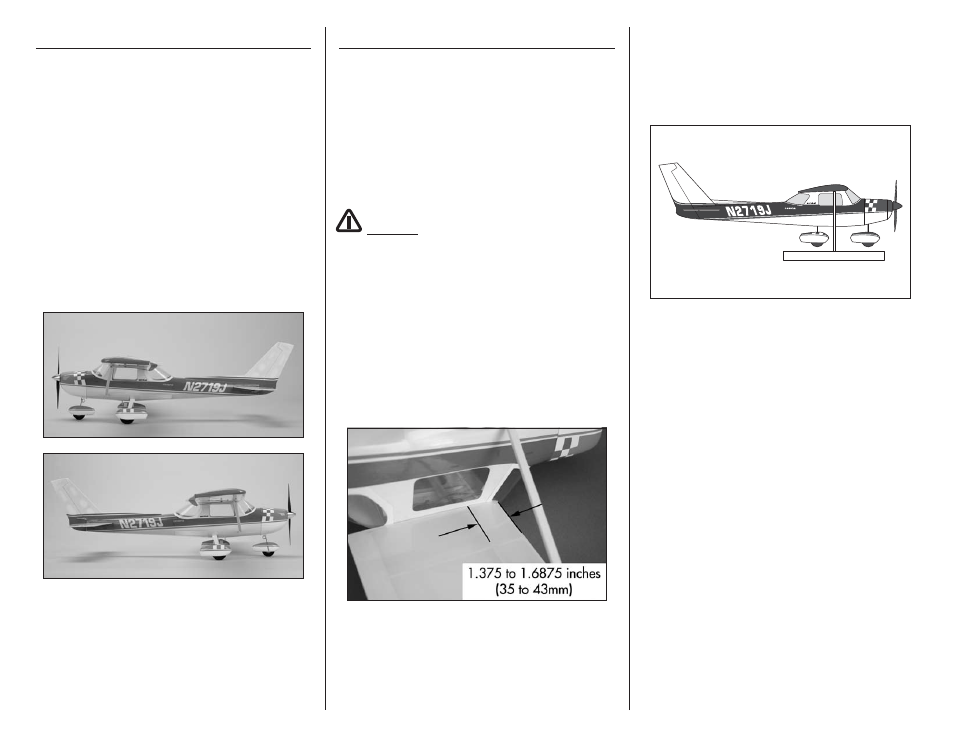
2. The recommended Center of Gravity (CG)
location for your model is 1.375 to 1.6875 inches
(35 to 43mm) back from the leading edge of the
wing as shown with the battery pack installed. Mark
the location of the CG on the bottom of the wing
with a felt-tipped pen.
3. When balancing your model, support the plane
upright at the marks made on the bottom of the
wing with your fingers or a commercially available
balancing stand. This is the correct balance point
for your model. Make sure your model is assembled
and ready for flight before balancing.
Balancing Stand
Adjust the motor battery as necessary so the model is
level or slightly nose down. This is the correct balance
point for your model. You should find the CG to be
very close with the battery installed as shown in this
manual. Mark the location of the battery on the battery
tray using a felt-tipped pen so it can be returned to this
position if it is removed from your model.
After the first flights, the CG position can be adjusted
for your personal preference.