Installation, Framing & finishing, Clean finish tile finish – Regency Bellavista B41XTCE Large Gas Fireplace User Manual
Page 14
14
Regency Bellavista™ B41XTCE Gas Fireplace
INSTALLATION
FRAMING & FINISHING
1. Frame in the enclosure for the unit with framing material.
Note: When constructing the framed opening, please ensure there is access to install the gas lines when the unit is installed.
2. For exterior walls, insulate the enclosure to the same degree as the rest of the house; apply vapour barrier and drywall, as per local installation codes.
(Do not insulate the fi replace itself.)
WARNING: Failure to insulate and add vapor barriers to the inside of the exterior wall will result in operational and performance problems
including, but not limited to: excessive condensation on glass doors, poor fl ame package, carbon, blue fl ames etc. These are not product
related issues.
3. The unit does not have to be completely enclosed in a chase. You must maintain clearances from the vent to combustible materials: See "Clearances"
section. Combustible materials can be laid against the side and back standoffs and the stove base.
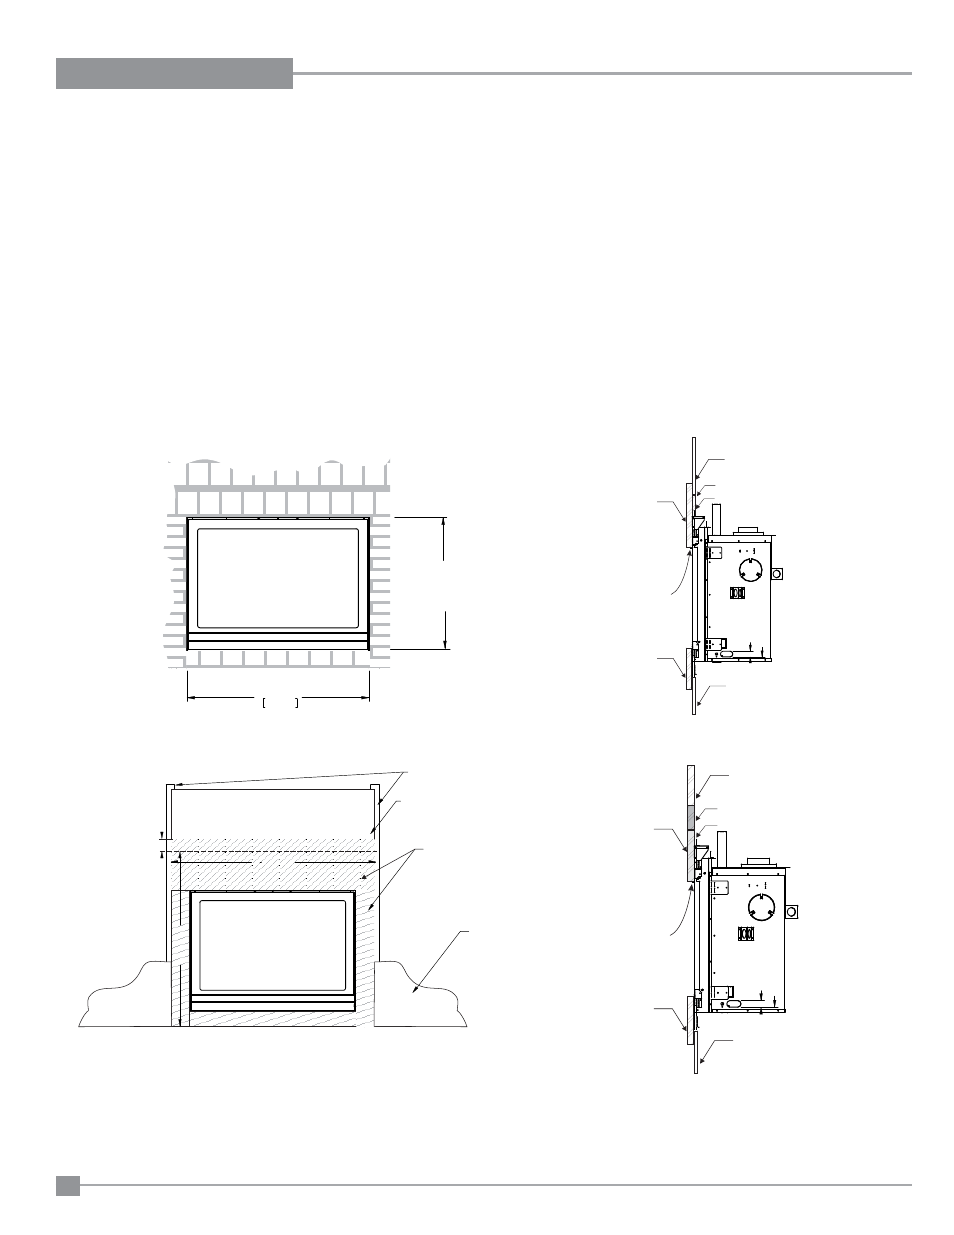
4. Tile Finish Option 1: Drywall may be installed onto the unit as shown below to create a surface to apply fi nishing materials such as tile, slate, etc.
Drywall cannot extend beyond the metal surface of the unit.
5. Tile Finish Option 2: If applying a non-combustible fi nishing material (tile,slate,etc) the material can be installed directly onto the metal surface (clean
front) of the unit in the area shown below.
1/2" DRYWALL
NON-COMBUSTIBLE FACING
FOR CLEAN LOOK (ie. painted finish)
(SUPPLIED BY OTHERS)
46-11/16"
[1186mm]
1/2" DRYWALL
DO NOT EXTEND
DRYWALL ONTO METAL
SURFACE OF UNIT.
WOOD STUD
44-1/4"
[1
124mm]
6"
[152mm]
NON COMBUSTIBLE BOARD SUPPLIED W/UNIT
38-7/16"
976mm
29"
[737mm]
Combustible and Non-combustible Facing and Finishing
Materials around unit.
CLEAN FINISH
TILE FINISH
6. If applying a non-combustible facing it may be installed over the metal surface (clean front) of the unit in the area shown below.
Combustible
Material
Non-combustible
Finishing Materia
l
(ie. tile)
Non-combustible Material (6" x 46-11/16")
Finishing Material
(ie. tile)
Nailing Strip -1/2" back from unit face
Combustible
Material
Non-combustible
Supplied with Unit
1-1/2
(38mm)
Ensure finished
material is
brought to lip
Combustible
Material
Non-combustible
Finishing Material
Non-combustible Material (6" x 46-11/16")
Finishing Material
Nailing Strip -flush with unit face
Combustible
Material
Non-combustible
Supplied with Unit
1-1/2
(38mm)
Ensure finished
material is
brought to lip
NOTE: The 6" x 46-11/16" non combustible material supplied with this unit can be replaced if trying to achieve a clean fi nish. A large piece of non
combustible material (ie. 4' x 8' x 1/2" can be used to eliminate taped seams on or near unit.