Stainless Works 450-264 Ford Mustang 5.0 2011+ AIRAID Intake System User Manual
Packing list, Tools required for installation, A. c. a. b. c. a. b
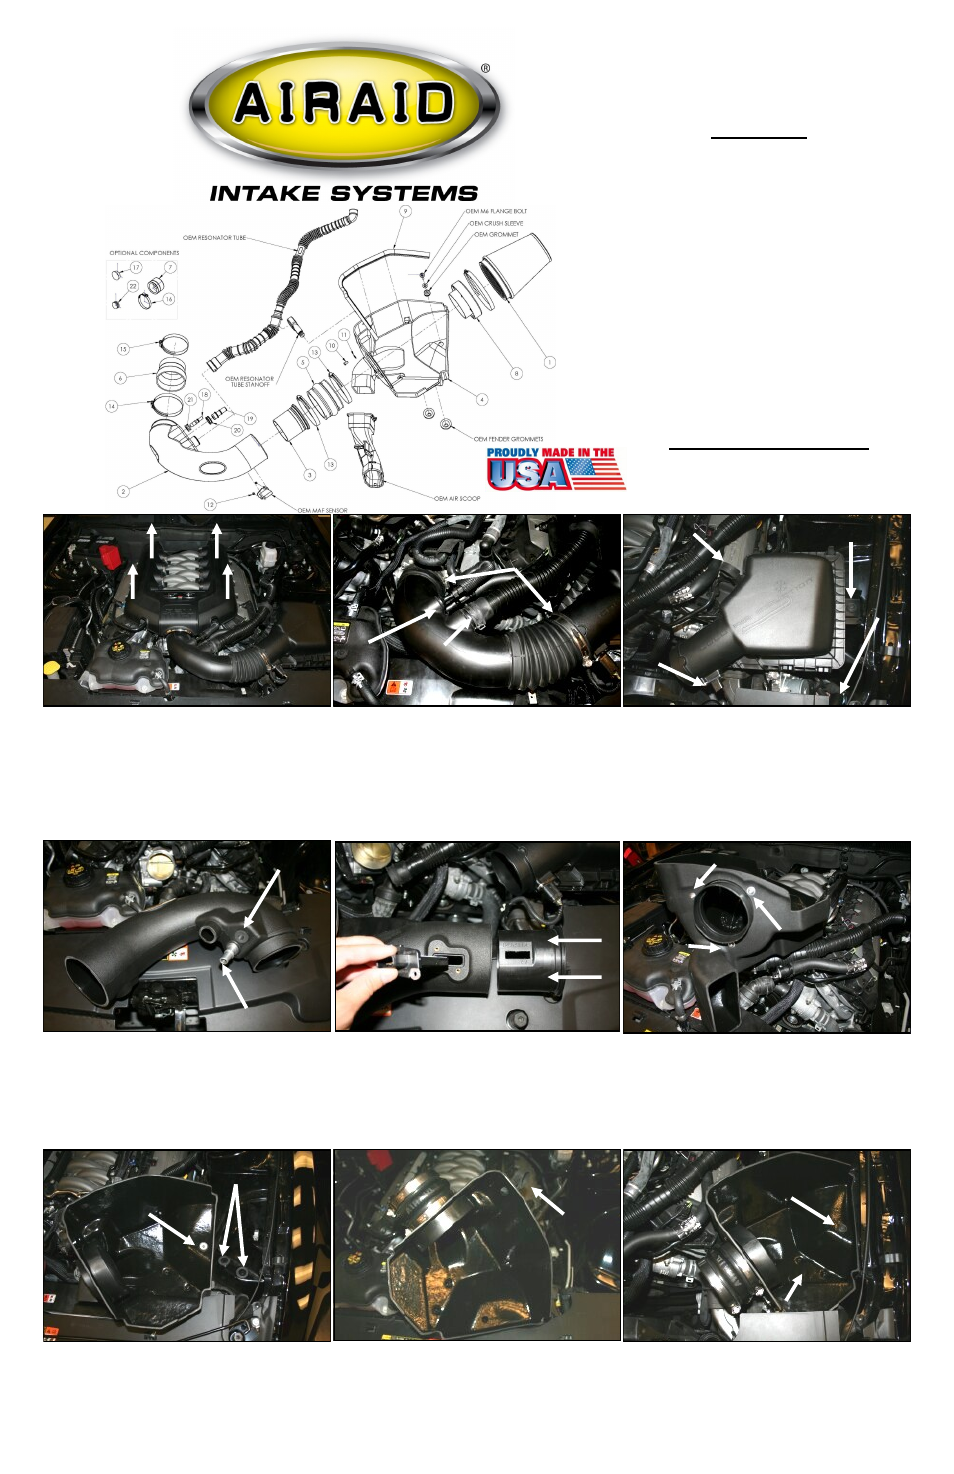
Installation Instructions
Part Number 450-264
2011-12 Ford Mustang GT
5.0L V-8
2. A) Loosen the hose clamps on the factory intake tube
B) Squeeze the clamp and disconnect the resonator from
the air intake tube. C) Carefully depress the hose lock
tabs, and disconnect the crank case breather line and the
brake aspirator line (if equipped, AT models only). D)
Remove the factory intake tube.
3. A) Slide the red tab, and disconnect the wiring harness
from the Mass Air Flow sensor (MAF). Carefully pry the
harness anchor from the air box using a screwdriver. B)
Separate the resonator tube from the stand off attached to
the Air box lid. C) Using a 10mm socket, remove the bolt
securing the air box to the inner fender and remove the air
box assembly. This bolt will be reused in step 9.
4. Install the Grommets and Fittings into the Airaid intake
tube (#2). A) All models will require the use of the 5/8”
Fitting (#19) and the 5/8”Grommet (#20). B) Automatic
transmission equipped vehicles will also use the 3/8” Fit-
ting (#18) and 3/8” Grommet (#21). Manual transmission
vehicles will not need the 3/8” components and will use
the Blind Grommet(#22).
5. Using the supplied Torx driver, remove the MAF sen-
sor from the Factory airbox and create the Tube assem-
bly.
A) Slide the Modular Venturi Tube (#3) into the Airaid
intake tube (#2) making sure to align the two slots for the
MAF sensor. B) Install the MAF sensor into the intake
tube using two provided 8-32x3/8” screws (#12).
6. Install the filter adapter (#8) using three 1/4-20 button
head bolts (#10), and flat washers (#11) into the Airaid
Cool Air Box (CAB) (#4) as shown.
8. Install the hump hose (#5) onto the filter adapter using
two #72 hose clamps (#13) as shown. Leave the two
hose clamps loose for now. Transfer the Resonator stand
off from the factory air box into the CAB.
Packing List:
#1 700-461
Airaid Premium Filter
1
#2 KIT264T
Airaid Intake Tube
1
#3 KIT264I
Modular Venturi Tube (MVT) 1
#4 KIT264CAD
Cool Air Dam
1
#5 KITHUMPHS05
Urethane Hump Hose
1
#6 KITRDCR18
Silicone Reducer
1
#7 KITCAP02
Urethane Cap*
1
#8 KIT1121MAFADA Urethane Cap*
1
#9 Weather Strip
Weather Strip
1
#10 KITHOSE06
3/8”x12” Hose
1
#11 KITWSTRIP03
Weather Strip 25”
1
KIT238HP
Hardware & Instructions 1
#12
KIT15DHC3050
¼-20 Button Head Bolt
3
#13
KIT09FWZ019
¼” Flat Washer
4
#14
KIT15BHC3038
8-32 x 3/8” Button Head Bolt
2
#15
KIT25C87HCSS
1/4-20 Hex Head Bolt
1
#16
KIT60C120HCS
6mm x 12mm Hex Bolt
1
#17
KITHS72
#72 Hose Clamp
4
#18
KITCLAMP60SS
40-60mm Hose Clamp
2
#19
KITGRMT03
Grommet
1
#20
KITPLUG01
Firewall Plug*
1
#21
KITFITTING05_REV_B Aluminum Fitting
1
#22
KIT238B
Resonator Tube Bracket
1
KITBIT01
#20 Torx Bit
1
Tools Required For Installation:
5/32” Allen Wrench & 3/32” Allen Wrench
1/4”, 5/16”, 10mm Deep,13mm Sockets
Ratchet & Extension, Pliers, Screwdriver, Razor Blade
7. Transfer the factory air box mounting grommets. A)
Locate and remove the Two Lower air box mounting
grommets, and install them in the inner fender. B) Re-
move the Upper air box mounting grommet and steel
sleeve, and re-install into the Airaid CAB.
9. Install the CAB into the vehicle. Make sure that the Air
inlet of the CAB aligns with the factory duct, and the two
locating pins on the bottom align with the factory grom-
mets. Next reinstall the factory bolt that was removed in
step #3 thru the steel sleeve and grommet and into the
inner fender.
A.
C.
A.
B.
C.
A.
B.
Packing List:
#1 700-461
Airaid Premium Filter
1
#2 KIT264T
Airaid Intake Tube
1
#3 KIT264I
Modular Venturi Tube
1
#4 KIT264CAB
Cool Air Box
1
#5 KITHUMPHS05
Urethane Hump Hose
1
#6 KITRDCR18
Silicone Reducer
1
#7 KITCAP02
Urethane Cap*
1
#8 KIT1121MAFADA Filter Adapter
1
#9 KITWSTRIP03
Weather Strip 25”
1
KIT238HP
Hardware & Instructions 1
#10
KIT15DHC3050
¼-20 Button Head Bolt
3
#11
KIT09FWZ019
¼” Flat Washer
3
#12
KIT15BHC3038
8-32 x 3/8” Button Head Bolt
2
#13
KITHS72
#72 Hose Clamp
2
#14
KITHS64
#64 Hose Clamp
1
#15
KITHS56
#56 Hose Clamp
1
#16
KITCLAMP60SS
60mm Hose Clamp
1
#17
KITPLUG01
Firewall Plug*
1
#18
KITFITTING05
3/8”Aluminum Fitting
1
#19
KITFITTING15
5/8”Aluminum Fitting
1
#20
KITGRMT10
5/8”Grommet
1
#21 KITGRMT03
3/8”Grommet
1
#22
KITGRMT17
Blind Grommet
1
#23
KITBIT01
#20 Torx Driver
1
Tools Required For Installation:
5/32” Allen Wrench & 3/32” Allen Wrench
5/16”, 10mm Sockets
Ratchet & Extension, Pliers, and Screwdriver
Disconnect The Negative Battery Terminal!
1. Remove the Engine cover by simply lifting up, and
set aside.
B
B.
A.