Light assembly, Install side marker lights – Let's Go Aero LittleGiant Trailer LGT 1107 - T (Torsion based model) User Manual
Page 18
– 18 –
l
iTTle
G
ianT
T
railer
™
LGT1107rev0614
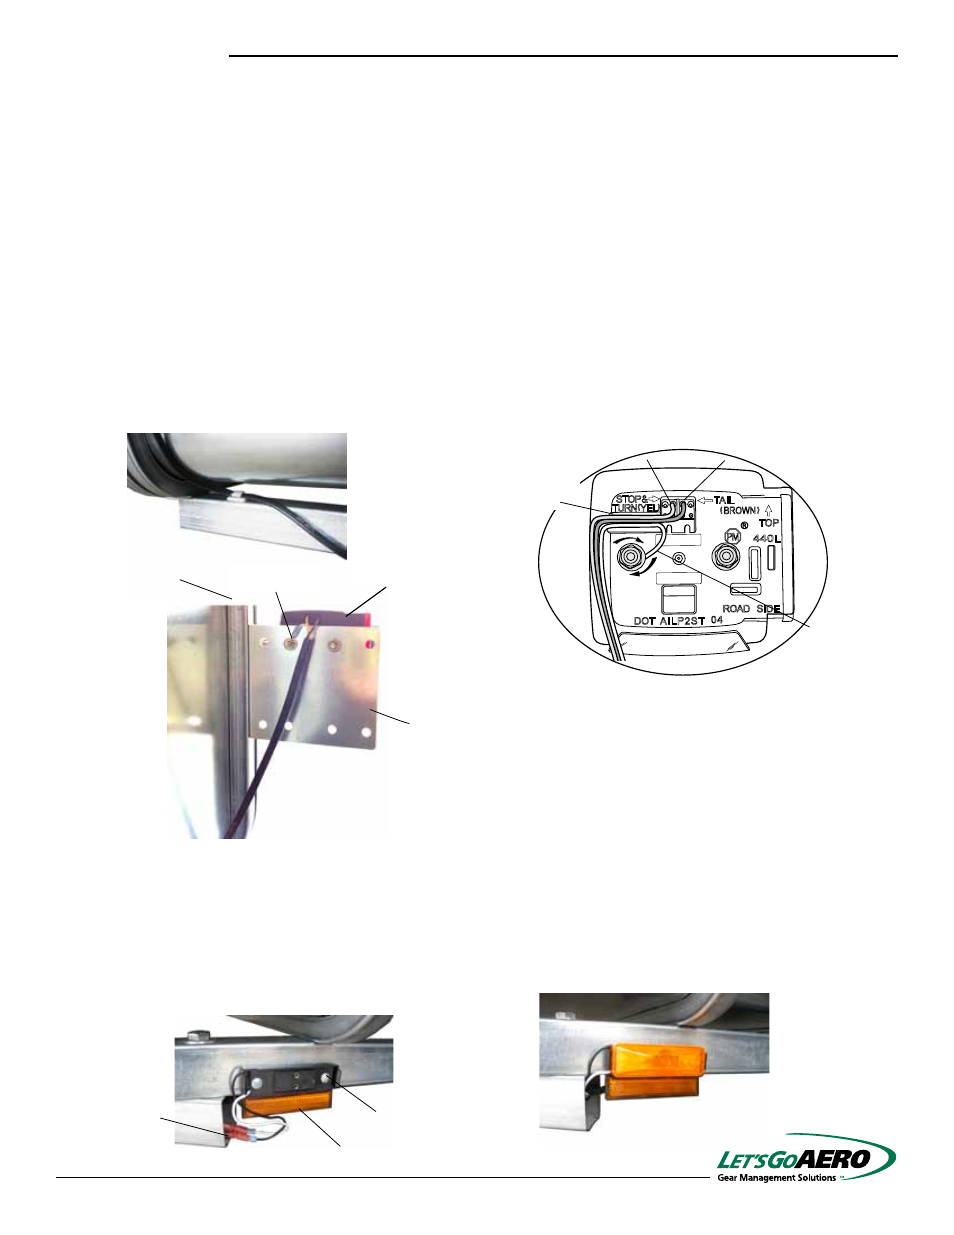
16. Light Assembly
Locate the Light Assemblies and remove the hardware furnished on the assemblies. Use this hardware to install the
rear signal and brake lights.
Place the Light Bracket and the taillight with license plate illuminating window on the #8 U-Tube on the driver side.
Orient it with the illuminated fixture down.
Use the holes in the U-Tube as a guide to drill holes through the side panel. Use two (2) 5/16” x 1-3/4” Bolts (DD),
two (2) 5/16” Flat Washers (HH) and two (2) 5/16” Nylon Lock Nuts (JJ) to install the Light Bracket to the U-tube.
Hold the light fixture in your hand and route the wires into the wire channel on the back of the fixture. From the
channel, wrap the white wire’s metal loop around the left hand post on the back of the light. Then insert the brown
wire into the second hole from the right. Insert the green or yellow wires into the third hole from the right.
To secure the wiring in the fixtures, twist the end of each wire and insert it down into the hole. If a wire does not lock
into place, simply remove it and try again.
Repeat this procedure on the passenger side.
17. Install Side Marker Lights
The left and right Amber Front Side Marker Lights plug into the wire harness. Each marker light has two plugs,
which are interchangeable. Locate the corresponding plugs on the Wire Harness, and route the Light along with the
Wire Harness through the A-Frame Tube. Using two self tapping screws*, attach each side marker light base to the
main frame tube. Then, press the light onto the base.
Self Drilling
Screws
Crimps
L-Bracket
U-Tube #8
Light
Ring Terminal
Brown
Wire
Yellow or
Green Wire
White Wire -
Wrap around
post
Route Wires
through Wire
Channel
Yellow on
driver, Green
on passenger
sides
Front Side
Marker Light