Set up the electronic control system – Condux CableGlider FO Cable Puller User Manual
Page 9
9
different load setting. See section 11.B for details. For proper operation, the relief valve must be set at a
tension limit greater than the electronic tension limit.
D. ATTACH THE CAPSTAN
1. Attach the 30 inch (762 mm) diameter capstan to the puller’s shaft (figure 4) by aligning the capstan’s slots
with the shaft’s pins. Push the capstan onto the shaft until it stops, then rotate clockwise until it stops.
Pull outward to lock the capstan into position. make sure the shaft locking pins are visible
through the holes in the capstan hub.
!NOTE: If using a capstan with a diameter other than 30 inches (762 mm), the hydraulic relief valve must be
recalibrated (section 11).
Set Up the Electronic Control
System
If the puller is not equipped with the electronic tension control system, go to section 7.
A. SwITCH CONFIgURATION
Following is a brief explanation of each of the switches for the Condux Fiber Optic Cable Puller Electronic
Control System. Detailed instructions for using the equipment follows these explanations.
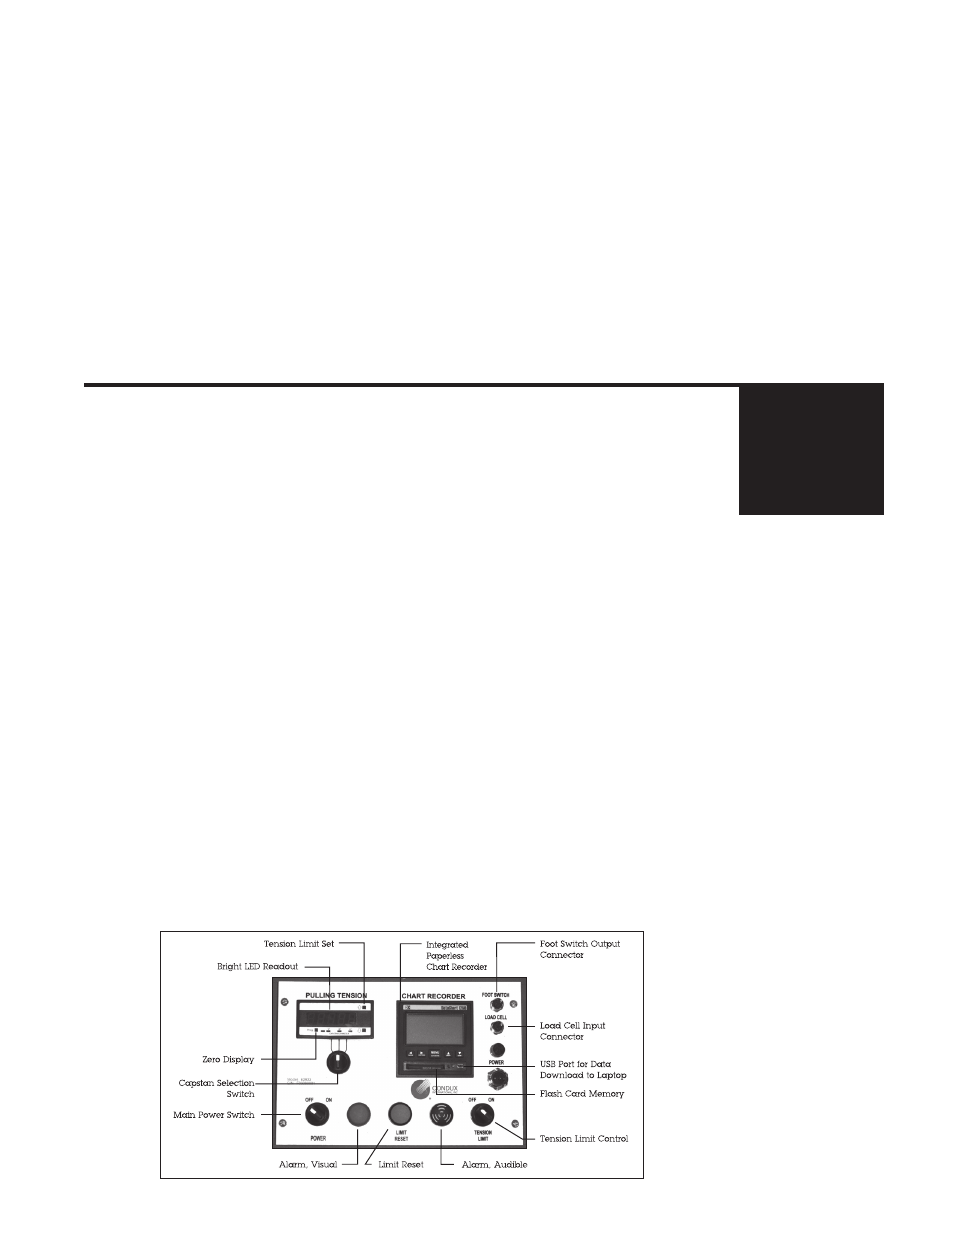
1. Electronic Control Box Panel Switches (Figure 5)
Power: Turns control box ON or OFF.
Set Tension Limit: Sets the limit where the control box will stop the puller. Press
and hold UP or DN button to set the desired value.
Tension Limit Control: Determines if the puller will stop rotating when the preset
tension limit is reached. Switch to ON to activate the
hydraulic bypass valve and stop the puller when the
tension limit is reached. Switch to OFF to disable the
hydraulic bypass valve.
Zero Display: Set the display to zero before beginning. Press “Prog” button to
zero display.
Capstan Selection Switch: Sets the control box to display the proper pulling forces
depending on the size capstan used. Turn switch to set
desired capstan diameter. The meter automatically calibrates
the displayed force to the selected capstan size.
Limit Reset: Resets the control box and puller after the preset tension limit
has been exceeded. Press button to reset hydraulic bypass
valve and audible alarm. This can be done only when the
tension is below the preset limit.
6.
Figure 5