Warning, Caution – COATS RC-100 Tire Changer User Manual
Page 11
Important: Always read and follow operating instructions.
• 7
Mounting
This information must be read and followed carefully
to prevent accidents and injuries during mounting.
WARNING
Check tire and wheel carefully before
mounting. Make sure the tire bead diameter
and wheel diameter match exactly. Con-
sult the Rubber Manufacturer’s Association
for approved rim widths for tire sizes. Mis-
matched tires and wheels explode.
CAUTION
Never Mount a tire and wheel handed to
you by anyone without checking both tire
and wheel for damage and compatibility. Be
extra cautious of persons without knowl-
edge of tire service. Keep by-standers out of
service area.
WARNING
Never mount a damaged tire. Never mount a
tire on a rusty or damaged wheel. Damaged
tires and/or wheels may explode.
CAUTION
If you damage the tire bead during mount-
ing, STOP!, remove the tire and mark it as
damaged. Do not mount a damaged tire.
1.
Inspect the wheel closely for damage. Clean the
wheel and remove any light corrosion or rubber residue
(Figure 12). Do not attempt to service heavily corroded
wheels.
Figure 12 - Inspect and Clean the Wheel
2.
Inspect tire for damage, paying close attention to
the beads. Verify size match between tire and wheel
(Figure 12).
3.
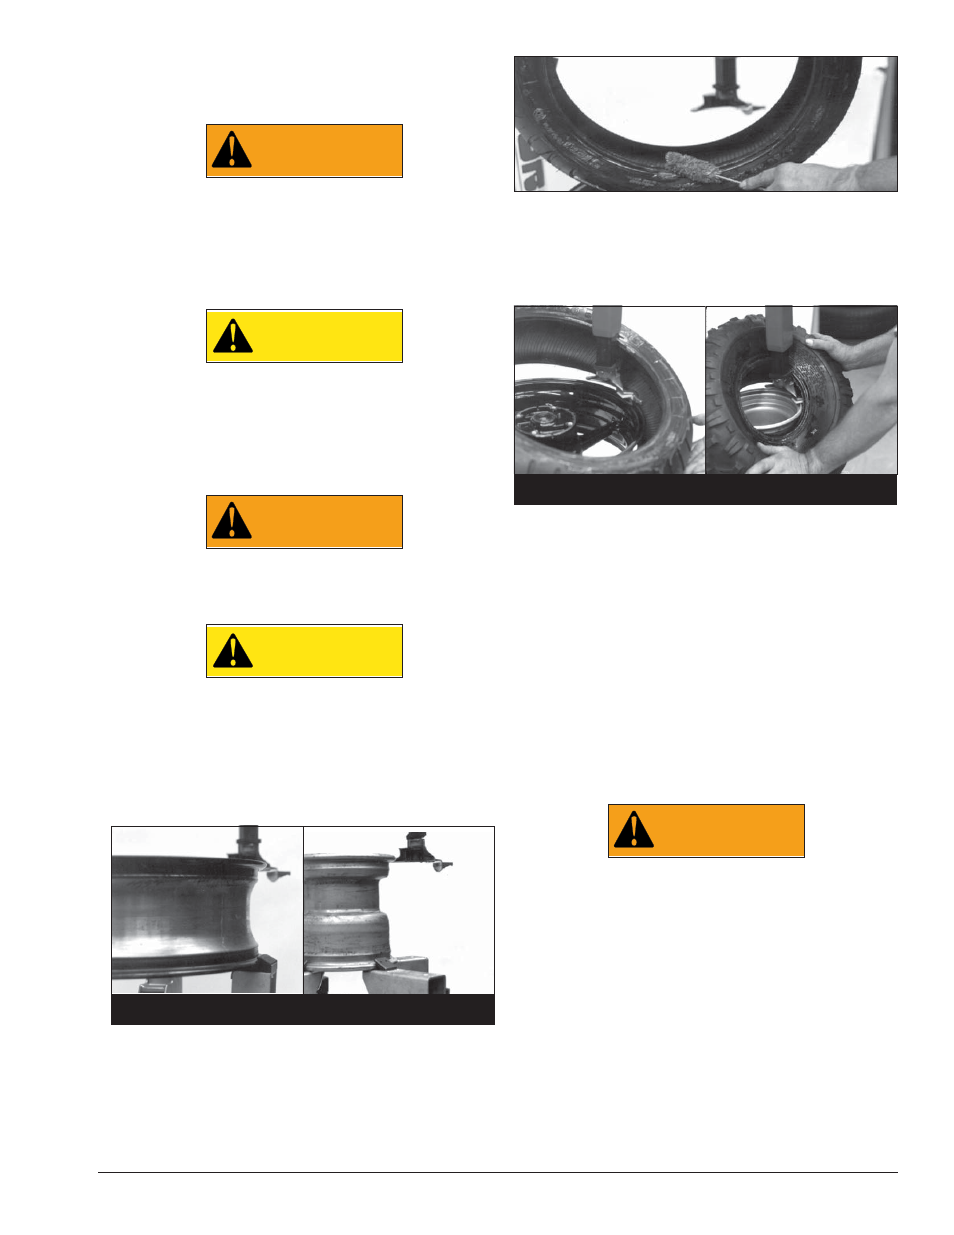
Lubricate tire beads liberally with tire manufacturer
approved lubricant (Figure 13).
Figure 13 - Lubricate Beads
4.
Place tire over wheel and move swing arm into
position. Position the tire so that the lower bead is
above the rear extension of the mount/demount tool
and below the front knob (Figure 14).
Figure 14 - Position Tire Against Mount/Demount Tool
5.
Depress table top pedal and rotate the wheel to
mount the lower bead. Use the drop center of the wheel
to reduce the tensional force on the bead by pressing
down on the tire directly across from the mount tool.
Rotate table top until lower bead is fully mounted.
6.
For top bead, rotate the table top until the valve
stem is directly across from the mount tool. Lift the
upper bead up and over the rear of the mount tool.
With your left hand press down on the tire between the
mount tool and the valve stem to hold the tire in the
drop center. Depress the table top pedal and rotate the
tire until the bead is mounted. Continue to press down
on the tire during the remaining mounting process.
WARNING
Do not force the tire onto the rim. Bead dam-
age could result making the tire unsafe and/
or creating the risk of injury.
NOTE: If table top rotation stalls, reverse the table top
momentarily until the tire bead is again loose on the
wheel. Reposition the mount tool, make sure the bead
is correctly positioned in the drop center of the wheel,
then attempt mounting again.
NOTE: For low profile or stiff sidewall tires, it may be
advantageous to use the bead lifting tool to initially hold
the upper bead down in the drop center, or use drop
center tools as shown in Figure 30.
NOTE: For tube type tires, mount the lower bead first,
move swing arm out, install the tube, and then mount
the upper bead.
Motorcycle
Motorcycle
ATV
ATV
Motorcycle
Motorcycle
ATV
ATV