Danger – COATS 9010 AX/EX Tire Changer User Manual
Page 17
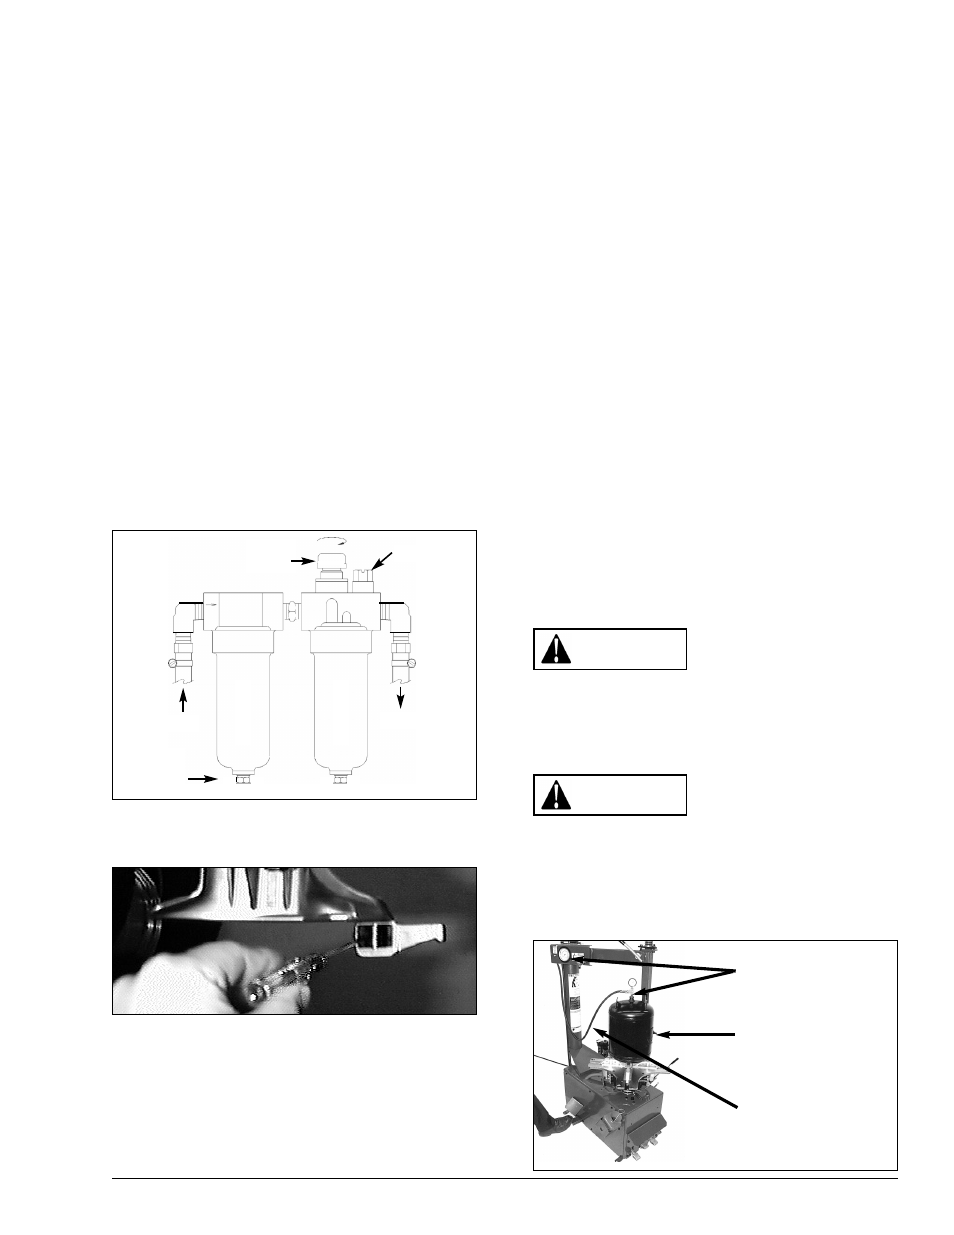
Separator/Lubricator Maintenance
Check oil and water levels regularly, and perform
these maintenance items weekly:
A. Disconnect air supply to machine.
B. The Separator (Filter) unit is equiped with an
automatic drain and should not normally need
draining.
C. Add oil to the lubricator if the fluid level is more
than 1/4” from the top of the gauge. Remove the
filler plug on top of the lubricator and add SAE
10W non-detergent oil or an air tool oil to bring
the level up to 1/4” from the top of the gauge.
Replace filler plug and clean up any spilled oil.
D. Adjust the oil flow by turning the black flow
adjustment knob and turning it to increase or
decrease the flow. Watch the formation of oil
drops in the see-through oil chamber.
Reconnect the air supply and continually cycle
the bead loosener through full strokes and count
the drips during the cycles. The delivery of oil to
the air line should be about 1 drop per 10
cylinder cycles. Adjust flow as required.
Mount/Demount Head Cleaning
Clean dirt and debris from the mount/demount tool
(duckhead) roller with small screw driver or pick.
Pressure Limiter Maintenance
The pressure limiter helps prevent inflation of
standard size or larger tires or tubes beyond 60 PSI
to minimize risk of explosion. This device is for the
safety of the operator and bystanders. Proper
operation of the pressure limiter is essential to safe
operation of the machine.
Check operation of the pressure limiter as shown
and described below at least monthly:
1.
Remove tires and/or wheels from the machine.
2.
Connect the inflation hose to an empty service
tank with a pressure gauge (gauge should read
0). Use a certified tank with at least 250 PSI
pressure rating.
3.
Depress inflation pedal to position 1 to start air
flow through the hose and into the tank.
Maintain a steady pressure for constant flow.
4.
Watch the rising pressure on the tank gauge
and the gauge on the machine. Machine gauge
should cycle between check and inflation
pressures while tank gauge climbs steadily. As
tank pressure reaches 60 PSI, the pressure
limiter should stop the air flow automatically.
Both gauges should read 60 PSI ± 5 PSI.
5.
Release inflation pedal. Check manual release
valve function by pressing the button and
releasing pressure from the tank until it reaches
50 PSI. Disconnect inflation hose, and release
air inside tank.
6.
Replace pressure limiter if it fails to cycle
properly during inflation, if it fails to shut air
supply off at 60 PSI, or if it malfunctions in any
other way. Do not operate machine with a faulty
pressure limiter.
Operating a tire changer
with a defective,
improperly adjusted, or
by-passed pressure
limiter could result in a tire explosion with
severe injury or death to the operator or
bystanders. Always be sure that the pressure
limiter is present and is operating properly on
the machine at all times.
Never inflate tire above
m a n u f a c t u r e r ’ s
recommended pressure
after bead is seated.
Pressure limiter is set at 60 PSI. Any required
inflation above 60 PSI should be performed in an
inflation chamber/safety cage or securely
mounted on the vehicle if an inflation chamber is
not available. A tire explosion may cause
personal injury or death to operator or
bystanders.
9010 Rim Clamp Tire Changer • 15
Auto
Drain
Outlet
Air In
Air Out
Oil Fill
Oil Flow
Adjust
Lubricator
Separator
250 PSI Tank
with Gauge
Watch Pressure
on Both Gauges
Tire Changer
Inflation Hose
Connected to Tank
DANGER
DANGER