Coats heavy duty tire lift • 7 – COATS 575 Heavy Duty Tire Lift User Manual
Page 7
COATS Heavy Duty Tire Lift • 7
8.
Locate the black hose attached to the valve and
feed it out the hole at the bottom of the TOWER
ASSEMBLY. Prepare the hose end for connection to the
main air supply by inserting a 1/4" straight fitting into
the hose end and secure using a hose clamp.
9.
Connect to air supply. Actuate VALVE HANDLE to
raise LIFT ARM BRACKET and provide clearance for
inserting bolts.
10.
Important: All fasteners MUST be started by
hand. They screw into a *Rivnut
®
in the CARRIAGE
INSERT and you do not want to cross thread them.
Insert two bolts at the back of the TOWER ASSEM-
BLY. Start BY HAND 2 or 3 threads; it may take a
“wiggle” or two of the TOWER ASSEMBLY.
Next, insert two bolts inside TOWER ASSEMBLY. Be
sure to support the LIFT ARM BRACKET so it does not
fall on your hand. Only start BY HAND 2 or 3 threads.
Now, insert all the remaining bolts. Only start BY
HAND 2 or 3 threads.
After all bolts are inserted and not cross-threaded,
tighten them down securely.
11.
Attach edge trim to the front side and backside
of the BASE TRACK.
Figure 6 - Attach Edge Trim At Both Sides Of BASE TRACK
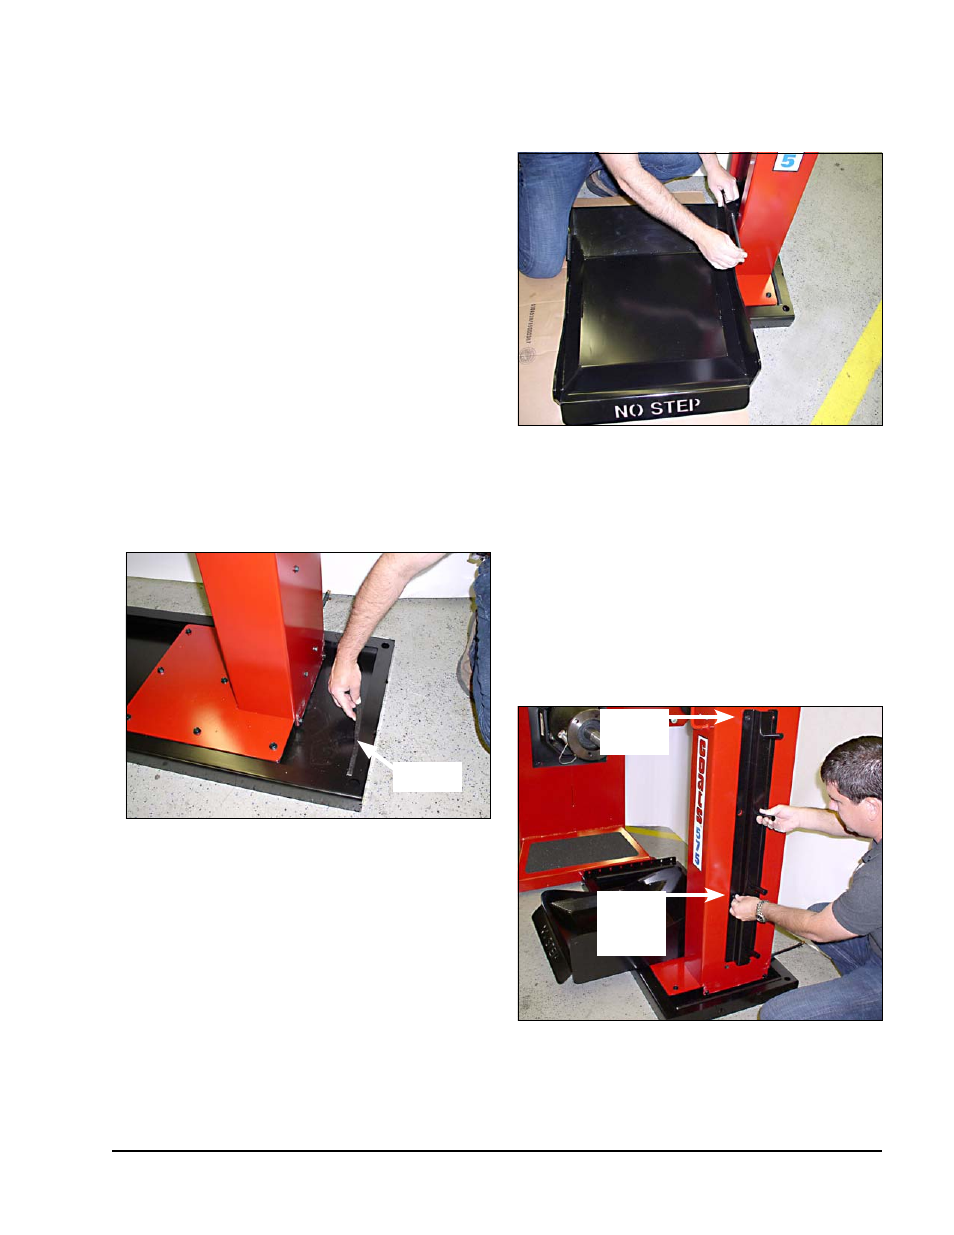
12.
Lower the WHEEL TRAY.
13.
Place a thick piece of cardboard or plywood on
the BASE TRACK to protect the TOWER ASSEMBLY
paint from scratches when sliding the WHEEL TRAY
into position. Now set the WHEEL TRAY next to the
LIFT ARM BRACKET on the TOWER ASSEMBLY.
*Rivnut
®
is a registered trademark of Bollhoff Rivnut Inc.
Fastening And Assembly Technology
14.
Re-insert the pivot bolt to assemble WHEEL
TRAY to LIFT ARM BRACKET on the TOWER ASSEM-
BLY. It is tight, but will slide into place by hand. Do not
use a hammer.
Figure 7 - Assemble WHEEL TRAY To LIFT ARM BRACKET
15.
Slide hairpin clips into the holes in the ends of
the pivot bolt.
16.
Now, actuate the VALVE HANDLE to cycle the
cylinder, and move the WHEEL TRAY up and down two
or three times.
Important: It is normal if the Tire Lift jumps 2 or 3
inches the first time it lifts, so be careful and expect
that to happen.
17.
Remove the top two and the next to the bottom
two bolts from the back of the TOWER ASSEMBLY.
Use these bolts to fasten the STORAGE BRACKET to
the TOWER ASSEMBLY.
Figure 8 - Fasten STORAGE BRACKET To TOWER ASSEMBLY
Install
Edge Trim
Fasten
Top Two
Bolts
Fasten
Next To
Bottom
Two Bolts