Drain tray - rotary glasswasher – CHAMPION CG Manual User Manual
Page 48
40
DRAIN TRAY - ROTARY GLASSWASHER
(0712551 (FLAT) OR 0712734 (CURVED))
0512967
PAGE 1 of 1
I N S T A L L A T I O N I N S T R U C T I O N S
P A R T S L I S T :
I N S T R U C T I O N S :
ITEM
DESCRIPTION
QTY/PER
0512717
TRAY, DRAIN FLAT MOLDED (included with 0712551 kit - flat front)
1
0512719
SCREEN, DRAIN TRAY FLAT (included with 0712551 kit - flat front)
1
0512718
TRAY, DRAIN CURVED MOLDED (included with 0712734 kit - curved front)
1
0512720
SCREEN, DRAIN TRAY CURVED (included with 0712734 kit - curved front)
1
0512943
TUBE,
DRAIN
TRAY
1
0512946
NUT,
5/8-20
BULKHEAD,
POLYPROPYLENE
2
0503716
GROMMET, RUBBER 5/8 ID X 1-1/8 OD X 5/16 THK
1
0507265
HOSE, BRAIDED PVC 5/8 ID X 7/8 OD X 2-1/2 LONG
1
0512977
CLAMP,
NYLON
7/8 1
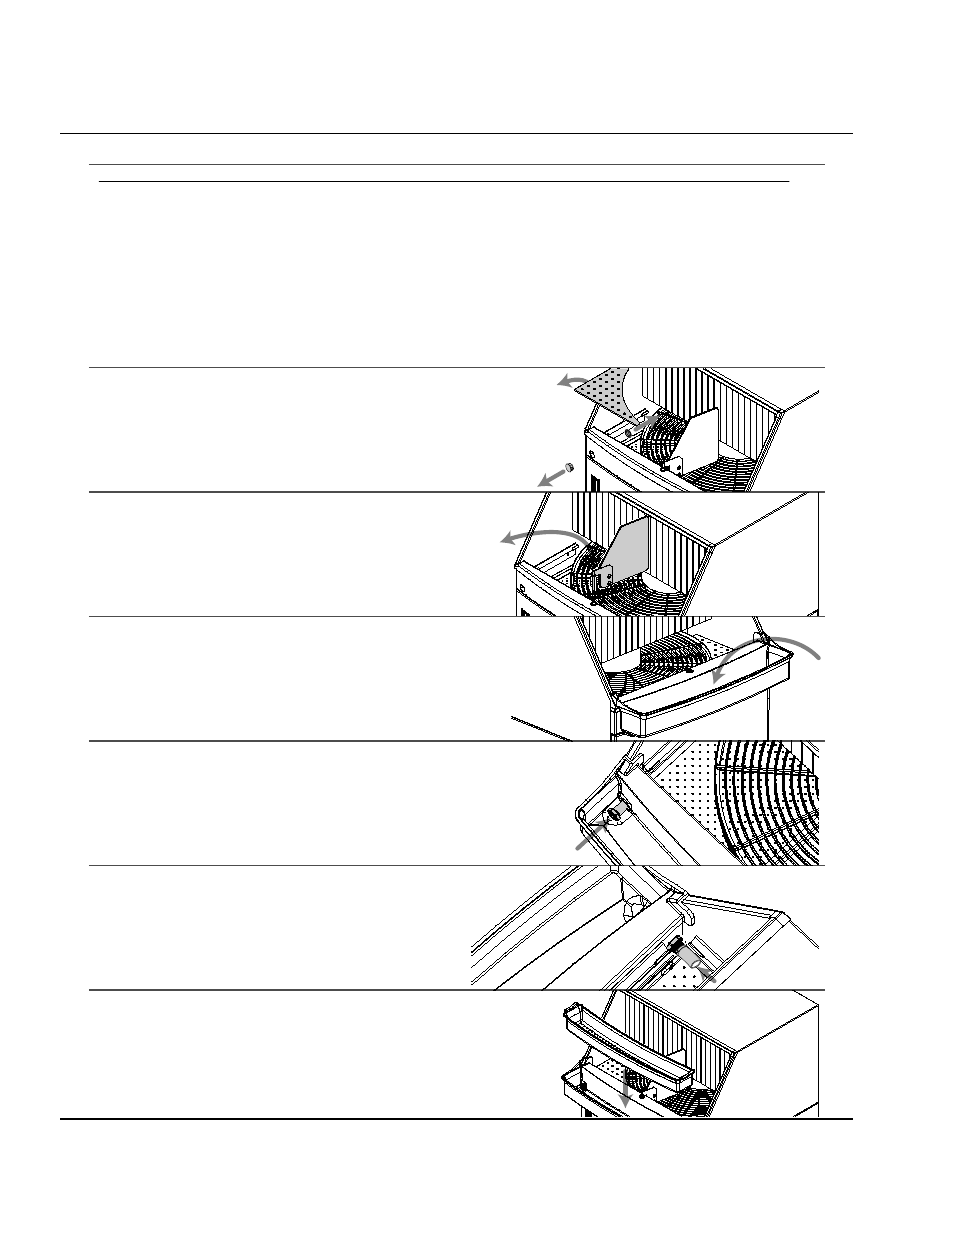
Remove left side pick-up plate allowing access to
internal button plug. Remove the internal button
plug and button plug on the front facia of the
machine.
1
Remove the activation swing arm.
2
Install the drain tray over the front edge ensuring
the swing arm receiver clears the hole provided.
The drain tube must line up with the pre-existing
hole.
3
Push the metal drain tube through the drain holes
so that it is fully extended into the machine
(pre-assembled nut is firm against the drain tray’s
grommet).
4
Screw the bulkhead nut to the drain tube that is
protruding into the the tank with the nut face
containing dimples facing the inside of the
machine. Attach braided hose to protruding end,
and secure using the provided hose clamp.
Ensure the hose is pointed slightly downward.
5
Replace the left pick-up plate and the activation
swing arm, ensuring the arm’s movement is not
hindered. Assemble the screen into the tray.
6
Drain Tray Conversion Kit Instructions