Aerovent ES-2-06 User Manual
Page 11
Twin City Fan Companies Engineering Supplement 2-06
11
All of the above conditions could lead to mechanical fail-
ure causing safety hazards including exposure to ejected
objects and toxic material or vapors.
For high temperature applications, it is recommended
that an auxiliary device be provided (such as a turn-
ing gear available from Twin City Fan Companies, Ltd.)
to slowly rotate the fan when it is not operating while
exposed to high temperatures. Exposure to high tempera-
tures while not operating could be due to a power failure
or standard operation of a process.
When multiple fans are installed for redundancy, the
fan used shall be switched at least weekly to avoid the
need for storage considerations.
Sound
Sound power levels are supplied with each fan. These
levels are based on AMCA 300 reverberant room test
methods. This method is similar to ISO 3741. Field
installation and conditions can affect sound greatly.
Because of this, the user shall verify if the sound pres-
sure levels in the installed condition are below 70 dBA.
If sound pressure levels are above 70 dBA, actions shall
be taken to reduce sound pressure levels to acceptable
levels.
The following EN standards can be referred to as a
guide when making noise measurements:
EN 809 EN ISO 5136:2003 - Acoustics - Determination
of sound power radiated
into a duct by fans and
other air-moving devices
- In-duct method.
EN ISO 11200/A1 1997
- Noise
emitted
by
machinery and equip-
ment - Guidelines for
the use of basic stan-
dards for the determina-
tion of sound pressure
levels at a workstation
and at other specified
positions.
EN ISO 11202/A1 1997
- Noise
emitted
by
machinery and equip-
ment - Measurement of
emission sound pressure
levels at a workstation
and at other speci-
fied positions – Survey
method in situ.
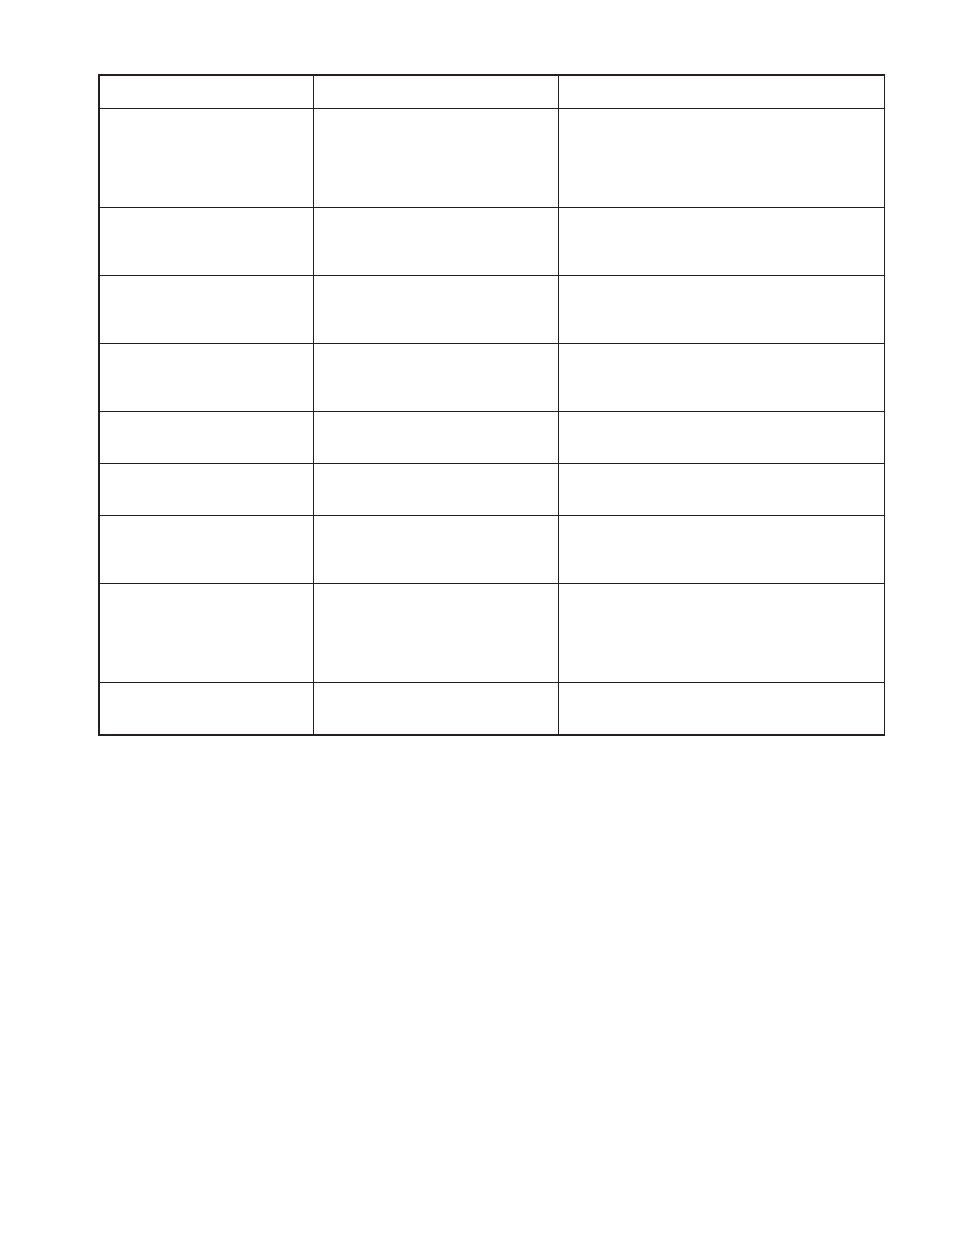
TYPE OF MAINTENANCE
WHEN TO DO
WHAT TO DO
Check for sheave groove wear
Initial inspection: 8 hours. Second in-
spection: 24 hours. Third inspection:
100 hours. Periodically thereafter.
Check for belt ride in the groove. In multiple groove
drives, belt ride should be uniform, not more than
1/16" above or below top of sheave groove. Check
groove wear area for wear. Side wall of groove
should be straight, not dished out. Bottom of groove
should show no signs of belt contact.
Check for sheave runout.
Initial inspection: 8 hours. Second in-
spection: 24 hours. Third inspection:
100 hours. Periodically thereafter.
Check sheave by eye for runout. If runout is exces-
sive, it can easily be seen by visual inspection. If
runout is noticeable, check sheave for source of
problem and correct.
Inspect for heat build-up and
proper ventilation
Initial inspection: 8 hours. Second in-
spection: 24 hours. Third inspection:
100 hours. Periodically thereafter.
Check bolts for heat. Ambient temperature should
not exceed 140°F. Contact temperatures should not
exceed 180°F. Make sure drives are properly ven-
tilated.
Clean belts and sheave grooves
Initial inspection: 8 hours. Second in-
spection: 24 hours. Third inspection:
100 hours. Periodically thereafter.
Inspect belts for contaminates, such as oil or grease.
Wipe belts clean with detergent and water. Inspect
sheave grooves for build-up of such material and
remove, if necessary.
Check belt tension
Initial inspection: 8 hours. Second in-
spection: 24 hours. Third inspection:
100 hours. Periodically thereafter.
Check belt tension using BROWNING belt tension
checker. Tension to recommendations shown in cur-
rent catalogs.
Check sheave alignment
Initial inspection: 8 hours. Second in-
spection: 24 hours. Third inspection:
100 hours. Periodically thereafter.
Check alignment with straight edge, string or ma-
chinist level. Correct alignment to as near perfect
as possible.
Mismatched belt check
Initial inspection: 8 hours. Second in-
spection: 24 hours. Third inspection:
100 hours. Periodically thereafter.
Check belt sag on slack side of drive. All belts
should have a slight bow. If this bow is not uniform
with all belts, replace entire set with a matched
set.
Check for worn belts
Initial inspection: 8 hours. Second in-
spection: 24 hours. Third inspection:
100 hours. Periodically thereafter.
Check wear surfaces for belt for excessive wear.
if belts have a slick, glazed look, belts ares lip-
ping. Check drive capacity and belt tension. Never
replace only one belt in a used set, as used belts
will elongate. Replace entire set if replacement is
necessary.
Check sheave setscrews and/or
busing capscrews
Initial inspection: 8 hours. Second in-
spection: 24 hours. Third inspection:
100 hours. Periodically thereafter.
Check all setscrews and/or bushing capscrews for
looseness. Retighten to recommended torque, if ne-
cessary.
Table 5. Drive Maintenance and Inspection