AEM 30-4900 Wideband Failsafe Gauge User Manual
Page 5
Page 6
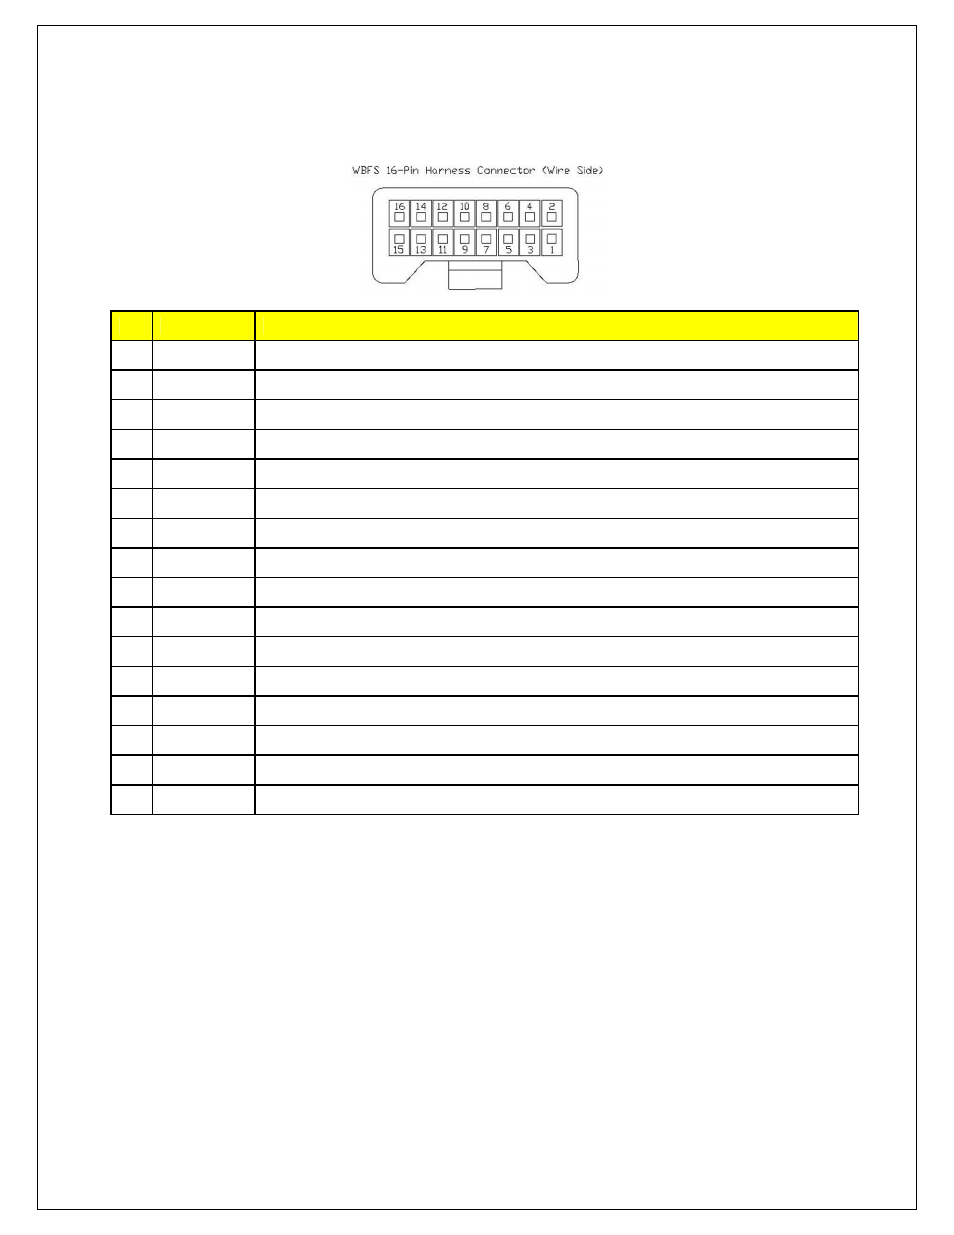
5. Next the main 16-pin connector will be manually wired into the vehicle.
Pin
Color
Description
1
Black
Ground; connect to good chassis ground or directly to battery negative (−) terminal
2
Red
Ignition power; connect to a fused key on +12V power source
3
Black
USB - Dedicated
4
N/C
Reserved
5
Red
USB - Dedicated
6
Green
USB - Dedicated
7
Blue
*OPTIONAL* Ground output; connect to an external auxiliary device (1.5A max current)
8
White
USB - Dedicated
9
Green
*OPTIONAL* Engine Speed Input; connect to a square wave trigger
10
Gray
*OPTIONAL* Gauge backlighting; connect to instrument lighting dimmer wire
11
N/C
Reserved
12
N/C**
*OPTIONAL* AEMnet -
13
N/C**
*OPTIONAL* AEMnet +
14
Brown
*OPTIONAL* Analog ground for AFR and MAP; connect to sensor ground of data logger or EMS
15
White
*OPTIONAL* 0-5V analog output for AFR; connect to + analog input of data logger or EMS
16
Yellow
*OPTIONAL* 0-5V analog output for MAP; connect + analog input of data logger or EMS
NOTES:
•
Pins 14/15 are differential analog outputs. The brown wire should be connected to an analog
ground input for best results. If the EMS, logger or similar device does not have an analog ground
input, the brown wire should be connected to a sensor ground. If no sensor ground is available, the
brown wire should be connected to a power ground. The brown wire must be connected in order to
obtain correct AFR and MAP readings from the analog output(s).
•
** Pins 12/13 are un-populated as delivered. Please order the optional 30-3439 wiring harness to
connect the WBFS gauge to other AEMnet products.
•
The WBFS gauge is able to receive RPM CAN data input from an AEM ECUs such as the Series-2.
6. Connect all cables and wiring harnesses to gauge. Fully install gauge into hole using mounting bracket
and nuts.