Save these instructions, Caution, For indoor use only – Balboa Water Group Max Flow 124 Suction User Manual
Page 2
Product Number
900904XX
900906XX
900908XX
900910XX
1a.
Flat Gasket: Locate and drill a 3-1/8 in. hole in a wall section of the spa or jetted tub. Be sure the area located
is flat and the wall thickness is uniform.
1b.
“L” Gasket: Locate and drill a 3-3/8 in. hole in a wall section of the spa or jetted tub. Be sure the area located
is flat and the wall thickness is uniform. (NOTE: “L” Gasket must be used with the Compensator.)
2.
Install the supplied GASKET over the threaded area of the FLANGE, and insert the FLANGE through the drilled hole.
Make sure the GASKET is not crimped or folded between the FLANGE and sealing surface.
NOTE: If desired, silicone sealant can be used in addition to the GASKET. Apply sealant to FLANGE threads
and backside of spa wall. Avoid getting silicone sealant on GASKET.
3.
Install the COMPENSATOR over the threaded area of the FLANGE from the backside of the spa wall.
4.
Install the NUT over the FLANGE threads and hand tighten. Using the BWG installation tool. P/N 943520, with a
customer supplied torque wrench, tighten the NUT to a max torque setting of 28 foot-pounds.
CAUTION
Do not over tighten as this may cause damage to parts and leakage may occur.
CAUTION
This is a PVC to PVC connection. Improper gluing or improper cement selection can cause leaks at glued
connection which can result in property damage.
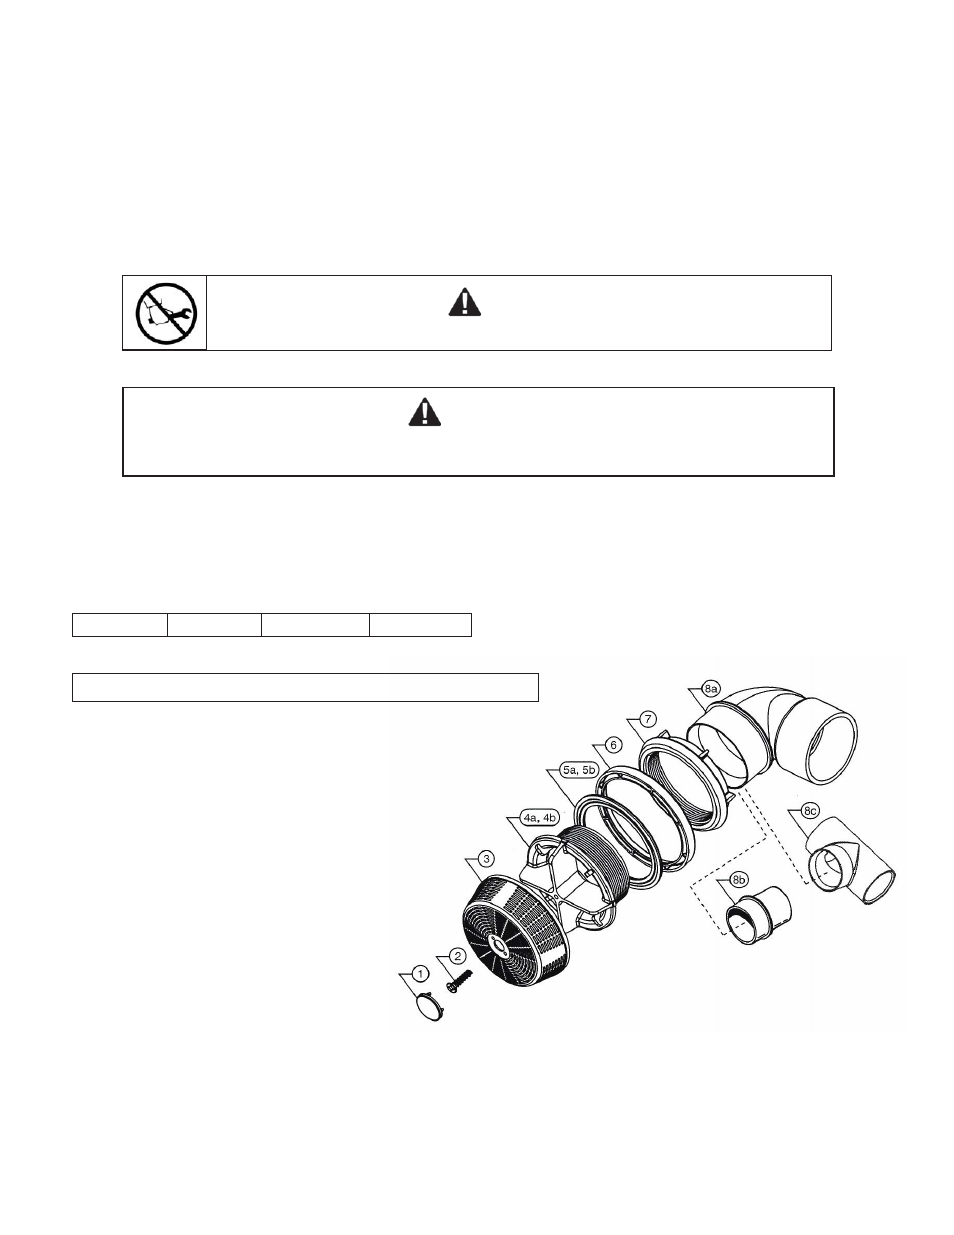
Item
No.
Part
Number
Description
1.
9808XX
Suction 124/200 Cap
2.
990006
Screw (#8-16 x 1.095 Plastite 48s/s)
3.
9809XX
Suction 124 Cover
4a.
980500
Suction 124 Flange - BWG *[1]
4b.
94000000
Suction 124 Flange - 2" Standard
5a.
980600
Suction Gasket - Flat Design
5b.
985713
Suction Gasket - "L" Design
6.
981000
Suction 124/200 Compensator
7.
980700
Suction 124/200 Nut
8a.
47223100
Suction Adapter - Elbow 2" *[2]
8b.
47223200
Suction Adapter - Straight 2" *[2]
8c.
943515
Suction Adapter - Tee 2" *[2]
*[1] Requires BWG Adapter: Items 8a, 8b, 8c.
*[2] Sold Separately.
Parts List:
For deco plate and cover color selection, replace the XX with one of the following:
00 = White
11 = Black
81 = Silver
WW = Grey
xx = 99, CP, BP, PN, GD, BN
For Indoor Use Only
5.
GLUE an adapter fitting into the FLANGE. Be sure to orientate the ADAPTER in the desired direction before the glue sets.
6.
Install the front COVER using the supplied stainless steel SCREW. Tighten SCREW until it bottoms out.
DO NOT OVER TIGHTEN.
7.
Press fit the CAP into the mounting holes on the top of the COVER.
SAVE THESE
INSTRUCTIONS