Operation, Fg e – Karcher HKF 200 K2 User Manual
Page 34
-
14
Caution
In order to avoid damage to the tank clean-
ing device by excessive pressure or too
high of a temperature, adher to the instruc-
tions in the Chapter "Specifications".
Install a filter (100 μm) into the supply
line to prevent clogging of the nozzles.
Connect the high pressure hose to the
high pressure connection (a).
To heat the tank prior to cleaning, steam
can be channelled in. This steam streams
through the draw pipe and enters the tank
area through three steam nozzles.
Connect the steam supply line at the
steam connection (b).
To dry the cleaned tank, you can blow in
warm air. For this purpose, there is the con-
nection (c) for the supply and exhaust flow.
You can select which connection you would
like to use for supply/exhaust.
To extend/retract as well as for the actua-
tion of the folding rack, you will need a lift-
ing unit. The load hook of the lifting unit is
hooked into the ring screw at the top end of
the draw pipe. The slip clutch of the lifting
unit must be set to 250 kg. This will prevent
possible damage to the tank cleaning the
device.
ƽ
Danger
Risk of injury on account of a drop of the
tank cleaning device. The lifting unit must
have a load capacity of at least 250 kg. The
load hook must have a security system
against inadvertent unhooking.
For flammable detergents or residual mate-
rials, the tank cleaning device must be
electrically grounded prior to startup.
ƽ
Danger
Risk of explosion and fire when using
cleaning agents and residue in the contain-
ers. Ground the tank cleaning device eletri-
cally. The operator of the system is
responsible for the proper implementation.
ƽ
Danger
Risk of injury on account of the possibly hot
high pressure or steam jet.
–
Only take the tank cleaning device in
completely closed tanks, do not clean
damaged containers, clamp the base-
plate down close to the dome of the
tank.
–
Only insert the tank cleaning device into
the tank or switch it into another tank
while the separate high pressure pump
and internal drive as well as the steam
inflow are turned off.
Caution
Risk of damage on the tank cleaning device
and on the cleaning heads.
–
The cleaning heads must never touch
the container wall or the items inside
the container. Please make sure these
are arranged with sufficient clearance
between them.
–
When retracting and extending the tank
cleaning device and when folding it into
its working position, make sure that the
cleaning heads do not hit the container
or the items inside the container and in-
side the dome neck.
–
Only extend and retract the tank clean-
ing device into and from the tank while
in extend/extract position and with the
transport safety device closed.
–
Only activate the drive of the cleaning
heads while the folding rack is in its
working position.
–
Do not manually adjust the position of
the spray nozzles on the cleaning
heads by turning them. A manual ad-
justment causes the breakage of the
overload fuse.
To fasten the tank cleaning device, you will
need a tank dome with a ledge. For domes
without a ledge, you must install an adapt-
er. For residual materials of group I and II
(see Chapter "Cleaning processes"), the
adapter without marking is used. The
adapter for residual materials of Group III is
marked with a III.
Installing the adapter:
Install the adapter onto the dome with
the seal facing down.
Tighten the star handle.
Completely empty the container to be
cleaned (open the floor drain valve or
suction off the remaining contents).
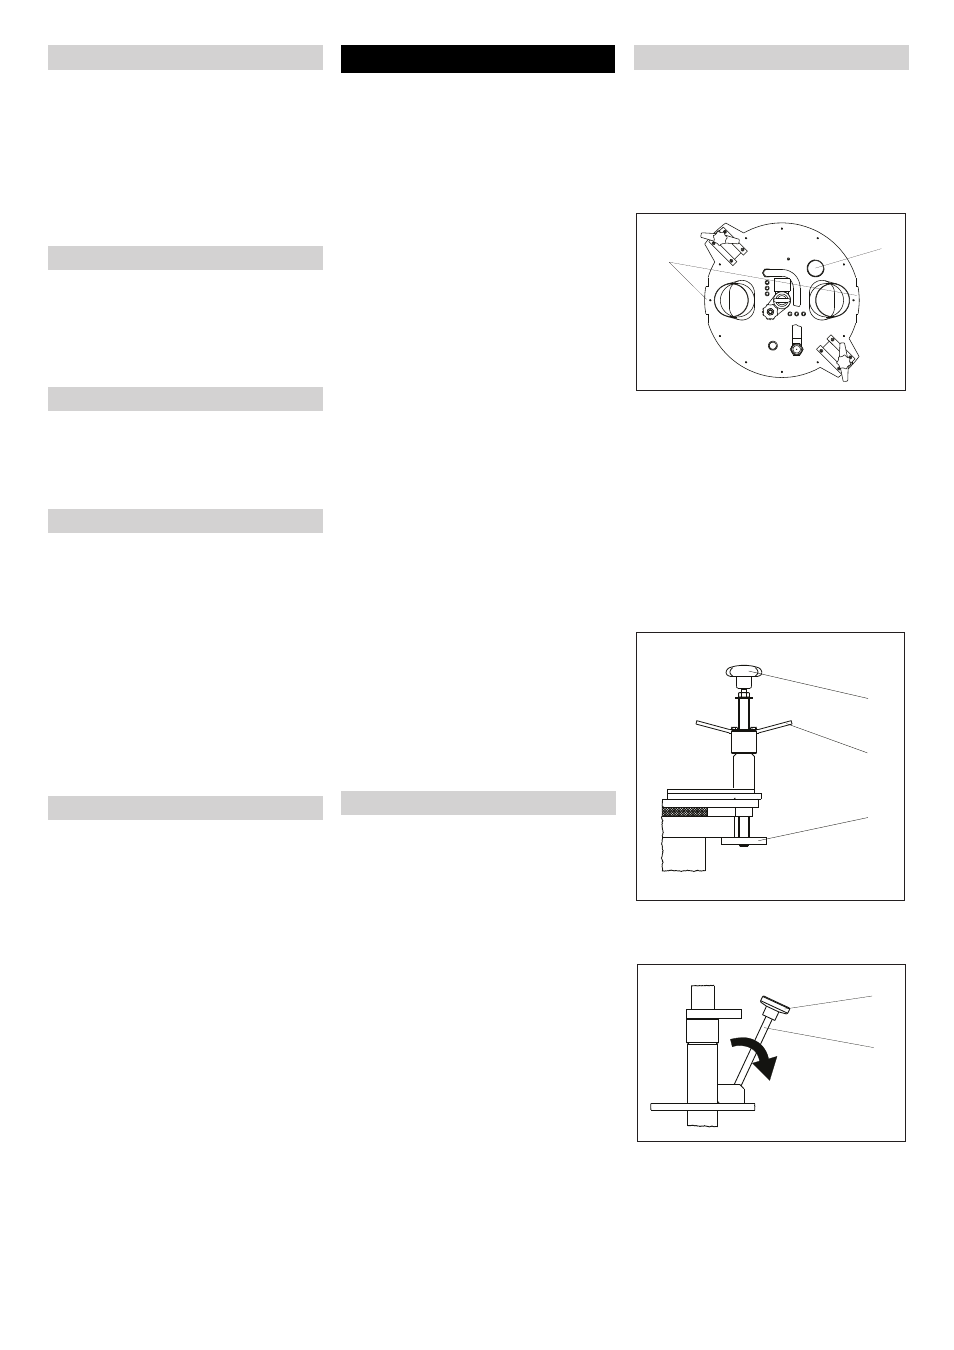
Bring the tank cleaning device into its
extend/retract position.
Retract the tank cleaning device into
the tank by lowering the lifting unit.
Center the baseplate on the dome of
the tank. The two noses (10) show the
swivelling plane of cleaning heads. The
noses should be aligned with the longi-
tudinal axis of the tank. If an installed
part in the tank (such as a floor drain
spindle) obstructs the swivelling move-
ment, the alignment can be slightly
askew.
Slide both tensioning units into the cen-
tre of the baseplate until the discs (e)
are located underneath the ledge of the
dome.
Pretension the tensioning units with the
star handle (f) and clamp them tight with
the T-handle (g).
Open the transport safety device on the
star handle (h) and tilt the spindle (i) to
the side.
Note: The chain attached to the tank clean-
ing device is used to show the swivelling
motion. In the working position, this chain is
almost stretched tight.
High pressure connection
Steam connection
Warm air connection
Lifting unit
Earthing
Operation
Preparing the tank dome
Retract the tank cleaning device
9
10
f
g
e
h
i
34
EN