Swiftech H20 80 R2 User Manual
Page 38
Rouchon Industries, Inc., dbA Swiftech™ – 1703 E. 28
th
St, signal Hill, CA 90755, USA – T (562) 595-8009 – F (562) 595-8769 – All content Copyright
Swiftech 2004 – Last edited 9-27-04 – Subject to revision without notice
- 38 of 38 -
2. Installing
MCW20-A™
water-block
Install the provided screws through the
motherboard, using a black fiber washer on both sides of
the motherboard, and tighten the nuts.
Install the motherboard back into the chassis
Lightly coat the microprocessor with the provided
thermal compound. Only a paper-thin coat is necessary.
It should be applied using preferably a razor blade, or a
credit card, held between thumb and index at a 45-
degree angle.
TIP! It is preferable to have the tubing inserted into
the water-block BEFORE you install the block onto the
motherboard. This is because pushing the tubes into the
block while it is already installed could exert undue
pressure onto the microprocessor.
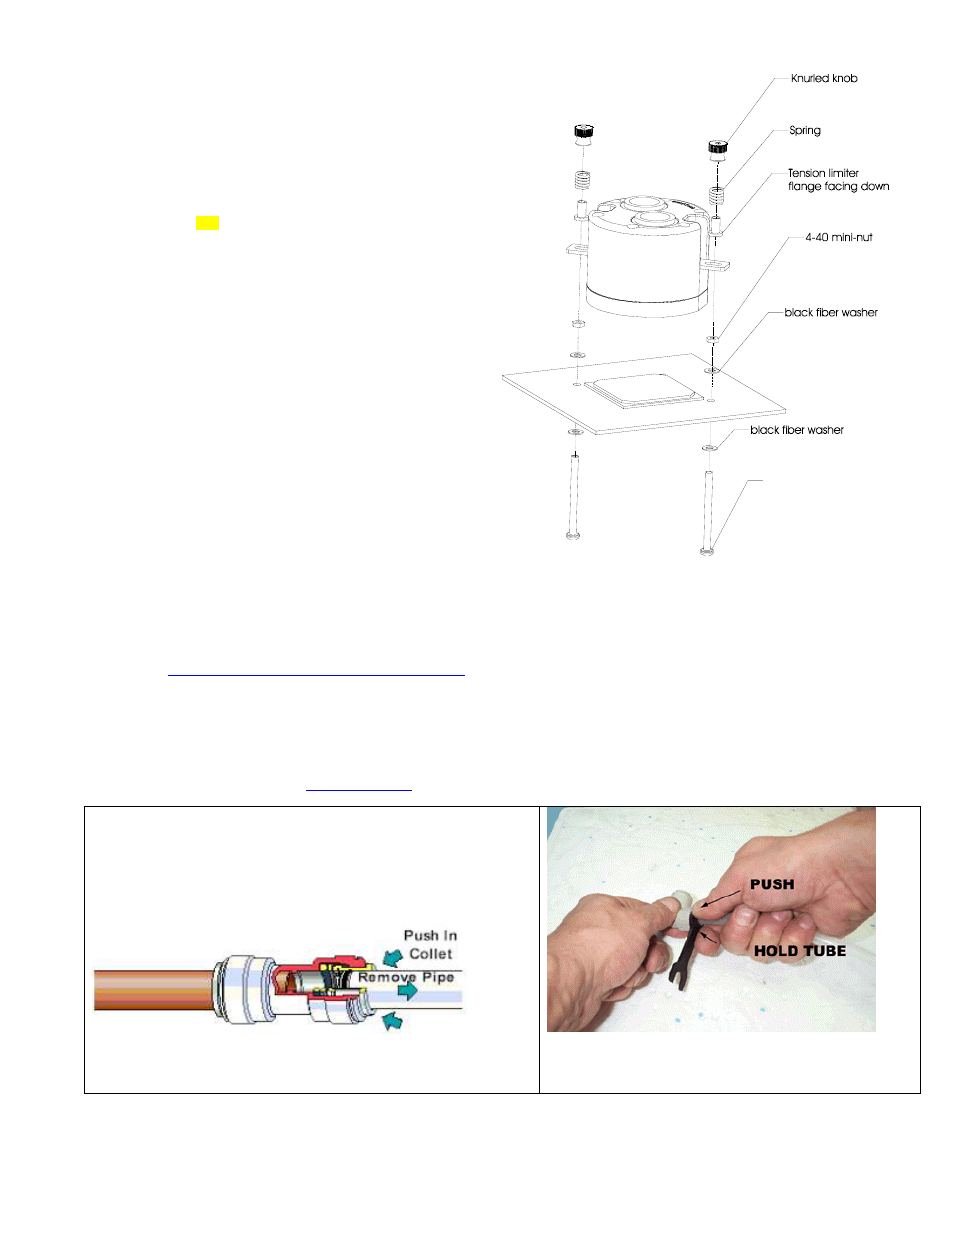
Slide down the MCW20-A over the retention
screws, as shown figure 10, then install the nylon tension
limiters (flange facing down), the springs, and tighten the
assembly with the knurled knobs. Over tightening of the
assembly is prevented by the tension limiter. Users
should be cautious nonetheless, as nylon can be easily
crushed.
4-40 x 1 1/2“ philips screw
Figure 10
3.
Connect the block to the rest of the cooling circuit.
The block is designed in such a way that it will bleed itself automatically in any vertical orientation (computer standing-up).
4.
Type of Coolant:
i)
For best performance, use 95% distilled water, and 5% Swiftech brand “HydrX” corrosion inhibitor (available here:
“accessories” section).
ii)
In ALL cases, you MUST use Distilled water AND a corrosion inhibitor with the MCW5002 water-block. Regular automotive anti-freeze
is acceptable. Automotive manufacturers recommend that not less than 25% is used.
iii) NEVER use tap water, even for a short-term test.
iv) Not following paragraphs b and c above constitutes misuse (*) of the product, and will void your warranty.
5.
Final inspection
Once the installation is completed, it is always a good idea to test the circuit for leaks, prior to powering up the computer. Troubleshooting
help is available on our
, or by calling customer support at 562-595-8009.
Note concerning removal of the tubing in quick-connect fittings
: Push in
the collet squarely against the face of the fitting using swiftech’s tube removal
tool, or a wrench of approximately the same opening diameter as the tube (1/2”
+). The collet is the inner plastic ring protruding from the face of fitting. It fits
loosely into the fitting, and can be moved up and down by approximately 1/8”.
With the collet firmly held against the face of the fitting, the tube can be safely
pulled out. Do not attempt to pull the tube out without pushing squarely against
the collet. This may result in damaging the fitting.
Figure 11
Figure 12