Swiftech MCW40 User Manual
Parts list
Swiftech Inc., 1703 E. 28
th
St., Signal Hill, CA 90806 T. (562) 595-8009 F. (562) 595-8769
Page 1 of 2
Parts list
Parts
QTY
PARTS
QTY
MCW40™ assembly
1
3/8” vinyl tubing
3’
2-56 S/S socket screw
4
Tube insert
4
Nylon screw spacer
4
Thermal compound
1
Nylon washer
4
Socket wrench
1
Spring 4
This product is intended for expert users only. Please consult with a qualified technician for installation. Improper installation may result in
damage to your components. Swiftech assumes no liability whatsoever, expressed or implied, for the use of these products, nor their
installation. The following instructions are subject to change without notice. Please visit our web site at
www.swiftnets.com
for updates.
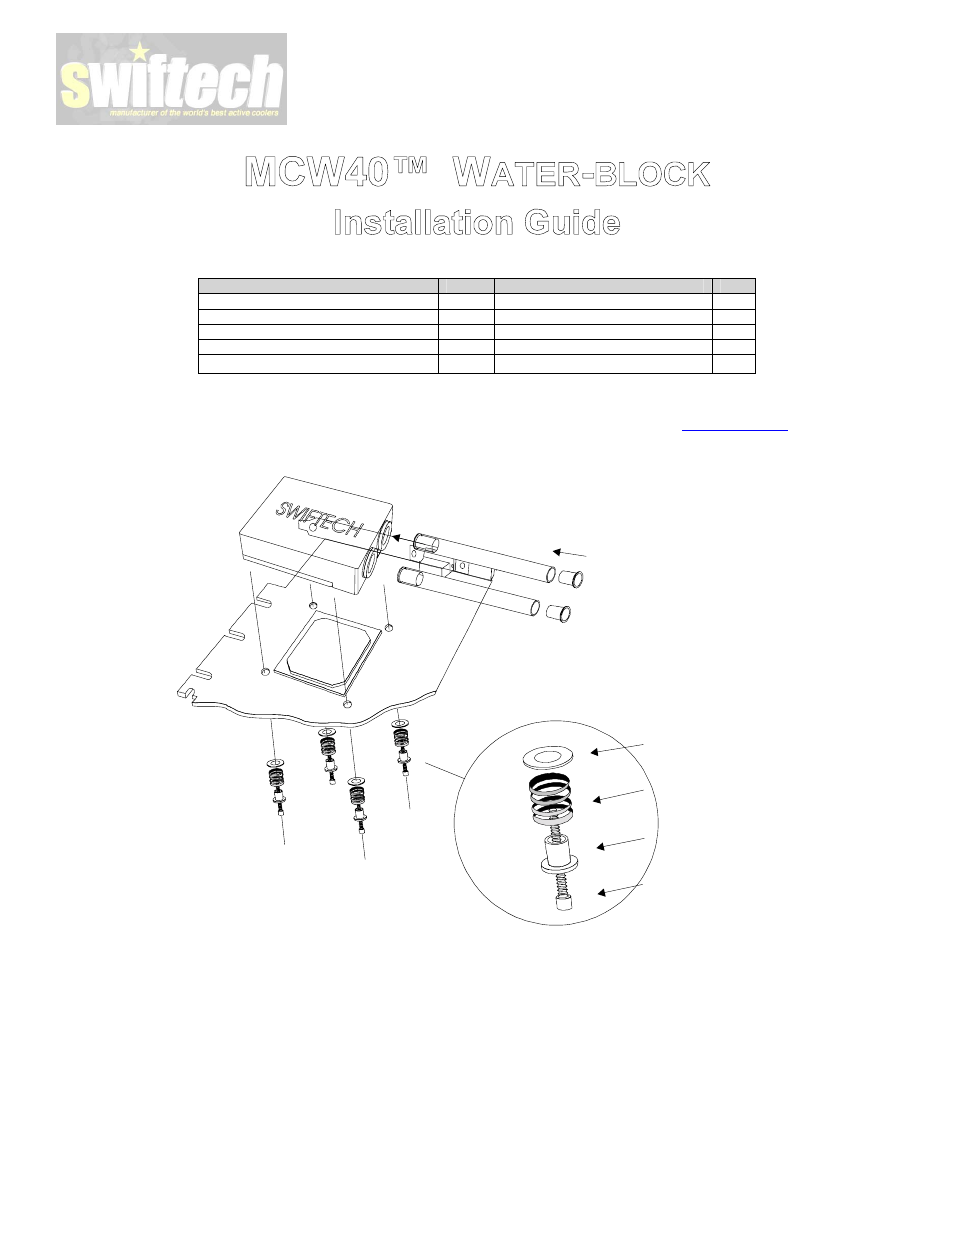
Installation diagram
Tube insert
Nylon washer
Spring
Nylon screw spacer
2-56 S/S socket screw
1.
Preparing your graphics card
a. Remove the existing heat sink
b.
Carefully clean the GPU (graphics processing unit)
c.
Lightly coat the GPU with the provided thermal compound. Only a paper-thin coat is necessary. It should be applied using
preferably a razor blade, or a credit card, held between thumb and index at a 45-degree angle.
2.
Installing the MCW40™ cooler
a.
The MCW40™ retention mechanism uses the four mounting holes standard specified in GeForce™ GPU's as shown in the
schematic above. It can also be installed with other graphics processors by using permanent bonding agents, such as
thermally conductive epoxies. We recommend Arctic Silver™ or Arctic Alumina™ epoxy.
b.
The MCW40™ can be oriented in any position, as needed to clear components on the board, except for one: the inlet and
outlet should not be oriented towards the motherboard as the block would otherwise interfere with installation of the graphics
card.