DAVIS Rain Collector for Vantage Pro2 (with grip grooves and bird spikes) User Manual
Rain collector, Components, Hardware kit
Rain Collector
(#7857 & 7857M)
This rain collector can be used with Vantage Pro2™
weather stations, including Vantage Pro2, Vantage
Pro2 Plus, and the Anemometer/Sensor Transmitter Kit.
The following instructions assume the rain collector
is being used with a Vantage Pro2 or Vantage Pro2
Plus Integrated Sensor Suite (ISS). Refer to the user
manual that came with your station for more information.
Manuals are available online at www.davisnet.com in the Weather Support section.
Note: Model number 7857 is factory-calibrated to take rain measurements in 0.01 inches. The
metric version of the rain collector, number 7857M, comes factory-calibrated to take
measurements in 0.2 mm.
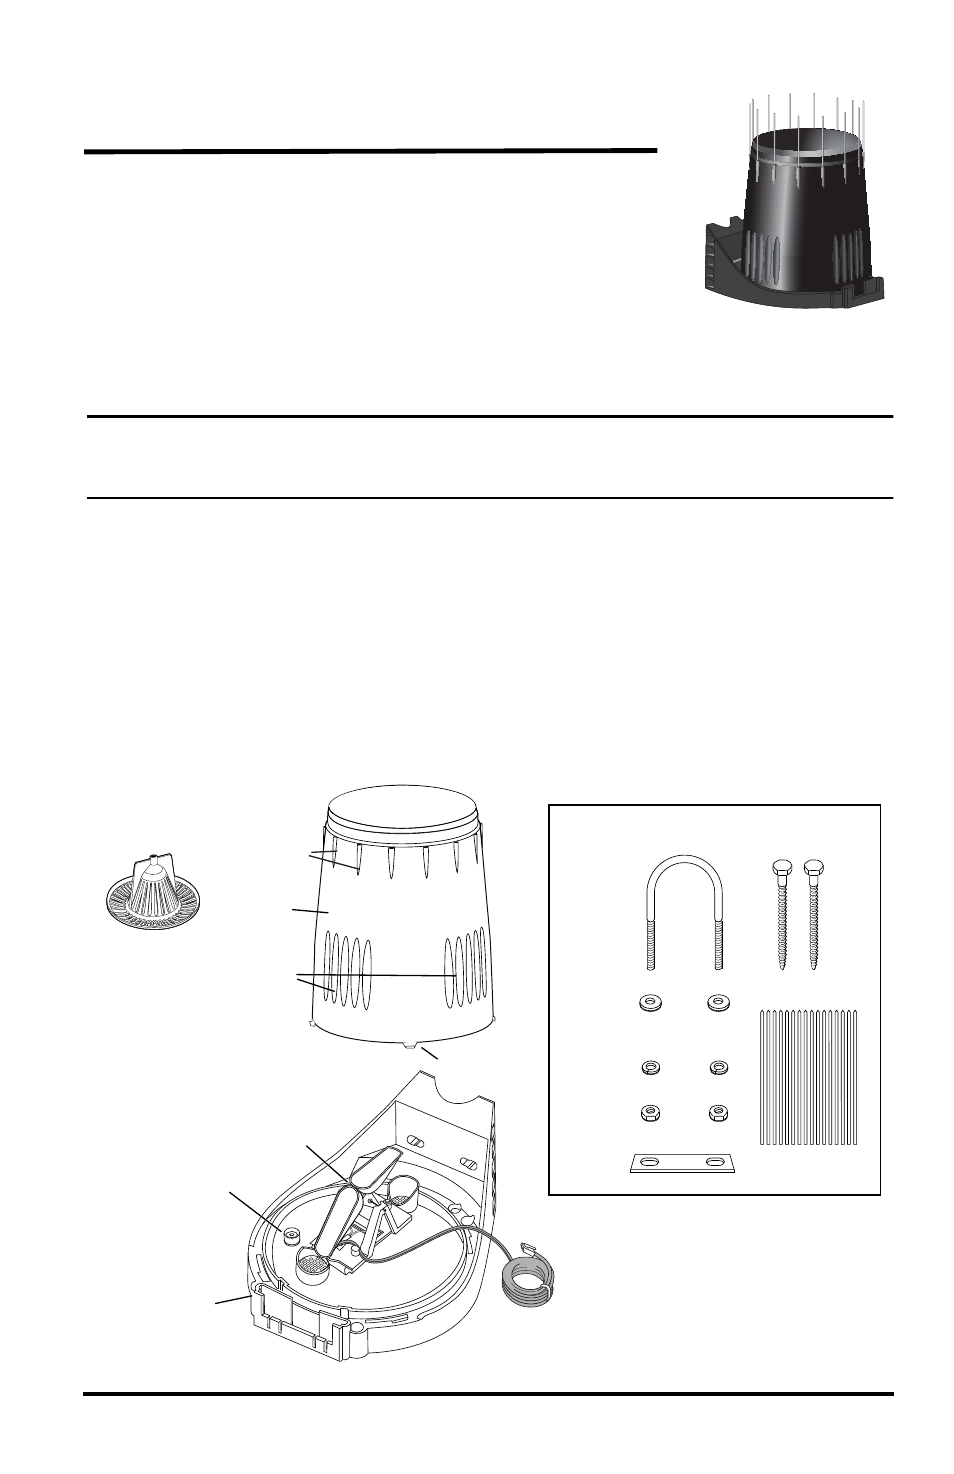
Components
Please make sure you have all listed components before continuing.
• Rain collector cone latched onto base
• Base with tipping mechanism and 40’ (12 m) cable
• U-bolt, backing plate and 2 each: lag screws, flat washers, lock washers, and
hex nuts
• Debris Screen
•16 3.5” (9 cm) bird spikes (optional)
TIPPING
MECHANISM
RAIN
CONE
40’ Cable
Bubble Level
BASE
14 Bird Spike
Sockets
Finger Grips
Debris Screen
(fits snugly
inside cone)
Latch
1/4" Flat
Washers
1/4" Lock
Washers
1/4" Hex
Nuts
3.5” (9 cm)
Bird Spikes (16)
U-Bolt
Backing
Plate
1/4" x 3" Lag Screws
(~6 x 75 mm)
HARDWARE KIT
Document Outline
- Rain Collector (#7857 & 7857M)
- Note: Model number 7857 is factory-calibrated to take rain measurements in 0.01 inches. The metric version of the rain collector, number 7857M, comes factory-calibrated to take measurements in 0.2 mm.
- Components
- Tools and Materials Needed
- Rain Collector Internal Components
- Rain Collector Internal Components
- Note: The rain collector is shipped with the 40’ cable coiled and exiting through one of the cable slots. You may want to uncoil the cable and feed it down through the hole in the base behind the tipping spoon.
- Prepare the Rain Collector
- 1. Remove the cone from the base by rotating the base until the latches on the cone line up with the latch openings in the base, then lifting the cone away from the base.
- 2. Carefully cut and remove the plastic tie which holds the tipping spoons in place during shipping.
- Test the Rain Collector
- 1. Open the transmitter shelter on the ISS. Remove the foam insert and feed the rain collector cable up through the opening. Plug the cable to the appropriate connector in the sensor interface (See illustration on page 6.)
- 2. Press the RAINDAY button on your console to display rainfall.
- 3. While watching the display on your console to see if it changes, slowly tip the bucket until it drops to the opposite side. Each tip indicates 0.01" or 0.2 mm of rain. (It may take up to a minute for the first tip to register at the console.) If t...
- Installing the Rain Collector
- Installing the Rain Collector on a Post or Flat Surface
- 1. With a 3/16" (5 mm) drill bit, drill two holes approximately 21/8" (54 mm) apart. Use the metal backing plate as a guide when marking the holes and a carpenter’s level to ensure the holes are level.
- 2. Remove the rain collector cone if it is installed.
- 3. Insert the 1/4" x 3" lag screws through the metal backing plate and the holes in the mounting base into the post. Make sure the base is level by checking the built-in bubble level.
- 4. Tighten the lag screws using an adjustable wrench or 7/16" wrench.
- Installing the Rain Collector on a Pole
- Accessories for Pole Mounting
- General Guidelines for Installing on a Pole
- 1. While holding the mounting base against the pole, place the two ends of a U-bolt around the pole and through the two holes in the base.
- 2. Slide the metal backing plate over the bolt ends as they stick out toward the rain collector cone. Secure the backing plate with a washer, a lock washer, and a hex nut on each of the bolt ends. Adjust the height of the rain collector, then tighten...
- Finishing Steps
- 1. Open the transmitter shelter on the ISS. Remove the foam insert and feed the rain collector cable up through the opening. Plug the cable to the appropriate receptacle in the transmitter. Replace the foam and close the shelter.
- 2. To be certain the rain collector is functioning properly after installation, retest the unit. See “Test the Rain Collector” on page 3.
- 3. To use bird spikes, insert one spike into each socket around the rim of the cone. The sockets are tapered: push firmly or tap lightly with a hammer for a more secure fit.
- 4. Place the cone back onto the base by putting the latches on the cone into the latch openings in the base and rotating the cone clockwise until the latches “lock” into place. As you reattach the cone, make sure to run the cable to the cable slo...
- 5. Place the debris screen, pointed end up, into the cone. The screen prevents large bits of debris from blocking the funnel hole. If bird nesting is a problem, you can place a spike in the hole on top of the debris screen. Note that using a bird spi...
- Note: If you choose not to install the bird spikes, we recommend that you keep the packet of spikes in case birds become a problem in the future.
- Note: Model number 7857 is factory-calibrated to take rain measurements in 0.01 inches. The metric version of the rain collector, number 7857M, comes factory-calibrated to take measurements in 0.2 mm.
- Use cable clips or weather resistant cable ties to secure the cable. Place clips or ties approximately every 3 to 5 feet (1 to 1.6 m). Do not use metal staples or a staple gun to secure cables. Metal staples, especially when installed with a staple g...
- Extending Cable Runs
- Adjusting the Rain Collector
- Note: Modify both adjustment screws by the same amount.
- Note: Avoid comparison to rainfall readings obtained from television, radio, newspapers, or neighbors’ readings. Such readings are not an accurate measurement of the weather conditions in your specific location. The rain collector is carefully test...
- Maintaining the Rain Collector
- 1. Disconnect the rain collector cable from the sensor interface in the transmitter shelter.
- 2. Separate the cone from the base.
- 3. Use a soft damp cloth to clean pollen, dirt, and other debris from the cone, cone screens, and bucket.
- 4. Use a pipe cleaner to clear the funnel hole in the cone and the drain screens in the base. When all parts are clean, rinse with clear water.
- 5. Reattach the cone and replace the debris screen. Reconnect the rain collector cable to the sensor interface.
- Troubleshooting Guide
- Specifications
- Sensor Type Tipping bucket with magnetic reed switch
- Output Contact closure
- Attached Cable 40’ (12 m), 4-conductor, 26 AWG
- Connector Modular connector (RJ-11)
- Recommended Max.Cable Length 900’ (270 m)
- Housing Material UV-stabilized ABS plastic
- Range
- Accuracy For rain rates up to 2"/hr (50 mm/hr): ±4% of total or +0.01” (0.2mm) (0.01" = one tip of the bucket) whichever is greater. For rain rates from 2"/hr (50 mm/hr) to 4"/hr (100 mm/hr): ±5% of total or +0.01” (0.2mm), whichever is greater.
- Update Interval 20 - 24 seconds
- Input/Output Connections