DAVIS Anemometer (7911, 7914) User Manual
Standard anemometer, Installation manual, Components
1
Standard Anemometer
Installation Manual
The anemometer measures and displays wind-related conditions such as wind
speed, wind direction, wind run, wind chill, and the temperature-humidity-
sun-wind index.
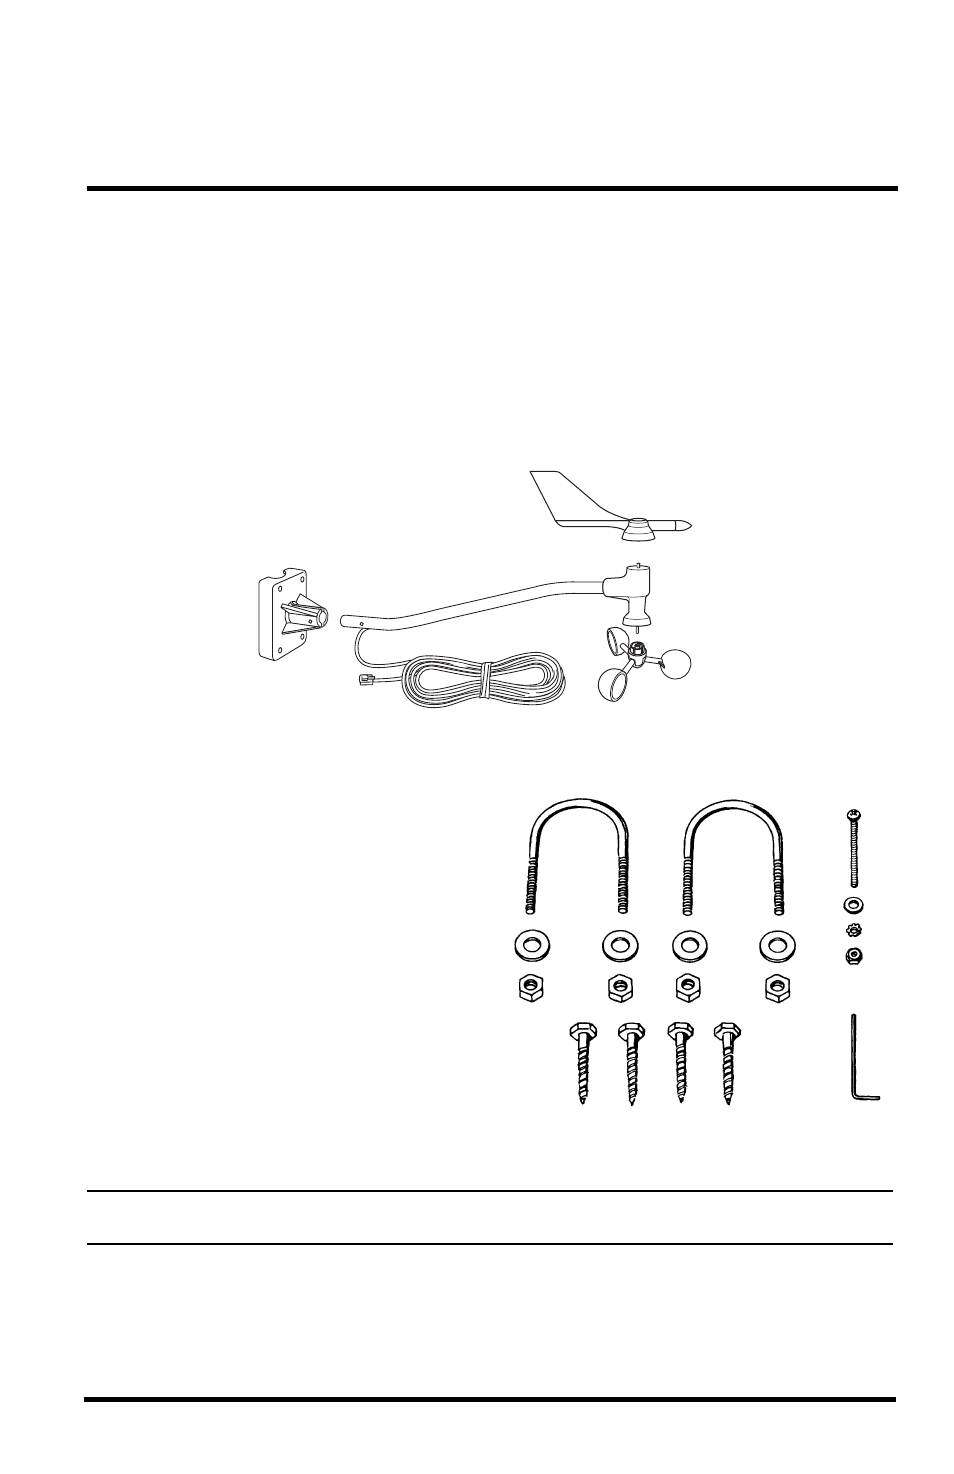
Components
The anemometer includes the components listed below. Be sure you have all
listed components before continuing. Assess your installation and make sure
you have all necessary parts, tools, and materials pictured below before you
begin.
Wind Cups
Anemometer
Base
Anemometer Arm
with 40 feet (12.2 meters)
of cable
Wind Vane
Hardware
The hardware kit contains the items
most commonly needed for the
installation of the anemometer.
Which items you use from the kit
depend on where you install your
unit. You may need to adapt or
purchase additional hardware to fit
your individual requirements.
Tools and Materials Needed
You will need the following tools
and materials to install your
anemometer:
• Cable Clips or Weather-Resistant Cable Ties
Note: Make sure the clips or ties you use to secure the anemometer cable have screw holes or other
means for mounting the cable. Do not use metal staples to secure the cables.
Document Outline
- Standard Anemometer
- Installation Manual
- Components
- Hardware
- Testing the Anemometer
- 1. Connect the anemometer cable to the appropriate connector on your junction box.
- 2. Push the wind cups onto the smaller of the two stainless steel shafts at the end of the arm.
- 3. Spin the wind cups gently. You haven’t secured them yet, and if you spin them too hard you may knock them off.
- 4. Check the display on your weather station to make sure you are getting a wind speed reading.
- 5. Grasp the upper, larger of the two stainless steel shafts at the end of the arm with your fingers and twist the shaft about 1/2 turn.
- 6. Check the display to make sure the wind direction reading on your display changes.
- Note: The wind direction readings will not change as rapidly as you turn the shaft. The station uses a low pass filter to smooth out the constant small shifts in wind direction and keep the direction display from jumping about in gusty winds.
- Assembling the Anemometer
- 1. Push the wind cups onto the smaller of the two stainless steel shafts.
- 2. Slide the wind cups as far up the shaft as possible.
- 3. Use the allen wrench provided to tighten the set screw on the side of the wind cups.
- 4. Spin the wind cups. If they do not spin freely, loosen the set screw, lower the cups slightly, then retighten the set screw.
- 5. Repeat Step 4 until the wind cups spin freely.
- Choosing the Best Anemometer Location
- Installing the Anemometer
- Installing on a Sensor Mounting Arm
- Check the Anemometer Base Orientation
- Installing the Base on a Wooden Post or Surface
- Installing on Antenna Mast or Metal Pipe
- 1. Hold the anemometer base against the pipe and insert the two U-bolts through the back of the base so that the U-bolts wrap around the pipe.
- 2. Place a 1/4" washer and a 1/4-20 hex nut over each end of the U-bolts and use a wrench to tighten the hex nuts.
- 1. Use two stainless steel hose clamps to attach the mounting base to masts or pipes larger than 1 1/4" diameter, large enough to fit around the mast or pipe and the anemometer base.
- 2. Hold the anemometer base against the pipe and fasten the hose clamps over the anemometer base and around the metal mast or pipe.
- Attaching Arm to Base
- Installing the wind vane
- 1. Slide the wind vane down onto the shaft as far as it will go. (Because of the shape of the shaft, the vane will only go on one way.)
- 2. Use the allen wrench provided to tighten the set screw on the side of the wind vane.
- 3. Test your assembly by pointing the wind vane in any direction and (using the compass or map as a guide) making sure the console displays the correct wind direction.
- 4. Because of the low pass filter used by the station, allow the wind direction reading approximately 5 seconds to stabilize after you turn the vane.
- 5. Spin the wind cups to make sure you get a wind speed reading. Readjust the cups if necessary.
- 6. Secure the cable to the metal mast or pipe with electrical tape. Secure the rest of the cable according to the directions below.
- Securing the Cable
- Securing cable
- Note: Do not use metal staples to secure cables. Metal staples can cut the cables.
- Maintenance
- Troubleshooting
- Contacting Davis Instruments Technical Support
- Specifications