Telenav for Nextel Supported Devices: v3.6 for Motorola i710, i730, i733, i736, i830 User Manual
Page 12
© TELENAV 2003-5
PAGE 12 OF 33
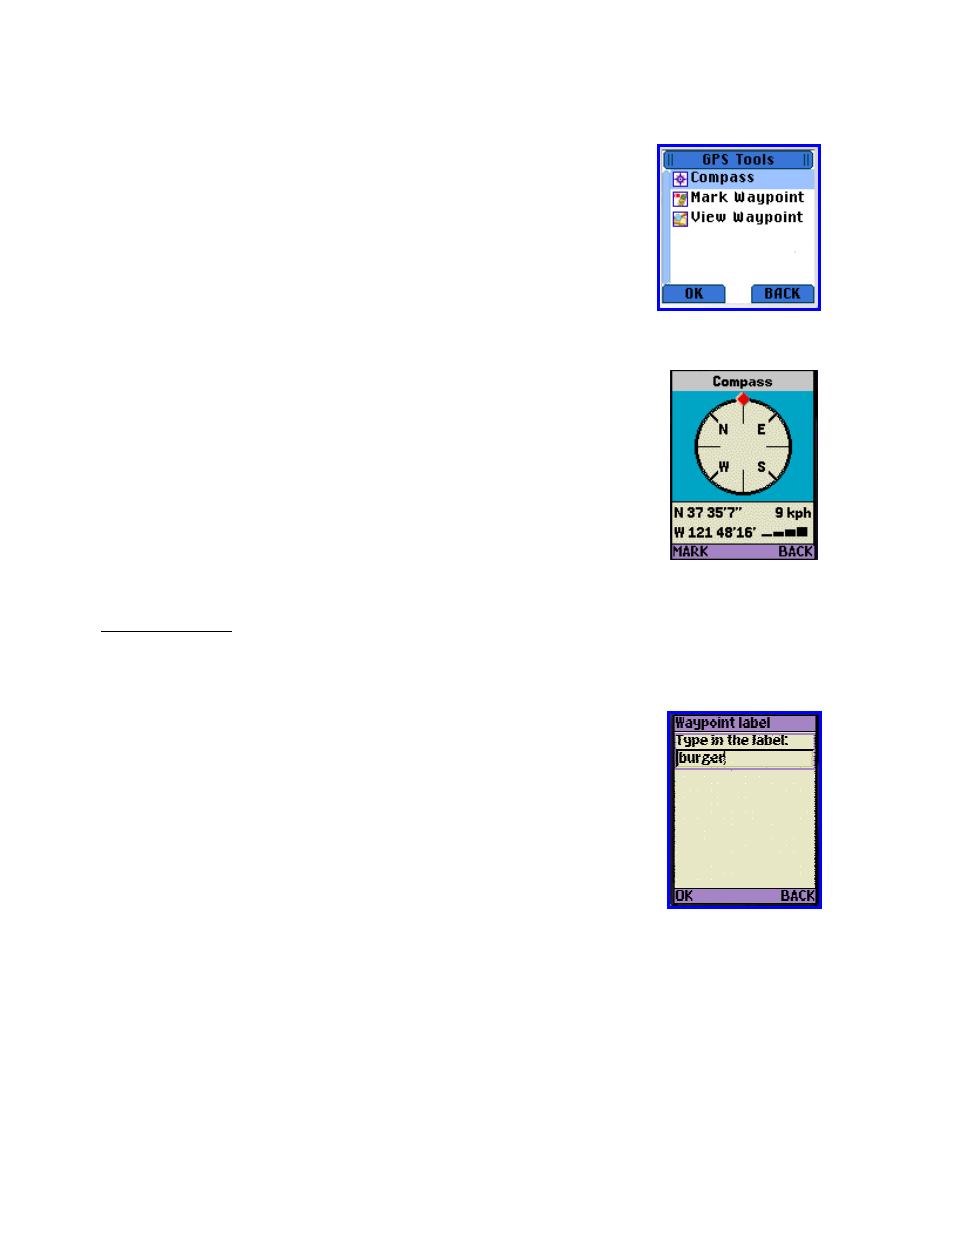
GPS Tools
None of the GPS Tools require Nextel packet data service or a TeleNav
subscription. If you select GPS Tools from the main menu, you will be taken to
the GPS Tools submenu. You can make a choice by highlighting the item, and
pressing OK. Otherwise, press BACK to return to the main menu.
Compass
If you choose Compass, you will see a display similar to a nautical compass, but
more correctly it actually displays course over ground, the direction you are traveling
if you are moving. The screen also provides current latitude, longitude, and speed.
Using the main menu Preferences, you can select the format of the speed as miles
per hour or kilometers per hour. Press BACK to return to the GPS basic submenu.
If no GPS data is available, “No GPS” appears instead of latitude and longitude.
Otherwise, a GPS satellite count indicator occupies the area below the speed value.
Add three (3) to the number of bars shown to determine the number of satellites
being tracked by the GPS receiver. When the indicator shows that 7 satellites are
being tracked (which is good), the receiver may actually be tracking even more
(which is even better).
Marking a Waypoint. The left MARK Option Key allows you to mark a waypoint (as described below) directly from
the Compass view.
Mark waypoint
This menu option (also available from Compass view) allows you to mark and label
your current location for future reference. If you choose Mark waypoint, there will
be brief activity to determine the GPS position, and then you will need to enter a
label of at least 3 characters length, or you can accept the default label based on the
current date.
View waypoint
Selecting View waypoint allows you to see the spatial relationship of a selected waypoint relative to your current
location. If you have not marked any waypoints, you will simply get a message “No waypoints” and you should
press OK to return to the submenu. Otherwise, you will see a list of waypoint labels to pick from. After you pick
one, you will see the waypoint’s latitude and longitude. The next display teaches you the key functions that allow
you to manipulate the following screen that shows you the relationship of your current position to the waypoint. The
Smiley Face is your location, and the other end of the vector is the waypoint icon. The view is North oriented, and
the approximate distance to the waypoint is shown, along with your current speed and the GPS signal quality
indicator.