12 cm pressure assisted device – Merit Medical Safeguard 12cm Multilingual IFU User Manual
Page 2
12 cm PRESSURE ASSISTED DEVICE
I N S T R U C T I O N S F O R U S E
Read instructions prior to use.
Product not made with natural rubber latex.
DEVICE DESCRIPTION
The SAFEGUARD 12 cm is a single use disposable device. SAFEGUARD
has a clear medical grade polyurethane window and bladder, a clear
medical grade PVC flexible fill tube, and a pressure sensitive, self-ad-
hesive peel backing. A luer valve on the end of the fill tube enables
a syringe to be connected to inflate the central bladder with air to
provide pressure to the puncture site. The SAFEGUARD pressure
assisted device has a sterile dressing with a clear window that
facilitates visibility of the access site without removal or manipulation
of the device.
INDICATIONS
The indications for use for the SAFEGUARD 12 cm pressure assisted
device are to assist in obtaining and maintaining hemostasis.
CONTRAINDICATIONS
The adhesive portion of the SAFEGUARD device should not be used
over excoriated skin.
CAUTIONS
Px Only. Caution: Federal (U.S.A.) law restricts this device to sale by or
on the order of a physician.
CAUTION: With over-inflation i.e., above 7 mL’s of air, the bulb may
begin to expand radially and could compromise the adhesive prop-
erties of the device.
CAUTION: Under-inflation of device could compromise the ability of
the device to assist in obtaining and maintaining hemostasis.
REUSE PRECAUTION STATEMENT
For single patient use only. Do not reuse, reprocess or resterilize.
Reuse, reprocessing or resterilization may compromise the structural
integrity of the device and/or lead to device failure which, in turn,
may result in patient injury, illness or death. Reuse, reprocessing or
resterilization may also create a risk of contamination of the device
and/or cause patient infection or cross-infection, including, but not
limited to, the transmission of infectious disease(s) from one patient
to another. Contamination of the device may lead to injury, illness or
death of the patient.
PRECAUTIONS
• Use proper aseptic techniques while handling product.
• Do not use if package is damaged
• Inspect device prior to use to verify that no damage has occurred
during shipping.
POTENTIAL ADVERSE EFFECTS
Possible adverse effects that may result from the use of this device:
• Hematoma
• Local bleeding
• Arterio-venous fistula or pseudoaneurysm
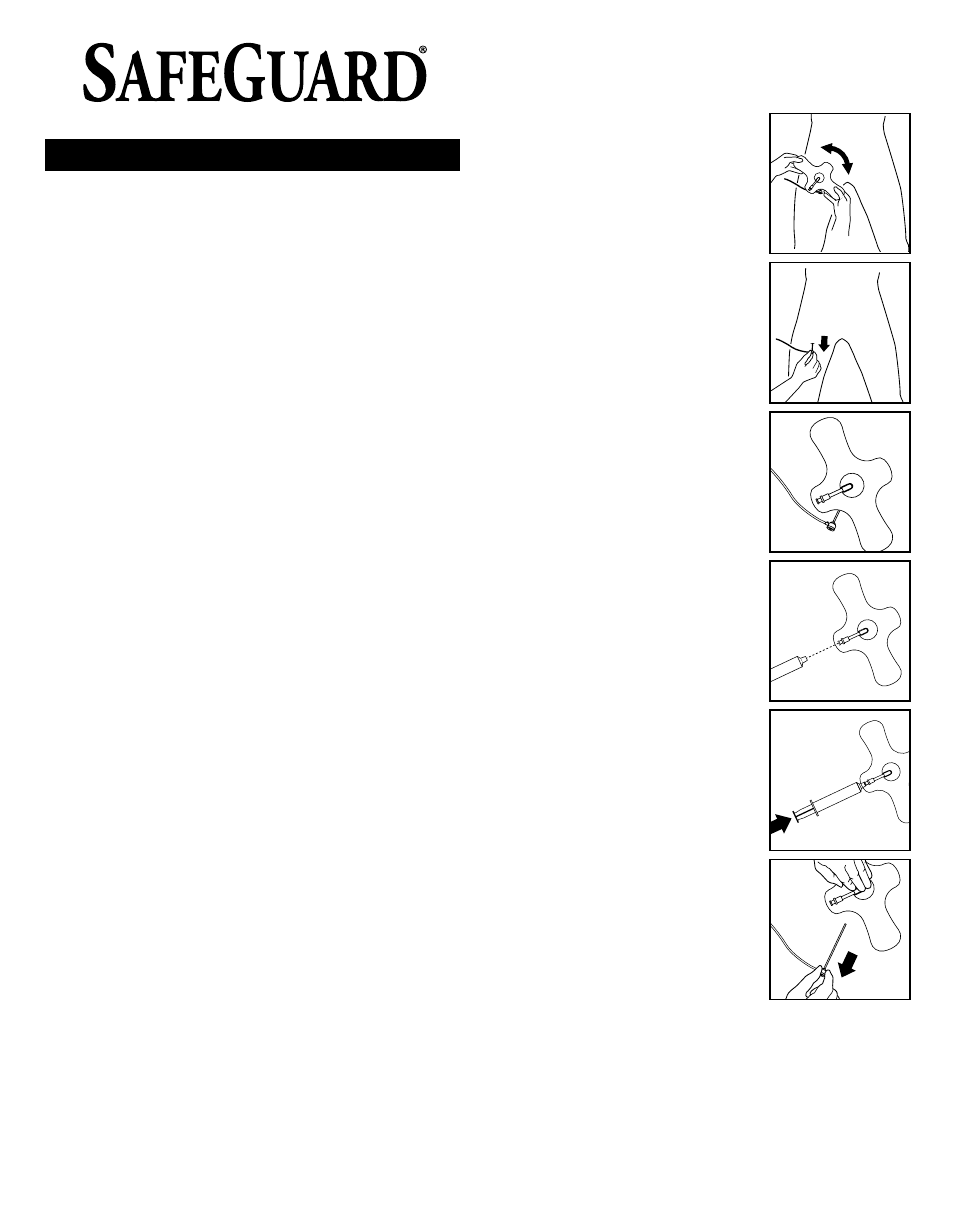
PRE-HEMOSTASIS, or MANUAL ASSIST TECHNIQUE
PLACEMENT OF SAFEGUARD
1. Before adhering SAFEGUARD to the
patient, be sure skin is clean and dry.
Determine the appropriate angle for
SAFEGUARD placement to provide easy
access to luer inflate/deflate port and to
allow for easy sheath removal.
Note: Placement may require adjustment
based on the patient’s anatomy, angle
of the puncture site, and the presence or
absence of a procedural sheath.
2. Consider the point of maximum pulse,
anatomy, angle of puncture and
direction of flow to determine the
appropriate SAFEGUARD position and
verify.
3. Pull the procedural sheath back
approximately 1” (2.5cm) so that when
SAFEGUARD is adhered to the skin the
sheath hub is outside the area of the
SAFEGUARD adhesive.
Note: It is recommended that you aspirate
the sheath prior to removal to prevent distal
embolization from residual clot in sheath.
4. Remove the adhesive backing and place
the bulb where you would position your
fingers to hold manual compression (for
example, in femoral artery procedures,
typically the point of maximum femoral
pulse). Make sure SAFEGUARD is com-
pletely adhered to the skin.
5. Attach and completely engage a
standard luer lock syringe to inflate the
desired volume a maximum volume
of 7 mL’s of air into the bulb to apply
pressure on the arteriotomy site. Syringe
must be completely engaged in the
luer to inflate/deflate the bulb. Remove
syringe.
Note: Maintain pressure on the plunger
while detaching syringe from the SAFE-
GUARD valve. Observe that the desired
pressure is achieved and maintained.
6. Remove sheath, then immediately
apply manual compression directly over
inflated bulb.
7. Hold manual compression until hemo-
stasis has been achieved.
• Slowly release manual compression.
• Check distal/proximal pulses to assure
flow is maintained.
• Confirm hemostasis by viewing the site
through the inflated bulb window.
8. Per hospital protocol, periodically check
the site through the bulb window to confirm hemostasis and
to manage the bulb volume and resultant pressure as needed.
Continue to check distal/proximal blood flow to assure patency.
9. Deflate bulb every two hours to allow for capillary refill and to
assess the site. Re-inflate the bulb if necessary.