Lokar Column Shift Linkage For Ford AOD, 4R70W, and AODE User Manual
Page 2
Page 2
© 2014 Lokar, Inc.
Fig. 5
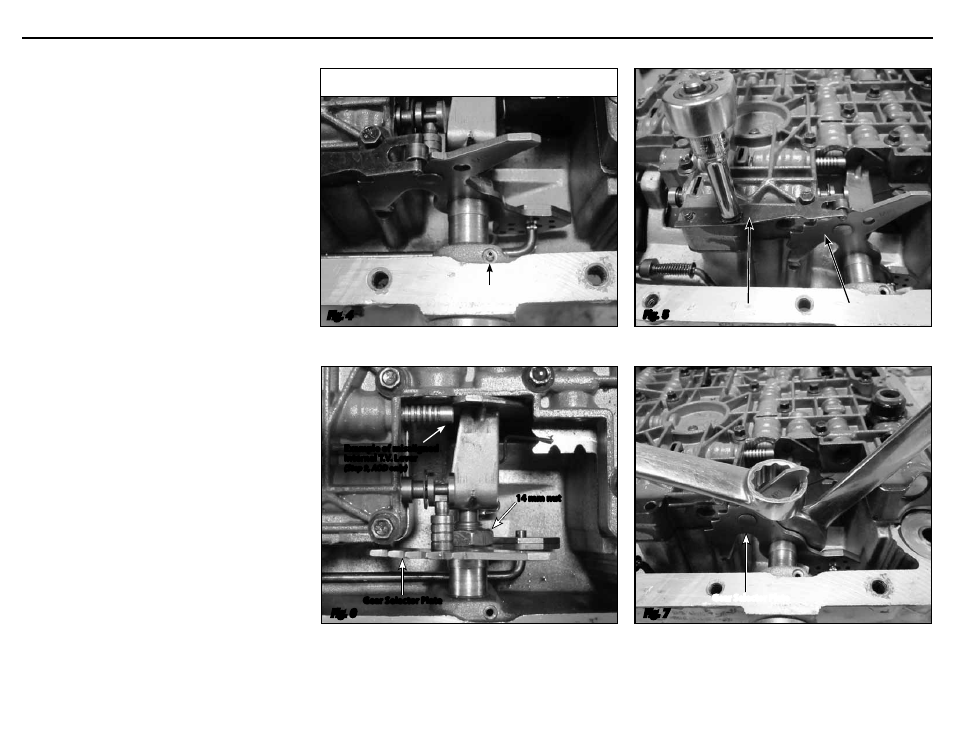
Fig. 4
Fig. 6
Fig. 7
AOD shown in all photos below. AODE & 4R70W are similar.
Example of misaligned
Internal T.V. Lever
(Step 9, AOD only)
14 mm nut
Gear Selector Plate
Roller Spring
Gear Selector Plate
Gear Selector Plate
Roll Pin
Column Shift Linkage Installation Instructions for Ford AOD, 4R70W, and AODE
Step 6: (continued) All: Move the gear selector plate all the way to
the rear to put it into low gear. Hold the gear selector plate
with a box end wrench or other tool to keep it from rotating,
and unscrew the 14mm nut from the end of the selector
shaft. On the AOD transmission, the nut will still be retained
by the T.V. shaft and will remain in the transmission.
Fig. 6
and
Fig. 7
Step 7: AODE and 4R70W Only: Remove the Auto Trans Gear
Position Sensor from the outside of the transmission case by
removing the mounting bolts and sliding it off of the selec-
tor shaft.
All: Remove the old selector shaft from the transmission by
sliding it out of the bore. The gear selector plate will stay in
the transmission, and you may have to tap on it or lightly pry
on it to get it separated from the selector shaft.
Step 8: Lubricate the selector shaft seal in the transmission and the
new Lokar selector shaft with a small amount of transmis-
sion fluid or transmission assembly grease. On the AOD
only, also lubricate the T.V. shaft seal that is inside the new
selector shaft.
DO NOT remove the T.V. shaft seal; it is not
necessary to remove it for installation of the selector shaft.
Slide the Lokar selector shaft into the transmission. On AOD
models, the T.V. shaft fits inside the selector shaft.
Step 9: Align the two flats on the new gear selector shaft with the
flats on the gear selector plate in the transmission, and
install the selector shaft into the gear selector plate.
Fig. 8
The gear selector plate has a pin attached to it that must be
positioned in the groove on the piston that protrudes from
the valve body. This pin needs to be in the groove before the
14mm nut is tightened.
Fig. 9 Once the pin is in the groove,
tighten the nut.
Step 9: AOD Only: If the T.V. spring slipped out of place, put the
spring back into position as shown in
Fig. 10. Also verify that
the internal T.V. lever is aligned with the T.V. piston. With
the external T.V. lever removed, it is possible for the T.V.
shaft and internal lever to slide in too far, and the lever can
get trapped between the T.V. piston and the valve body.
Fig. 6 and Fig. 10
Step 10: Reinstall the roller spring that holds the gear selector plate
in gear.
Fig. 11
Step 11: Reinstall the 1/8" roll pin. It will align with the groove in
the selector shaft.
DO NOT DRIVE THE ROLL PIN ALL THE WAY
IN FLUSH WITH THE CASE! It is important that the roll pin
is sticking out beyond the casting so it can be removed if
needed at another time.
Fig. 12
AODE and 4R70W Only: Reinstall the Auto Trans Gear
Position Sensor onto the selector shaft and attach to the
transmission case using the original bolts. Make sure the
tabs on the inside of the sensor are aligned with the slots in
the selector shaft.
Step 12: Rotate the gear selector plate all the way forward (clockwise)
into the
"PARK" position.