Lokar Curved Aluminum Brake & Clutch Pedal Pad Cover User Manual
Lokar For the car
Building American Quality… With A Lifetime Warranty!
General Installation Notes:
Please read instructions completely before beginning installation. If you
have any questions please call.
Before starting installation, scotch vehicle tires to avoid accidental
movement of the vehicle. Do not attempt to install this product while
the engine is running. Disconnect negative battery cable before begin-
ning installation.
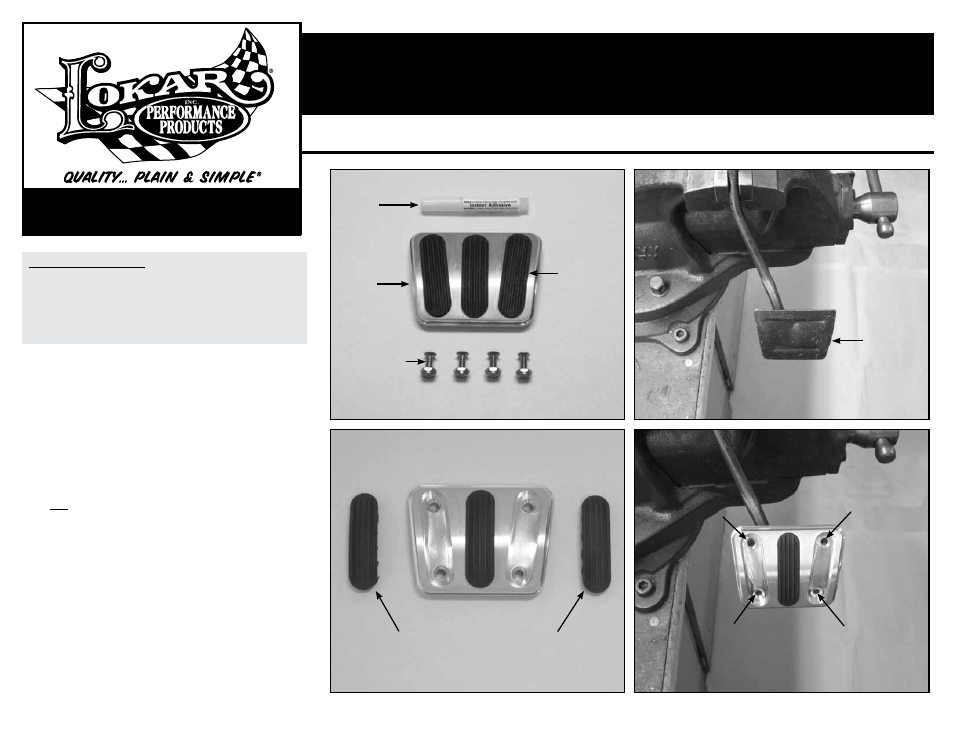
Refer to Fig. 1 for the component names.
Step 1: Remove the stock rubber cover from the clutch or brake pedal.
Clean the original steel pedal pad to remove any rubber or glue
residue.
Fig. 2
Step 2: Remove the two outer rubber inserts from the Lokar aluminum cover
by pushing through the holes on the back side of the cover with a
blunt object.
Fig. 3 The other rubber insert(s) are glued in. Do not
use any sharp objects on the front of the cover as this may scratch
or damage the aluminum. Position the Lokar aluminum cover on the
stock steel clutch or brake pedal pad. Make sure the aluminum cover
is seated so the lip on the back side of the Lokar aluminum cover is
even all the way around the steel pedal pad.
Note: Due to the variations in stock brake pedal pads, some stock steel
pedal pads may have a thicker rolled edge than others. This is normal.
Step 3: Each Lokar aluminum cover has four mounting holes in order to
accommodate several applications. Typically only two mounting holes
are used on an installation. Choose mounting holes that will not inter-
fere with the pedal arm. If only using two holes, make sure that they
are diagonal from each other. We recommend using a 3/16" transfer
punch to accurately mark the holes. The marks must be centered in
the holes on the Lokar aluminum cover.
Fig. 4
Step 4: Double check the marks to be sure they are centered and correct.
Remove the Lokar aluminum cover and drill the steel pedal pad using
an 11/64" drill bit. Deburr the holes.
Step 5: Place the Lokar aluminum cover back onto the original steel pedal pad
and use the supplied #8-32 countersunk screws and nylock nuts to
attach it. Tighten the screws evenly so that the Lokar aluminum cover
will stay squarely seated against the stock steel pedal pad. Do not over
tighten the screws.
Fig. 5
TOLL FREE 1-877-469-7440 • [email protected] • www.lokar.com
®
Curved Aluminum Brake & Clutch Pedal Pad Cover
Installation Instructions
Curved Aluminum Brake & Clutch Pedal Pad Cover
Installation Instructions
INS0042 Rev. 01/21/14
Page 1
© 2014 Lokar, Inc.
Fig. 1
Fig. 3
Fig. 2
Fig. 4
Adhesive
Aluminum
Pedal Pad
#8-32 x 1/2" Phillips
Flat Head Screws
With Nylock Nuts
Rubber Inserts
(3 shown on this
model, some have
4, 5, or 6)
Original Pedal
with Pedal Pad
Removed
Use Transfer Punch
To Mark At Least Two
Diagonal Holes
Rubber Inserts Removed From Aluminum Pedal Pad