Lokar Automatic Trans Mount Shifter 700-R4 , 4L60, and 4L60E User Manual
Page 3
Step 7: Tighten all of the bolts on the left, right, and rear mounting brackets, leaving the tension set screws for last.
Tighten the tension set screws on the side brackets until the side brackets move outwards about 1/8". On 4 wheel
drive transmissions, tighten the set screws in the main plate last (2 wheel drive transmissions do not require set
screws in the main plate). Finally, install a 3/8"-24 jam nut onto each tension set screw and tighten.
Step 8: You are now ready to position your shifter assembly onto the main plate. There are several mounting position
options from front to rear on the transmission.
If your vehicle already has an opening in the tunnel for the shifter and the engine is installed in the vehicle,
measure from the rear face of the engine block to the center of your existing shifter opening. If your engine
is not yet installed in the vehicle, measure from the engine mounts to the center of the existing shifter open-
ing instead.
If the vehicle does not have an existing shifter opening in the transmission tunnel, decide where you want
the shifter to be positioned so that it will be comfortable and will not interfere with the dash or a bench seat
(if applicable). Mark that spot on the tunnel, and measure as described above.
Transfer that measurement to the transmission (or to the engine/transmission assembly if the engine is not
installed in the vehicle). Mark that location on the shifter's main plate. The holes in the main plate that are
closest to your mark are where the
FRONT banana bracket bolts will need to be installed. Fig. 5
If you choose to install the shifter assembly where any of its mounting holes line up with the left, right, or
rear bracket mounting bolts, mount the shifter using the same bolts and lock washers that are already being
used to attach the left, right, or rear mounting brackets to the main plate. In this case, the bolts will go
through the banana bracket first, then the main plate, and finally into the mounting bracket below.
Any shifter mounting holes that do not line up with the side or rear mounting bracket bolts must use the
provided 5/16"-24 x 1/2" button head bolts and nylock nuts
(NO lock washers). Make sure the shifter assem-
bly is mounted using all four bolt holes.
Do not use any other length bolts.
NOTE: If mounting the shifter all the way forward on a 700-R4 or a 4L60, using the four bolt holes at the very
front of the main plate, a bell crank kit (Lokar Part No. S-6999*, sold separately) will be required. Fig. 5
(*S-6999 is for a mechanical speedometer output only – if your transmission has an electronic speedometer output
and you need a bell crank kit, call Lokar for assistance)
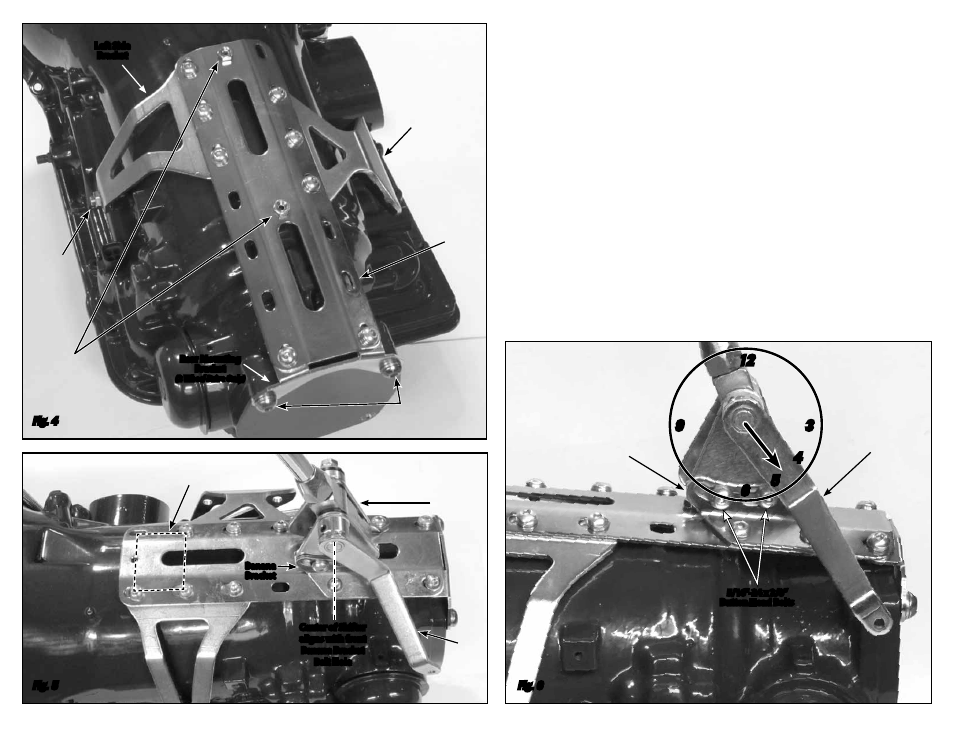
Fig. 6
Fig. 5
Fig. 4
Page 3
Right Side
Bracket
Main
Plate
Shifter
Assembly
If Shifter is mounted in this
location, Lokar Bell Crank
Kit # S-6999 will be required
Quad Lever at
Approximately
4:30 Position in
Park (Step 11)
Banana
Bracket
5/16"-24 x 5/8"
Tension Set Screws
with Jam Nuts
(4 Wheel Drive Only)
M10 x 35mm
Button Head Bolts
and Lock Washers
(2 Wheel Drive Only)
5/16"-24 x 3/8”
Button Head Bolts
3/8"-24 x 1"
Tension Set
Screw with
Jam Nut
Rear Mounting
Bracket
(2 Wheel Drive Only)
Quad
Lever
Banana
Bracket
Center of Shifter
aligns with front
Banana Bracket
Bolt Hole
Left Side
Bracket
6
12
3
4
5
9