Caution, Warning – Brewer Access High-Low User Manual
Page 17
Document # 100452 RevL
17
Printed in USA © 2013
Preventative Maintenance
CAUTION
Failure to perform periodic inspections of the
table could result in personal injury or equipment
damage.
• Periodically inspect the electrical cord to ensure it is
free of cuts or damage.
• Inspect the mechanical functions to ensure satisfac-
tory operation. Complete the operating test.
• Check fasteners to make sure they are present and
tightened securely.
• Lubricate moving parts (such as back and storage
cover hinges) with a food grade silicon lubricant.
• Have a qualified technician inspect your table every 6
months.
Control Box Fuse Replacement
WARNING
Disconnect power by removing plug from the
power outlet before changing fuses.
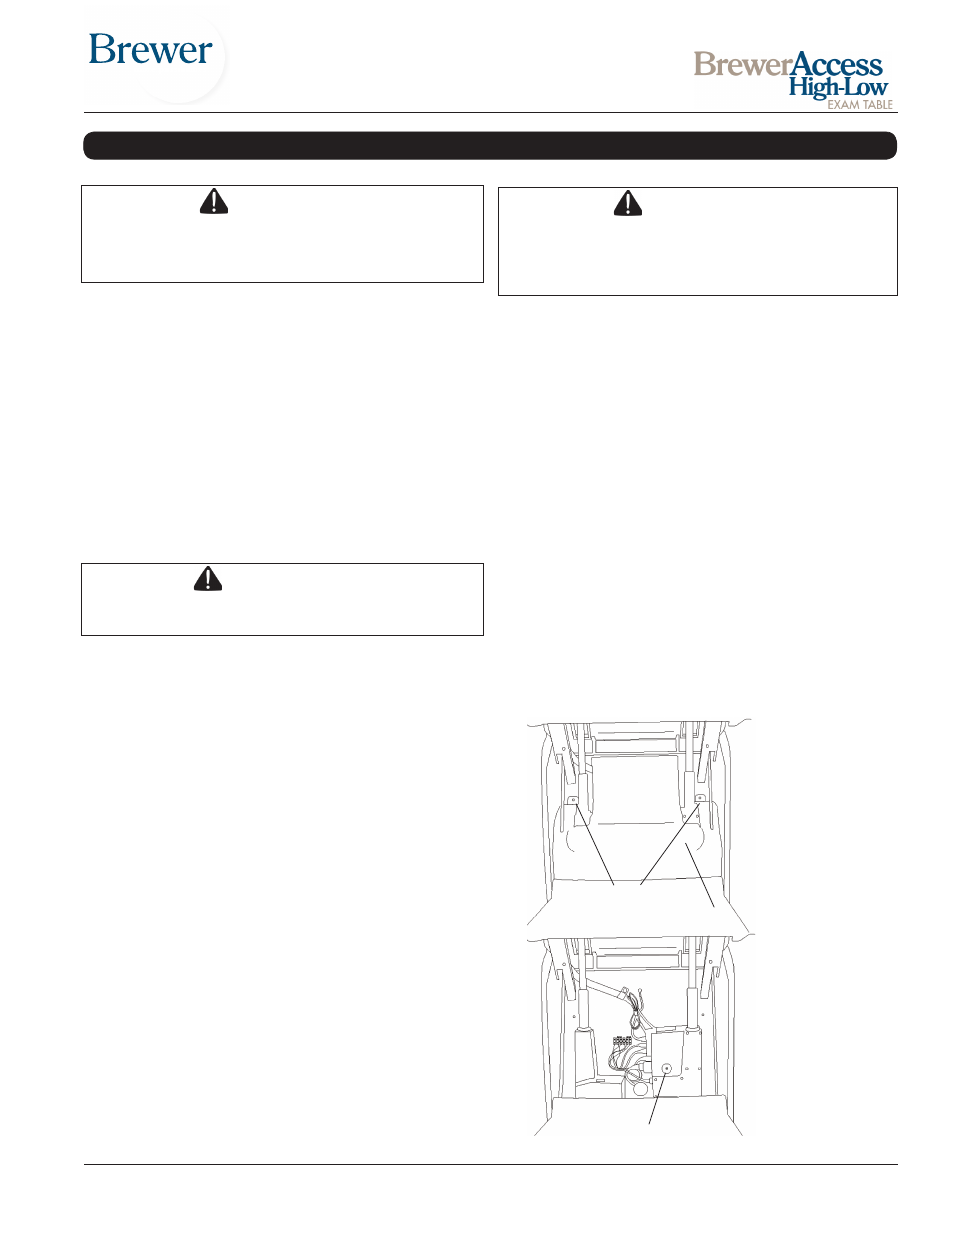
1. Manually raise table and prop in raised position.
2. Remove shroud below seat to expose actuators and
control box. (See Figure 32.)
3. Locate fuse cover on control box. (See Figure 33.)
4. Pull out fuse cover with pliers. Note: pull cover
straight out. Do not twist.
5. Replace fuses using spare fuses in fuse cover. Fuse
type is 250V/2.5AT for 115 VAC and 250V/1.25AT for
230 VAC models.
6. Reassemble.
*Drawer Warmer Fuse Replacement
(Models 6001, 6501 and 6801)
1. Remove two fuse covers from back of table near the
power cord.
2. Replace both fuses. Fuse type is 5 x 20mm,
250V/1.0A.
3. Replace fuse covers.
* Models 6001, 6501 and 6801 with Warmer & Outlet
have a single fuse. Fuse type is 5 x 20mm, 250V/3.0A.
MAINTENANCE
CAUTION
The upholstery material is resistant to most medici-
nal type stains, but may be damaged by solvents
and dyes. Remove any spilled fluids from the up-
holstery immediately.
Clean the table weekly, wiping the painted metal and
plastic surfaces with a clean, soft cloth. If desired, mild
cleaners may be used.
Clean the work surface and rear paper storage cover im-
mediately after contact with any fluids or gels. Use a mild
soap and rinse with clear water. Avoid the use of harsh
chemicals as they can permanently damage the finish.
Table Care
Upholstery Removal
1. Remove the two screws under the seat securing the
pelvic tilt lever to the seat frame (models equipped with
pelvic tilt only, all other models skip to step 2).
2. Lift the seat and remove the three screws securing the
hinge to the seat frame.
3. Remove one screw in the paper holder securing the
seat back to the back frame.
4. Remove the upholstery from the table.
5. To remove the leg extension upholstery, pull up on pad
to release the plastic clips.
Remove Two Screws
Remove Cover
Remove Fuse Cover
and Replace Fuses
Figure 32.
Figure 33.